Question: “How to create a second mailbox on Yandex?” relevant only for inexperienced users. There are a couple of convenient ways to do this; the choice is individual for everyone. The first option is to use several browsers (Opera, Mazila, Chrome, and so on), the second is to constantly log in/out of accounts as needed in one browser.
Multi-browser option
The technology is simple, takes up a minimum of hardware resources, and is easy to learn:
- the user downloads several browsers to view websites (four are in the lead in the ranking: Opera, Google Chrome, Mozilla Firefox, Internet Explorer);
- in each of them you need to go to Yandex.Mail, click on “Create mail”;
- at the first stage, you need to indicate personal data, create a login, checking that it is free, a password, and duplicate it;
- then the service offers to select a secret question, answer it, and remember the information for easy recovery of the account of a user who had the temerity to forget the password, login, or both of these details at once;
- All that remains is to enter the characters from the picture (captcha), not forgetting to set the check box next to the line confirming the user agreement.

Each browser requires you to create a unique login; the password can be the same in all of them. The Yandex mail service is designed, among other things, to collect letters from different mailboxes into one. To do this, just open the “Settings” of mail, select the required function, and enable the required collector. The browsers do not conflict with each other, take up negligible space on the hard drive, and are easy to launch from the desktop. The only inconvenience is the constant request that each newly opened one asks to make it the main “default”. Read about how to set the default Internet browser.
Creating multiple accounts in one browser
The second technology answers the question a little differently: “How to create a second mailbox on Yandex?” Most users prefer one browser with preset settings. If you need several mailboxes (relevant for creating accounts in several virtual money systems, registering on social networks, creating your own websites), most of them open them in different Internet portals (Google, Mail, Yandex, and so on). Moreover, on the Mail.ru portal the user is invited to add several mailboxes at once (bk.ru; list.ru; inbox.ru; hotmail.com; yahoo.com; gip.ru; rambler.ru).

For fans of the Yandex portal who do not want to register with numerous email services, but are asking the question: “How to create an alternative mailbox on Yandex?”, there is also a way out in the literal sense of the word. You can also make it for Yandex fans.
The technology for creating a second account is as follows:
- in the upper right corner of the Yandex portal pages there is a blue “Exit” link;
- Just click on it to log out of your account, finding yourself on the main page of the Internet portal service;
- in order to make a new registration, you must first open the Mail service;
- To do this, you need to activate the “more” link, then “All services”;
- Once in Mail, a new account is registered.

The sequence of actions can be repeated many times; the only inconvenience will be the mandatory confirmation of the login-password pair when logging into the account of interest. One of the options that increases the convenience of using several Yandex mailboxes is to create a Word or text document on the desktop with login-password links.
Yandex is not only a search engine, but also a service that offers easy and simple way to create a mailbox. Registration will take 5 – 10 minutes, and you can use it for a long time and successfully.
After registering, you will receive a postal address (e-mail), which is necessary for correspondence with friends, colleagues, subscriptions, creating a page on social media. networks.
Mailbox capabilities on Yandex
Each mailer has its own characteristics.
Let's look at the main features of Yandex:
- receiving and sending letters and files;
- information about the sender is in the letter;
- unlimited volume;
- interesting and non-standard interface themes;
- availability of Yandex.Disk with a capacity of 10 GB;
- quick access to files and links attached to the letter;
- viewing attached files directly in the mail interface;
- creating a mailbox for a domain.
Using this service, you can set up a convenient workplace for correspondence. And also share large files.
The creators thought about those who use mail for personal correspondence, and about those who need this service for work (organizations, domain owners).
Video: creating an electronic mailbox
Stages of creation
The basis of this service is not particularly different from others. Therefore, creating an email address on Yandex will not be difficult, both for a beginner and for the owner of another mailbox.

First of all, you need to go to the official Yandex website. In the upper right corner, click “Create a mailbox.” In the window that appears, fill in the fields: First Name and Last Name. If you don’t want to spread your last name online, you can enter a fictitious one.
Unique login
Login is your middle name. You will indicate it when entering your mailbox. Also, the login will be the beginning of your e-mail.
Important! Enter a login that you won’t be embarrassed to send to your friends or colleagues.
That's why your email name should be unique, readable and easy to remember.

The login should consist only of Latin characters, numbers are possible. A hint will appear to the left of the field as to what your name might look like. For example, this could be your mobile phone number.

To the right of the field one of two things will be written: the name is taken or free.

If you are busy, you can add more numbers or letters to your name. Or try entering something else.

If you feel free to move on to the next stage.
Usually the system offers you free options. They are based on your first and last name, plus additional numbers.
If you have trouble coming up with a name, just choose any of the options you like. Click on it and it will automatically appear in the input field.
Important! Remember the login you chose, you will use it to log in.
Login password
To protect and access your email, you will need a password. It should be easy to remember, and at the same time difficult to guess.
Important! For reliability, it is better to use different registers, languages, numbers and symbols.
Dots will appear in the input field instead of symbols. This is to protect your data from prying eyes.

Below the field you will be shown the level of protection:
- simple;
- average;
- reliable.
The simple option needs to be improved, at least to the average level.

It's very easy to create a complex password by entering your favorite phrase in the English keyboard. The original will look like a set of letters and symbols.
Then repeat the entered password in the appropriate field.
If you do forget and lose your password, there is a way to confirm that you are the owner of the email. About him below.
Question to restore access
A security question is required so that you can easily recover a forgotten password. The phone number is entered for the same purpose.
Important! There is no need to come up with brilliant questions. After all, the answer to it should always be in your head.
The standard choice is to choose the mother's maiden name because it is unchangeable and unforgettable.
You need to enter the question and answer in the appropriate fields. The system will remember it, and when you request to renew your password, it will ask you for the answer to your secret question.

If none of the suggested options suit you, select “Ask your own question.” Write it down and give your answer below.
If you enter a phone number, then with similar actions, you will receive an SMS with a code. You will rewrite the code in the appropriate field and go to your mailbox.
Completion
The next field is “Enter symbols” or “Enter captcha”, below there is a picture on which the symbols are written, so you need to enter them in the very bottom field.

To complete registration you need:
- check the box indicating agreement with Yandex rules;
- Click on the Registration button.
All mailbox has been created.
Now you are on the page with your letters. There is already one incoming letter from Yandex. You can open it by clicking on the inbox, and in the window that appears, click on the letter itself.
How to create an email on Yandex under a different name
Internet users need mail for various purposes. It is very convenient to create, for example, a separate address for registration of subscriptions. Then important letters will not be lost among the mailing list.
First you need to log out of your mail:

Click on the “Registration” button and fill out all fields of the registration form. Only now enter another login, it should also be free.
You can enter the same password, it’s more convenient. But repeating passwords makes your security vulnerable. Therefore, it is better to protect the mailbox for receiving letters with personal information with a good password. However, it should not be used anywhere else.
The security question can be left the same as on the first box.
If you entered a phone number, then when creating a new address, you need to specify a new one. You must have access to this number, as an SMS will be sent to it with a confirmation code.
We complete the creation in the same way.
We use mail
Now you need to figure out how to work with email. Immediately after registration, you are taken to the message control panel.

There is a menu on the left:
- inbox – received messages are received and collected here. In order to open a letter, you just need to hover the cursor over it and click the left mouse button. Unread ones are highlighted in bold. When you open the letter, it will not be highlighted;
- sent – the name speaks for itself. All messages you create and send to the recipient are stored here;
- remote– a message can be deleted from any folder, after which it will be sent to this folder;
- spam – all advertising correspondence ends up here;
Important! Messages you need may also end up in spam, so it is better to periodically check this folder and delete unnecessary ones.
- drafts - if you wrote a text and got distracted, you can save it rather than send it. You can find the saved message in the “Drafts” folder;
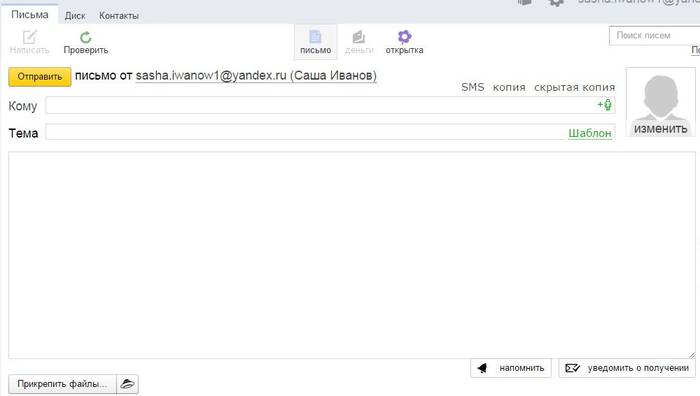
In order to create a message you need:
- go to the post office;
- select the “Letters” tab - “Write”;
- In the “to” field, enter the recipient’s email address;
- in the “Subject” field - the title of the message (filling in is optional);
- in a large white field - the text of the message;
- click "Submit".
All messages have been sent. You can also attach a postcard or file.
There are two ways to delete a letter:
- open the letter and click the “Delete” button at the top;
- open the folder where the unnecessary letter is located, check the box next to it. Click “Delete” at the top.

There is a horizontal menu at the top:
- letters;
- disk;
- contacts.
Each of these points has its own sub-points. Working with letters is described above. Large files are stored on the disk; and in contacts you can create your own notebook with the addresses of your correspondents.
Be sure to exit the box when finished. This way no one will be able to read your correspondence.

To log into your mail again you need to:
- go to the main page;
- enter your username and password;
- click “Login”.
Create mail for your domain
If you are the owner of a domain, you can create a mailbox with an address like “[email protected]”, where name is any word. For one domain, the service allows you to create up to a thousand mailboxes.
Plus you can connect your organization's domain. You can use it to create mail for your employees.
Creation algorithm:
- go to the domain connection page;
- fill in the appropriate fields;
- click “Connect”.

The system will take you to a page with your domains.
To get started:
- confirm that this is your domain;
- submit the domain to service management.
Creating a mailbox is simple and quick. Yandex ru has an intuitive interface. Therefore, it is enough to read all the tips and fill out the appropriate fields.
The capabilities of this service are quite wide. It would seem that the creators thought through everything to the smallest detail, as long as it was convenient for users.
>Yandex combines many useful services for both webmasters and ordinary users. He also did not bypass the service that allows you to exchange letters. As you may have guessed, we will talk about how to create mail in Yandex for personal use.
Create mail
The algorithm is very simple.
We go to the Yandex website and in the upper right corner click “Create a mailbox”.
We get to the page with the form. It contains the following fields:
- Surname
- Login
- Password
- Re-entering your password
- Security Question
- Answer to security question
- Mobile phone
Fill out the form.
Please note that you must select and enter an answer to the security question. If you forget your password, you can use it to restore access to your mail. It is not necessary to enter a phone number, but if you are creating an email for business correspondence, I recommend linking your Yandex account to your phone number. This will give additional advantages when using other services.
Enter the characters from the picture and click the “Get mail” button.

Quick setup

Tags will allow you to sort letters from different recipients. You can select existing ones or create new ones.
On the second tab "Collector" you can link a second mailbox. This is done to ensure that all letters are collected in one place.
The “Sender” tab is one of the key ones. Allows you to customize your signature and photo that the recipient of the letter will see.

On the last tab “Design” you can select a design theme. I use a simple subject line so I don't get distracted from the content of my emails. At the end you will be prompted to enter your phone number again if you have not done so previously.
Now you know how to create your own mail on Yandex, moreover, for free. But that's not all! By registering an account in Yandex, you have access to its other services. I will talk about them in the following articles. 🙂
I hope I helped you and you help your friends- click the social button. networks and tell us about this instruction.
Yandex.Mail - free electronic mail (email) from the IT company Yandex. Operating since 2000. Reliably protects user mailboxes from spam and viruses (content and messages are automatically scanned on the server by Dr.Web anti-virus). Supports machine translation of letters from foreign languages into Russian. Sends information over an encrypted connection. One of the five best postal services in Europe.
Registration
1. To register with Yandex Mail, open the page in your browser - ya.ru.
2. In the login panel (located on the left side of the page), click the “Registration” button.

Note. To go to the registration form on the main page of the search engine (www.yandex.ru), click on the “Create mail” link.

3. Enter all the required data in the fields:

- "First name" and "Last name";
- “Create a login”: enter the name of your email account. Come up with a name that is readable and easy to remember. The login cannot be changed after registration is completed.
Advice! You can use a login automatically created by the system. Under the “Create a login” field, in the list, click the option you like. It will immediately appear in the column.

“Create a password” and “Repeat...”: in these fields, type a character combination to enter your email. The length of a reliable key is 15-20 characters (including small and large Latin letters, special characters and numbers).
Verification
Confirmation of rights to email in Yandex.ru can be done in two ways.
#1 (by phone)
1. In the “Mobile phone” line, enter your number.
![]()
2. Click the “Get Code” button.
3. In the additional field that opens, enter the code from the SMS message received from the mail service.
Note. Sending a verification code is free.

After entering the code correctly, the message “... successfully confirmed” will appear.

#2 (via security question)
- In the “Mobile…” block, click the “I don’t have a phone” option.
- Open the drop-down menu and select a security question. If you want to come up with your own, click the last item in the list.
- In the next field, write the answer to the question. Remember or write it down. Otherwise, if you lose your password, you will have to re-create an account on www.yandex.ru.
Sending data
Once you have completed filling out the fields, check all the data again to ensure it is correct. If everything is “ok”, click on the register button.
Profile design
Once registration is complete, you can use the Quick Mail Setup feature. It consists of 6 steps. Using hints, it helps the user to quickly enable and configure the main options.
Note. You can skip steps in the additional panel. They are optional for completion and activation. To move to the next section, click the “Next” button in the lower right corner.
Step #1
To use your mailbox on your phone, enter your number in the field. Click get. To view and download the mobile application, click the “Android” or “iOS” icon (depending on the type of device you are using).

Step #2
If you plan to receive a large amount of correspondence, create color labels with message categories (Work, Promotions, Friends, etc.):

- check the box;
- type the name of the category in the line;
- in the drop-down menu (on the right side) assign a color to it.
Step #3
To save yourself the hassle of checking messages in every existing mailbox, forward all messages received to them to a Yandex Mail email:

- click the “Yes, there is” button;
- enter a different email address and password to log in;
- click "Connect".

Step #4
If you wish, you can customize information about the sender (about yourself):
1. “Send emails from an address”: select an alternative email address from the drop-down list. Short name “ya” or one of the regional domains (.by - Belarus, .ua - Ukraine, .kz - Kazakhstan).

2. “Your name”: enter your first and last name. When sending a letter via email, the service will automatically place this data in the “From” field.

3. “Your signature”: will be added to the body of the message (at the bottom of the letter).
4. “Your photo”: click “Upload photo” to upload an avatar to the service profile.

Advice! To take an instant photo for Ava using your webcam, click the “take a photo” link under the button.
Step #5
In the tiled menu, click the mouse to select the theme you like (graphic design) to design your account.

Step #6
The final step. To go to the profile, click “Done”, and to view and change options - “Settings” (link at the top of the window).

The first two letters from the service
After creating an account, you will find two letters from Yandex in your mailbox. They also contain links to further configure the service.

“How to read email from a mobile phone.” Click on the appropriate button (Android or iPhone) to download applications for your mobile device. To go to the extension store, click Google Play or App Store.

“Collect all the mail...” Forwarding correspondence from other emails.

Click the “Connect other mailboxes” button in the text of the letter. Under the heading “Pick up mail...” Enter the address and password of the mail from which you want to forward letters. And then click “Enable Collector”.
Convenient use of the Yandex.Mail service!
The Yandex company began its active activities under this brand in 1993. Although some developments were carried out back in the late eighties. It was the first Russian search engine. Today, Yandex has developed into a giant in the Internet industry.
Company provides 46 services, which are united by one brand. Among all the services we can highlight mail, weather, posters, tickets, maps, news, music and, of course, a search engine. The company's most popular service, Yandex mail, has proven itself over the years of its existence as a reliable, fast and high-quality product. For example, in the Yandex mail service, free registration takes the least amount of time when compared with its competitors.
The advantage of a mail server is high-quality spam detection still on the side of Yandex. An important advantage is that a mailbox can be registered and maintained absolutely free of charge. At the same time, you don’t have to worry that if you don’t use it for a while, it will be deleted. The box will belong to you on a permanent basis and will be accessible both from yours and from someone else’s computer, portable devices, or as a mobile application.
The mailbox itself is ready for use immediately after registration is completed. In order to register in the Yandex mail service, you must first go to the main page of yandex ru. It is the full version of the site address, and not the more familiar ya ru or ya mail.
The Yandex mail registration button is located in the upper right corner. By clicking it, you can create mail on Yandex. In addition to registering in the standard view, you can create mail on Yandex using one of the social networks, which are presented below.
If you don’t want to connect your mail with social networks, then let’s look at how to create mail on Yandex using the standard registration form. Fortunately, the company made sure that the registration form was as short and understandable as possible. 
The most difficult thing about registration is create a username and password. Login is the unique name of your mailbox. The difficulty is that the name must not already be used by another owner. If your desired mailbox name is already taken, the system will offer you alternative free options.
For security of access there is linking a mailbox to a mobile number. By entering it, you will receive an SMS with a code that you must enter. This is very convenient for when you have forgotten your password and want to recover it.

If scammers try to hack your mailbox, they won’t be able to do anything without access to your mobile phone. So, if you are worried about your mailbox being hacked, then attach a number to it.
For those who do not want to associate a mailbox and a telephone, there is a way out - to do everything the “old fashioned way”. To do this, click “I don’t have a mobile phone” and you will be prompted fill out security question and answer.
It’s up to you to decide exactly how to open an email account on Yandex. So, fill out a short list of required fields, come up with a name for your mailbox, indicate your phone number or security question - and that’s it, your Yandex mailbox has been created.

Basic settings of Yandex mail
So, we managed to create an email on Yandex. In the web mail interface, in the “Inbox” folder you will immediately find several letters. Don’t be alarmed, this is not someone’s correspondence, these are standard welcome letters from the Yandex team.
By the way, if you linked a phone number to your mail, then in addition to your main mailbox another new box is created, whose name will be your phone number. This is exactly what will be written about in the letters, in addition to the usual congratulations.

A so-called Yandex passport. This is basic information about you for all Yandex services. What to share with the company and what not is up to you to decide. Here you can come up with and indicate a security question if you did not do so during registration. This will help protect your account from hacking.

Here you can change your name the way you want to be seen by users receiving emails. You can set an avatar for yourself, change your password and much, much more.

If you plan to make purchases in Yandex.Market or create a Yandex.Money wallet then "Payment details" tab just for you. Let's move directly to the settings of the service's mail capabilities.
How to create an email on Yandex for free, step-by-step instructions were provided to your attention a little higher. Now let's talk about settings.
There are only five steps, so to speak. easy version of settings:

Advanced settings for Yandex mail mailbox
To enter the “Advanced settings” of Yandex.Mail at any time (the second version of the name is “full version of settings”), you need Click the gear icon in the right corner.

Here you can configure “White and Black lists” your recipients. This can be either a specific addressee, a name or email domain, as well as filtering by topic or text.
You can also configure sorting of letters into folders. In the “Security” tab you can find tips on creating passwords, as well as a log of visits.
In the “To Do” tab you can plan your day, week, month... This service can completely replace a paper organizer.

Other parameters contain the previously described settings. Besides you can customize the application interface: the number of letters displayed on the page, the visibility of letters, viewing attachments in letters, menu settings, the ability to quickly send and edit letters, sound notifications, etc.

To log out from the mail web interface, just click on the “Logout” button. There is also an interesting function - log out on all devices. Since email is available not only in the browser, but also on mobile devices, this function is very useful.
After logging out, the system will redirect you to the main page of Yandex mail, where again, you can log in by entering your username and password.
Yandex mail for domain
You can use the Yandex mail service for a domain. This service provides the ability of an organization to have up to one thousand mailboxes without restrictions for effective interaction of employees both within the company and outside it. In addition, this service will useful for those who want to create mail on their website and provide it to your users.
But it is worth considering the fact that in the Yandex ru service mail for the domain will not have access to such popular services companies like: Yandex Direct, Yandex Money, Yandex Advertising Network.
Creating a Yandex mailbox for a domain is no more difficult than creating personal mail. All you need to do is link your domain to the service.