This article is for those who use the Google Chrome browser and have not yet used the ability to synchronize their browser data, such as bookmarks, history, passwords, etc., with their Google account. This way, all browser data that can be very important (especially passwords) will be securely stored in your account and will not be lost anywhere as long as you have access to your Google account.
What is the benefit of syncing Google Chrome browser data with your Google account?
Bookmarks, which sometimes number in the tens and hundreds, and where there may be links to sites that you really need, which you then will not immediately be able to find on the Internet, because you will not remember how you found them.
Logins and passwords for sites.
Passwords are, in general, one of the most important points, because many users save all their passwords in their browsers and nowhere else. And if something goes wrong even with the browser itself, your passwords may be deleted! And they can even be accidentally removed through various third-party programs to clean Windows and speed up its operation.
Saved bank card data that you use when paying on various sites via Google Chrome.
Browser settings.
Installed extensions.
History (which sites were visited and at what time). Sometimes, using history, you can find a site that you lost and did not save, remembering that you visited it on such and such a date.
Your data saved in the browser will be safe! In the event of a crash of the system itself, the hard drive, or, ultimately, a simple “breakdown” of the Google Chrome browser, you will not lose important data from your browser. The most important of these:
It also saves data such as autofill (what you entered into various comment forms, search engines, etc.), browser themes, and open tabs.
All this is constantly transferred in encrypted form to your Google account, i.e. synchronization occurs. Therefore, if any failure happens, all you need to do to recover your data is to log back into your Google account through the Google Chrome browser. The saved data will be instantly transferred to your computer in the browser!
Your data from Google Chrome will be available to you on any device where the same browser is installed and you are signed in to your Google account.
For example, you mostly work from home, but you also have another workplace. All you have to do is log in to your Google account via Google Chrome and all your data will be available in this workplace in a few seconds!
Also, when using any devices where you use the Google Chrome browser, everything will be synced with your Google account. For example, on a smartphone or tablet, log into your Google account through this browser and again all your saved browser data is at hand.
All this is very convenient!
Let's get started with practical implementation...
How to set up Google Chrome data synchronization.
Setting up your Google Chrome browser data to sync with your Google account is actually simple.
You will need your Google services account. If you don’t have one yet, I recommend that you get one (link to register in Google services: open). Click the “Create account” button there:
Why do I recommend having a Google account? Firstly, you will be able to use the most reliable and secure mail from Google today, which is called GMail, and secondly, you can use the same account on all other Google services, and this is the well-known Youtube, Google Drive, Google Maps, Google Photos, social network Google+ and many other useful services.
Of course, you can use most Google services (for example, maps, YouTube) without an account, but by logging in with your account, you get more features and convenience!
Open the Google Chrome browser menu on your main device, where all the bookmarks, passwords and other data you need for this browser are saved and go to settings.
Since you haven’t yet logged into your Google account through a browser (because if you had, you wouldn’t need the information from this article), all data is saved on the device itself. Our task is to upload them to your account so that you can access them from any device.
A window will open where you enter the login for your account in Google services (this is your EMail in Gmail), click “Next” and then enter the password and “Next” again.
A window will appear telling you what data Google Chrome will sync with your Google account. Click "OK" to complete the setup.
Now in the browser settings, in the “Login” section, it should be displayed that you are logged in under such and such an account and below there will be buttons for the ability to disconnect from your account and change synchronization settings.
That's all! Immediately after connecting the Google Chrome browser to your Google account, all data from the browser (bookmarks, passwords, history and everything else) will begin to be downloaded to this account. This whole process will take only a few minutes, and sometimes it flies by in less than half a minute (depending on the amount of information stored in the browser).
Now you can sit down and work anywhere, from any device, using all the same settings, bookmarks, passwords and other Google Chrome browser information that you already have saved in your Google account.
If you want only certain data from the browser to be synchronized with your account, for example, only passwords and bookmarks, then in the Google Chrome settings at the top, click “Advanced synchronization settings.”
If you changed anything, don’t forget to click “OK” to save the settings.
Conclusion
Synchronizing browser data in Google Chrome is extremely convenient! Because on each of your devices, where you access the Internet from the same browser, you will have different bookmarks, different passwords and other information saved. It turns out that, for example, some of the saved logins and passwords may be on one computer, and some on another. It can't be convenient. And after setting up synchronization, everything will be in one account!
For all Google Chrome users who still do not use the ability to synchronize browser data with a Google account, I recommend setting it all up, because it is very convenient and simplifies the work!
Surely, when launching the Yandex browser, you saw the “Synchronization” button in the menu, and wondered - what is it and what is it for? In fact, almost all modern browsers have this function and is simply necessary, since it has a very important mission. It makes it possible to save all your data, including browser settings, browsing history, cookies, cache, saved bookmarks, frequently visited sites and generally all important information on a special web storage. Therefore, if some situation happens and all data is lost, you can restore it without problems using the presented function. In addition, synchronization in Yandex Browser is convenient because all the data that you save on the local server can be imported to any other devices, for example, a phone or tablet.
By syncing your data just once, you can be sure that in any situation you can get it back in just a few clicks. Below we will describe in detail how to enable synchronization, how to configure it, how to import data and use other features of this function.
Create an account (if you don’t have one)
To enable Yandex browser synchronization, you need to get an account in Yandex services. If you already have an account, you can safely skip this step and move on to the next one. If you do not have an account in Yandex, then before you begin synchronization, you need to have one. To do this, follow the instructions:
That's it, you have successfully created an account and gained access to many services, including synchronizing Yandex browser settings.
How to enable synchronization
Now we can safely begin the process of enabling the function. To do everything correctly, carefully follow the instructions and you will succeed.
Step 1. Launch Yandex Browser if it is not already running.
Step 2. In the upper right corner we see the settings icon in the form of three horizontal stripes. (The icon may be different depending on the version of the browser installed). Click on it and move on to the step below. There is a more complicated way, go to “ Settings” and at the very top click the button “ Set up synchronization”.

Step 3. A small list appears where you need to find and click on the item called “ Synchronization”.
Step 4. After clicking on the appropriate tab, you will be redirected to the login page. Enter your account information and click the login button. In field " Login”enter the login that you chose during registration, enter from @yandex.ru. Well in the field Password”, there is no need to explain what to enter.

Step 5. After logging in, a window will appear on the screen asking you to install Yandex Disk. It can be installed on a computer, phone and even tablet. We recommend doing this. Then you can always quickly and easily manage your saved data and even store your files there. If you do not need this, click on “ Close a window" In some cases, this window may not exist, but you will immediately be prompted to enable synchronization, do as in the screenshot.


Step 6. Voila, synchronization has been successfully enabled. But we would like to draw your attention to the fact that it can be customized. And how to do this, see below.
Setting up synchronization in Yandex Browser
After synchronization is enabled, the browser allows you to configure what data to save. To start setting up, do the following:

You can also delete all data saved during synchronization there. To do this, click “ Show data” and click on the link “ Delete " In the pop-up window that opens, confirm your action and the data will be successfully cleared.
To disable Yandex Browser synchronization, click on the “Disable” button, which is also located in the settings.
Synchronizing Yandex Browser between devices
As mentioned below, in the browser from Yandex, you can easily import data to other computers, smartphones and tablets. We will now look at how to do this.
In fact, it's as easy as snapping your fingers. If you need to synchronize data on another device, all you need to do is launch the Yandex browser and log into your account in the manner described in the article ( Settings – Enable Sync – Login to account).
No further action needs to be taken. All data will be downloaded to a device that has data synchronization enabled automatically. All you need to do is just wait a few minutes until the Internet browser completes the process of downloading bookmark data, passwords, history, etc. to the device.
Import data from other browsers and HTML file
Another useful feature of the Yandex browser is importing data from another browser, or from an html file. Thus, you can easily transfer all data from any other browser to Yandex.
This is very convenient, especially when you decide to change your browser and start using Yandex Browser, but want to save your settings, bookmarks, etc. As a result, you won’t have to transfer all your bookmarks, passwords, and everything else manually.
How to import data into Yandex Browser:

When using multiple devices, it is necessary to be able to obtain the necessary data from each of them. It is for these purposes that gadgets have a convenient function. Let's talk about what synchronization is in an Android phone and why it is needed.
Synchronization - what is it?
Synchronization is a mechanism that combines actions on different devices into one coherent flow, which allows you to get up-to-date, unified information on each device. To fully use an Android device, you need a Google account, which is used to log into the application store. But it also has another function - synchronization.
If this setting is activated, then user data is automatically uploaded to the Google cloud. After logging into your account on another device, the data from the storage will be transferred to the gadget for use by the user. The following elements are synchronized:
- browser bookmarks;
- mail;
- application data;
- documentation;
- calendar;
- contacts;
If you have one of the Google applications installed on your device (Photos, Documents, Notes, etc.), then the corresponding items will additionally appear in your account settings.
How to set up synchronization for Google
Let's move on to setting up the main Android account.
Note! For example, Meizu M5 with Flyme shell is used. The location of the items may differ on other devices.

Note! To sync photos and videos, use the Google Photo app, and for files, use Google Drive.
To disable it, simply uncheck the appropriate boxes.
other methods
It is worth noting that you can copy data to all your devices in other ways.
For branded shell
Almost all smartphone manufacturers use proprietary Android shells (add-ons) on their gadgets. Some of them have a synchronization function for your own profile.
Note! For example, we used Meizu with the Flyme shell, which provides a Meizu account. Different manufacturers' own profile may differ or be completely absent.

Similar actions for Mi-account and others.
Third Party Applications
There are many apps available in the Play Store that allow you to back up your data and sync it to another device. Let's look at the example of one of the most popular programs - G Cloud.
- Install and launch the application.
- Click "Don't have an account yet."

- Select “Register with Google+” → enter your account.

- Check the boxes to add the items to the cloud → click on the button with the floppy disk.

- Wait for the process to complete.

- Your data is now in the cloud.
For automatic synchronization:

To install data on another phone, just install the application on the second device → log into the same account.
- Open the side menu → “Restore”.

- Select your smartphone.

- Go to the folder with the relevant data.

- Click on the file → “Recover”.

Synchronization with PC
You can access the elements of your smartphone via your computer using the MyPhoneExplorer program.
Feature overview
- Contacts:
- View and edit all smartphone contacts;
- Add or remove;
- Write SMS or email;
- Transfer to the desired group;
- Call;
- Export Import.
- Challenges:
- View the history of current calls;
- Add a contact from lists or edit the current one.
- Organizer:
- Full work with the calendar;
- Fully functional alarm clock;
- Add, edit or delete notes.
- Messages:
- View all messages and conversations;
- Write SMS;
- Deleting SMS or transferring them to the archive;
- Files:
- View all files on a memory card or internal memory;
- View all system storage files.
- Additionally:
- View monitoring of the current state of the smartphone;
- View available Android memory.

Any user’s smartphone or tablet will definitely contain data that they would really not like to lose. The easiest way to save them is to copy them to your computer. To do this, you just need to connect your Android device to your laptop using a USB cable. This way you can transfer photos and videos to your hard drive. But how to save contacts? And what if you don’t have a USB cable at hand? You will find the answer to these and other questions in our article.
Synchronizing data using a Google account manually
One of the most convenient and reliable ways to save important information from a gadget and have free access to it is to synchronize your mobile device and Google account. If the user does not yet have an account in this service, he must create one. Registering an account and mailbox is simple and free, there will be no problems with it. It can be done either from a smartphone or tablet running Android, or from a computer, it doesn’t matter. After receiving an account, you must complete the following steps:

- Enter the “Settings” section of the main menu.
- Scroll the screen to the “Accounts” sub-item. It may also be called Accounts and Sync.
- Click on the + icon (“Add new account”).
- A window will appear with two commands “Existing” or “New”. Select the first one.
- Enter your email address and password in the appropriate fields. You will be logged in, which may take some time (usually no more than a minute).
- After this, a window will appear with information about what data can be synchronized. Check the checkboxes next to the ones you want to save.
Automatic data synchronization
Now your contacts, calendar, application data are synchronized with your Google account. If you make changes to them, you will need to repeat the entire procedure. For data to be updated automatically, the user needs to enable auto-sync on their mobile device. It's very simple. Do this:
- Enter the main menu and select the “Settings” section.
- In the “Wireless Networks” menu item, go to the “Data Transfer” tab.
- Use the settings touch key (for smartphones) or click on the dotted menu icon (for tablets) to open tab commands.
- Check the checkbox next to the “Auto-sync data” command.
- Return to the Settings section and go to the list of accounts.
- Click on the account selected for automatic synchronization.
- Now her update icon has changed from gray to yellow-green. Auto-sync activated!
You can synchronize your Android phone with your Google account in two simple ways: manually or automatically. Select the most suitable synchronization method and follow the instructions provided.
Was the article useful to you?
Rate it and support the project!
Thanks to this, they can be accessed from different devices (smartphone or computer). This is convenient if you use several phones or are simply worried about the safety of important files. Next, we will tell you how to enable and configure account synchronization Google on Android.
How to enable Google account synchronization on Android
By using Google account, you can synchronize contacts, messages, photos, passwords and other user data. For example, to have access to them from another smartphone or computer. How to enable backup:
Step 1. If there is an item in the phone settings "Synchronization", then select it. In the page that opens, move the slider "Auto-sync data" in a state "Enabled".
Step 2. Confirm the action. If necessary, synchronize objects immediately, limit data synchronization (for example, only by WiFi). Here you can set up individual accounts.

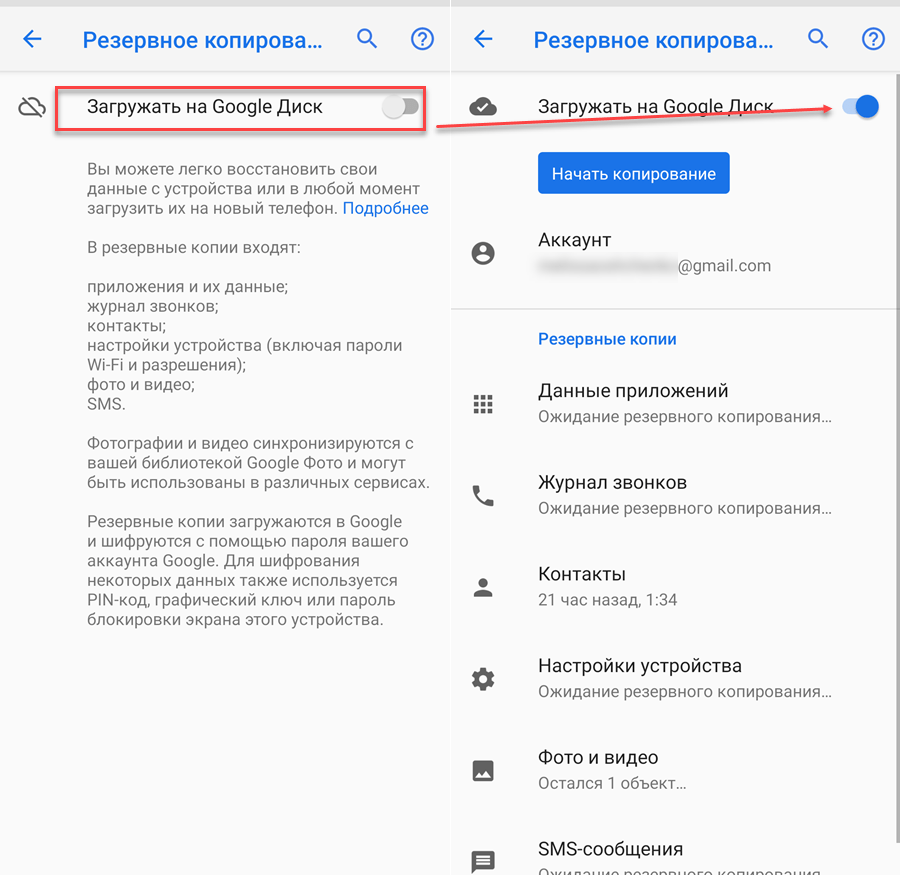
Step 3. In settings, find and select "Google". Click on the line here "Backup".

Step 4. Move the slider "Upload to Google Drive" in a state "Enabled". After this, the information on the screen will be updated, a button will appear "Start copying" with which you can immediately create a backup copy of your data.
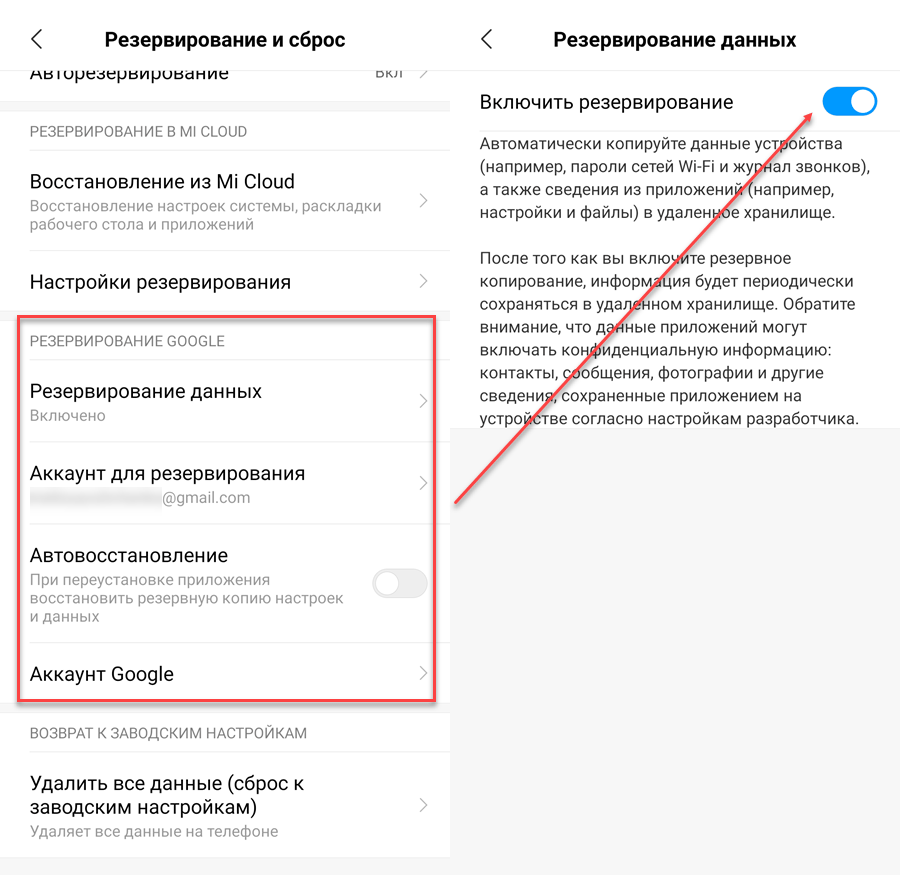
Step 5. Go to the menu through settings "Advanced settings". Here, find and select "Backup and Reset".

Step 6. In settings "Local reservation" you can manually backup system settings or delete existing ones.

Step 7. In chapter "Google Backup" you can select an account, auto-recovery, and configure other settings. Depending on the device model, there may be other sections here.
After that, you can synchronize Android with Android. To do this, it is enough to use one Google account on two devices. This is convenient if you want to transfer all user data from one smartphone to another.
How to disable contact synchronization on Android
By default, when creating a backup, Android copies all settings and user data to the cloud. If you do not want to sync contacts between devices, you can disable this. Instructions:
Step 1. From the setup menu select "Advanced settings". Find the item here "Backup and Reset".

Step 3. If you do not want to sync Android contacts, then select "System settings". Here, uncheck the line "Contacts" and click on the button "OK" to confirm the action.

Step 4. If you want to disable synchronization of other applications, then click on "Select applications" and mark those objects whose data you do not plan to save.

The names of some menus and buttons may differ depending on your device model. The same applies to the location of some sections. Therefore, if you cannot disable contact synchronization, then you can transfer them to SIM-card and delete from Google account.