Disks with an uninstalled file system are indicated RAW(translated from English " raw», « raw"). This means that the data standard unknown, the stored information does not have a clear specification. If in Windows one of the disks or partitions is recognized as RAW, it means that the installed drivers was not recognized file system name. In normal mode this name should be FAT or NTFS.
When you try to enter such a section, you will see next error.
Or a message that the disk is not formatted.
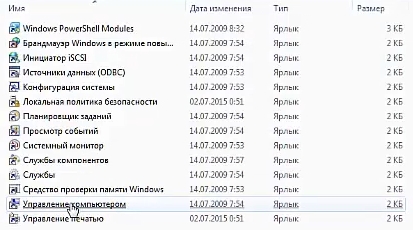
If you go to Administration Control panels, choose Computer management, can see state this disk.


In this case, the system reports that the logical drive OK, But unknown format.
Reasons There can be several occurrences of an unknown RAW format:
- file system structure broken(partial destruction of boot sectors);
- disk not formatted(file system not installed);
- No access.
This may be a consequence of the following actions:
- incorrect installation(reinstallation), OS recovery;
- faulty hard drive sectors (you may have recently noticed a long response time when trying to open a particular directory);
- unstable work Power supply or mains voltage fluctuations;
- poor contact of cables and cables connecting the hard drive to the power supply and motherboard;
- viruses.
Checking for errors
If the disk has not suffered serious damage, and most of the file system structures have survived, you can fix the error using standard system tools. In this case, the section should not be systemic.
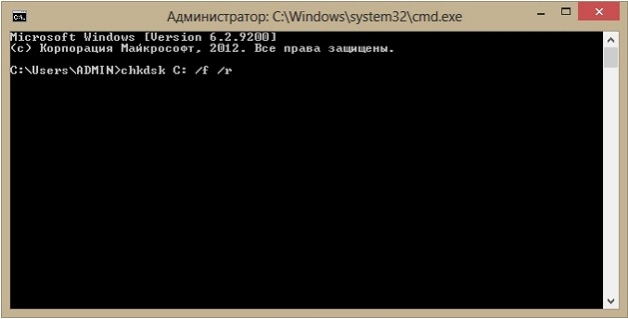
Let's launch command interpreter with rights administrator.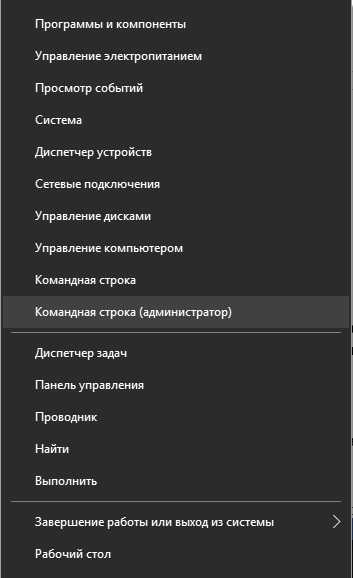
There is a system utility Checkingdisk, designed specifically for checking the hard drive.
To call it in the console, enter chkdsk (drive letter): /f
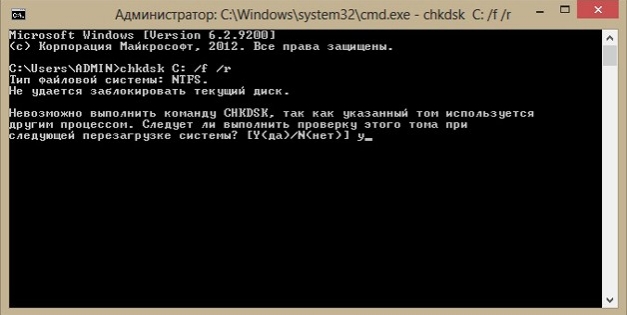
Confirm checking the specified volume by entering a character Y– the search and elimination of errors will begin. Upon completion reboot. Scanning can take a lot of time, depending on the size of the disk that needs to be fixed. Wait for it to complete, because there is a high probability of a successful recovery this way.
Using Formatting
Carrying out the procedure formatting, Please note that all data will be lost. If the information stored on it was not important to you, to start reformatting, go to as shown earlier. 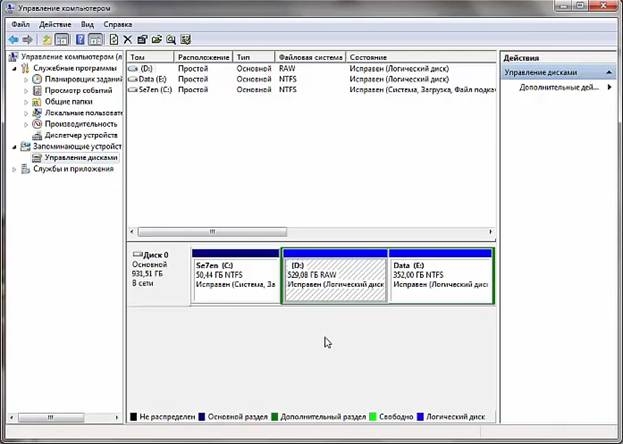
Right-click on the disk and select. 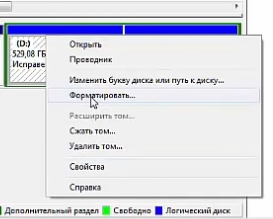
If a lot of necessary data is stored there, then proceed to formatting The last thing you should do is try to restore them using other available means.
Using DMDE to recover without data loss
One of the tools is a free program DMDE. Download it from the official website. After installation and launch select physical device that contains a RAW section, check the box below Show sections and press OK.
The required disk can be found at crossed out icon or type RAW, select it and click Open volume.
View contents, if it opens, make sure that the selection was made correctly.
Then click the button Restore And Yes to confirm the recovery of the boot sector from the copy. 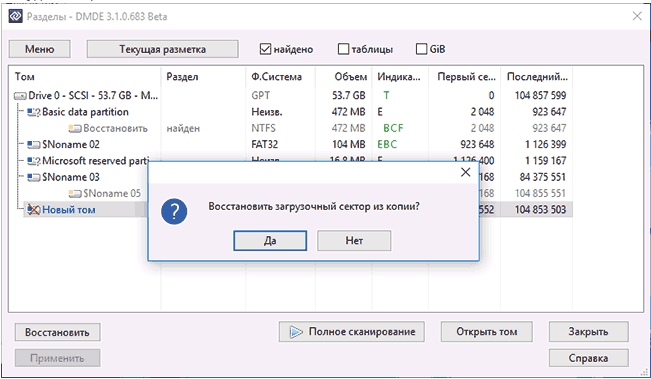
Using the TestDisk utility
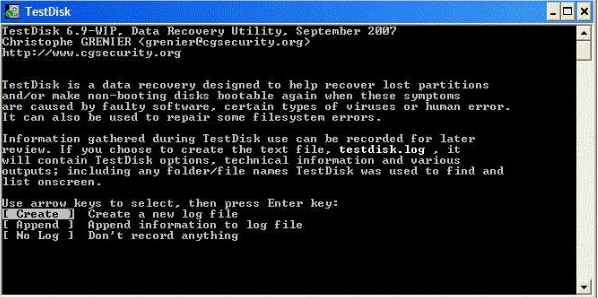
Another free program that can restore partitions in case of data corruption is TestDisk. It works more effectively than the previous one, but you will have to tinker with it a little more.
After pressing " Create"(creating a new log file) select drive with ROW format.

The disk is selected using cursor keyboards.
Select Analyze and button Enter for confirmation. 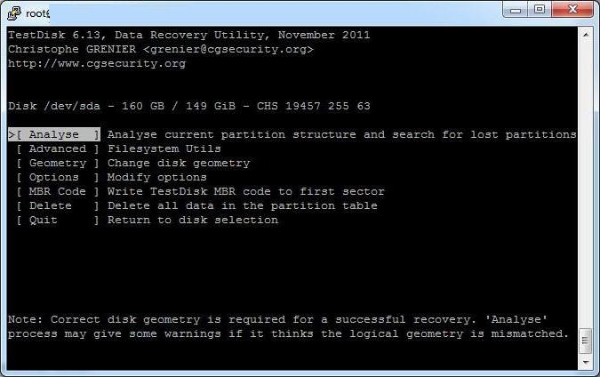
Wait until the analysis is completed - the program will find several disks, including the one that contains information in RAW format. To identify it is possible, knowing the volume. 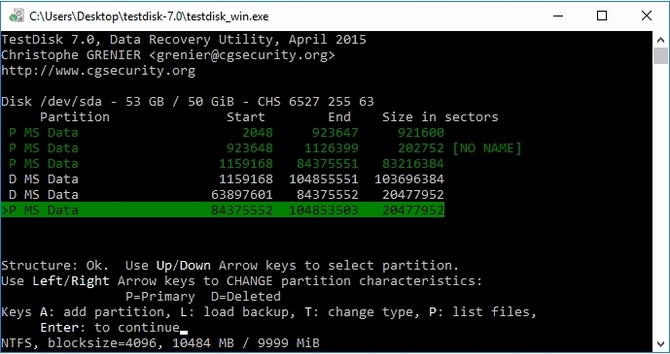
Select P to enter the mode viewing. Once you are sure that this is the drive you need, click Write for recovery and Y to confirm this action. 
After recovery is complete reboot and check if the recovery was successful.
Raw format on the system partition
 If you are restoring a system partition, you should take into account that after returning the disk to the original format of the OS file system will stop loading- required restore loader.
For recovery, you can use the same utilities that were discussed above. We recommend for these purposes, connect the hard drive to another device and perform this procedure from it, or use a special boot disk containing, for example, Minitool Partition Wizard, Active Partition Recovery Boot Disk or similar specialized facilities.
Good afternoon!. Not long ago, we successfully solved two global problems in Microsoft operating systems, namely, we eliminated the black screen when loading Windows 10 and were able to defeat the endless update of Windows 8.1, for which I congratulate you. But Windows does not want to give up and periodically throws up interesting and not always pleasant situations. I have a 4 TB Seagate NAS HDD hard drive, on which I store a collection of films. On one of the beautiful winter days, the HDD drive began to be detected as RAW file system and does not open standard OS tools. Naturally, I would like to return it to working condition and fix RAW format without data loss, which is exactly what we will do in this article and, most importantly, we will learn to prevent such situations in the future.
What is RAW (file system)
Surely many of my readers, the overwhelming majority, know only the NTFS file system, since it is a standard in operating systems of the Windows family; those who are older and more technically savvy know FAT16 and FAT32. Those who follow the latest news and trends in the industry have already managed to read, and some have already become acquainted with the new ReFS, but few know about the “file system” ( HDD status) RAW, and this is not surprising, since if you met her, then in most cases you have problems.
RAW file system is the condition of a hard drive or other storage device that does not have a known Windows file system. Since there is no file system on the disk, there can be no files or folders on the disk, and it cannot be used to store data, that's what your Windows thinks and you shouldn't blame it for that.
You can read a little more about the RAW file system here https://ru.wikipedia.org/wiki/RAW_(file_system)
Reasons why RAW appears on hard drives
Here is a list of the main problems due to which your HDD may appear as RAW:
- MBR partition table corruption
- Corruption of boot blocks on the file system
- If you had NTFS, then the MFT main file table area may have been damaged
- Your disk initially has a different file system, for example, when it was previously part of a RAID array, since storage systems have their own file systems.
- There is a problem with the drivers, your system could not find the correct driver that could correctly identify the HDD.
- Incorrect or abnormal computer shutdown
- Problem with USB ports on motherboard
- Problem with docking stations for externally connecting hard drives
- You do not correctly remove your flash drive or HDD, as a result of which you break its file system; unfortunately, NTFS is critical to this. Here, on the one hand, the user is illiterate, and on the other hand, he is slightly deceived by the operating system, a simple example, you copy a file to your flash drive. You logically have a slider with the copying status, it visually ends, but the problem is that the system continues copying it from the buffer in the background. The buffer is created to speed up copying, and if at this moment a person simply pulls out the flash drive, then the information on it will, at best, be damaged. For such things there is a safe removal of the device.
Methods for repairing a RAW file system disk
There is a lot written on the Internet about various methods that supposedly help in restoring a hard drive or flash drive with RAW, but the problem with most sites is that they are not run by specialists who check everything from their own experience, but by stupid copywriters who simply rewrite other people’s articles with errors and mistakes, and to additional questions or errors, the authors of these articles simply blur and do not answer. As a result, the user loses his data and is disappointed with everything and everyone. Among the methods I want to highlight:
- Checking the disk for errors via CHKDSK, whether it only applies to the system disk or not, and in system recovery mode
- AOMEI Partition Assistant is a chic processor with extensive tools, thanks to it we enlarged the C drive in Windows 10 or converted a GPT drive to MBR.
- DMDE utility - it allows you to find lost partitions
- TestDisk - The utility also allows you to find lost partitions
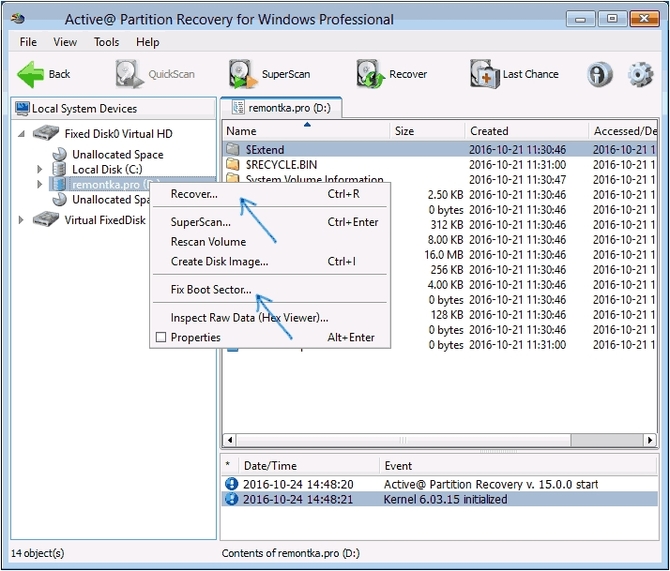
- Active Partition Recovery for Windows Professional - can also correct errors in the boot sector
- Minitool Power Data Recovery is another tool that allows you to scan your hard drive for other file systems and allows you to recover RAW.
What does a partition with a RAW file system look like?
And so, before I show you what to do when restoring your HDD or flash drive, I will show you what it all looks like. I have the Windows 8.1 operating system installed on my home computer, and I am satisfied with it in all respects. I also use regular 3.5-inch hard drives to store various information. On them I have films, music and a huge number of video lessons and courses. To connect hard drives I use Agestar docking stations, they are shown in the photo below.

One fine day, when connecting the drives, autorun did not work on one of them. I go to “My Computer” and what I see is that the drive I need has the letter G, but it does not display information about its size and load. When I tried to open it, Windows Explorer simply froze and did not respond for about 5 minutes.

After about five minutes, instead of opening the disk, a window appeared:
To use a disk in drive G: format it first. Do you want to format it?

Naturally, this was not part of my plans, since the disk is full of information. Sometimes I encountered this and it was related to the fact that the connected disk through the docking station did not have enough voltage, I switched it to another one, the effect was the same. I connected it directly via SATA, it was still unavailable.
I opened the snap-in "(diskmgmt.msc)". The equipment itself also took about 5 minutes to open and become dull. As a result, I received a list of my hard drives, and what a surprise I was when I saw that my 4 terabyte drive had a RAW file system, and it had a letter assigned.

When I tried to open a RAW disk from Disk Management, I received the following error:
No access to G:\. The file or folder is damaged. Reading is impossible.

How to fix a disk with a RAW system
As I tell you many times, you always need to start from the physical level. First, open your “Device Manager” and make sure that you don’t have any yellow warnings on your equipment, especially in the “USB Controllers” section if you connect a disk or flash drive through them and in the “Disk Devices” section.

Most often they are related to drivers. Therefore, I advise you to download and install the latest drivers for your computer equipment, focusing on the motherboard, disks and processor. I have already told you how to update drivers on a Windows computer; if you don’t know how, I advise you to read it.
Also, be sure to check your physical wires after updating the drivers; if possible, try installing others. You can plug external docking stations or a flash drive into another USB port to eliminate this probable cause. If there are no problems at the level of physics and hardware, then we have no choice but to resort to software solutions.
Restoring a RAW disk using chkdsk (checking the disk for errors)
When I started looking for ways to fix the RAW file system on my devices, I very often came across articles that try checking your HDD for errors using built-in Windows tools, the so-called chkdsk utility. I remind you that my operating system is Windows 8.1. There are two ways to run a disk error check: through the graphical interface or using the command line.
I'm trying to run it from graphical mode, I remind you that this is done through the disk properties. I click in the “Disk Management” snap-in on my own and select its properties. On the general tab, my hard drive was displayed as empty, it had a capacity of 0 bytes. Go to the "Service" tab.

Select "Check for errors" and click check. Personally, I immediately got an error window:

Let's try to do the same thing, but from the command line. To do this, open a cmd shell as an administrator and enter the command:
chkdsk G: /f (Where G: is the letter of your RAW volume)
The scanning process will begin, if everything is fine, then you should have identified the old file system, in my case, it is NTFS, and the volume label has also been determined, in my case, it is HDD-48 (Movies). Now begins three stages of checking for bad sectors, searching and restoring non-indexed files, and repairing the file table itself.

In my case, after half a minute this gave the result in the form of a restored HDD, now it was NTFS, not RAW type.

If chkdsk for RAW disks is not applicable on your system, then you will receive an error message:
Here, for some reason, the operating system was unable to install the previous one, and shows the wrong type. In such cases, the chkdsk utility with the /f key will not help you, but don’t worry, everything can be fixed, we’ll fix it below.

Recovering a RAW disk when the system does not boot
There are situations when you cannot run a disk error check because your Windows operating system does not boot. It goes a long way, the recent error 0xc0000098 or whea uncorrectable error can be listed for a very long time. In each of these cases, we have developed an algorithm:
- If you are my regular guest and subscriber, then you have probably seen my publication on how to return the “Last Known Good Configuration” item, from which it is easy to resuscitate the system, but by default this option is not enabled.
- The next step was to launch the command line, but from Windows recovery mode, which can be launched via F8 at startup or from a bootable USB flash drive, which you should have; if not, then do it in 5 minutes, if you have, of course, another computer. Don't forget to configure booting into the BIOS from a flash drive. When you see the language selection window, press the Shift and F10 keys at the same time to open the Command Prompt.


Among the additional parameters, you can also find a command line item.

First of all, we need to calculate the drive letter, since here it may differ


If everything is fine, then you will successfully restore the system disk, but if you suffer the same fate as the message “CHKDSK is not valid for RAW disks,” then do not rush to get upset and this can be fixed.
Before the next manipulations, I advise you to practice using future utilities by creating RAW disks in a test environment in a virtual machine, as I have already described how to do this
Easily format a disk or RAW partition when there is no important data on it
Before I move on to describing more advanced methods, I want to tell you that if you have a flash drive or hard drive that is in RAW state no important data, then you can generally quickly format everything and return it to a working state, since I remind you that the RAW state is most often that the system cannot find the previous file system on the media. Open the Disk Management snap-in, I remind you, press WIN and R at the same time and write diskmgmt.msc there. In the snap-in, find your RAW disk that needs to be fixed and converted to NTFS. Right-click on it and select “Format” from the context menu.

We specify the NTFS file system type and correct the RAW format on your media.

We agree that all data will be destroyed, since in this case it is not significant for you.

As you can see, this method is the easiest to fix HDD RAW format.

If, when you try to format, the “Format” option is inactive, then in this case you will need to delete the partition.

When the partition is deleted, your disk will be in an unpartitioned state. Right-click and select "Create simple volume"

As a result, we received a corrected HDD or flash drive in the form of NTFS, and not the notorious RAW.
What is raw markup on hdd, memory card and usb flash drive. How to fix the error “chkdsk is not valid for raw disks” and return ntfs.
A fairly common problem: the contents of the memory card or hard drive are inaccessible, Windows OS (7 - 10) displays the message "chkdsk is not valid for the disk." The file system format is RAW.
What is raw, is it scary and how to fix the error (returning the NTFS file system) - read here.
What is a "RAW file system"?
When you connect the device to the USB connector, you see in the properties of the file volume information that the flash card has a raw file system type and is not formatted in the standard NTFS or FAT file system.
Windows OS assigns a RAW label to a volume with an undefined file system. This occurs if none of the system drivers could recognize the file system. In the case of Windows OS, we are talking about FAT(32) and NTFS.
Thus, RAW is not a file system, but a sure sign of an error in the hard drive.
RAW disk: reasons for the error
Most often, RAW markup appears if:
- The disk or file volume is not formatted,
- Access to the file system/disk/memory card is prohibited or limited,
- There were reading errors, damage to the file system structure, and bad blocks.
A raw disk has some symptoms that definitely indicate problems with the disk. Among these symptoms:
- Incorrect media type when reading disc
- Windows displays "Cancel", "Retry", "Error" window
- File system appears as RAW in applications
- The error “chkdsk is not valid for raw disks” appears
- Windows asks you to format the disk
- File names contain non-standard characters
- The message "Sector not found" appears
When does the error chkdsk not valid for raw disks occur?
File system information is stored in two places:
- MBR partition Table
- Volumes boot sector
If one of these sectors is damaged or not found, chkdsk reports that the utility is not valid for raw disks.
Why raw markup is bad
If your device has raw markup, you cannot view its contents or perform file operations. Also, the disk cannot be checked for errors or defragmented.
As a result, files stored on the disk become inaccessible, although they are physically still there and can be restored by any recovery program.
Important! If your disk or partition is a raw file system type, the Windows operating system will prompt you to format it, warning you "The disk is not formatted. Do you want to format it?" (Disk not formatted do you want to format it now?).
Don't settle for this: if you format the HDD, you will lose all the data on the raw disk!
How to fix raw without data loss in EaseUS Data Recovery Wizard
You can access files by correcting the MBR partition Table or converting raw to ntfs format. This can be done virtually without loss of data or formatting.
Since the raw disk still contains data, let's try to return it (if not completely, then at least the most valuable files).
We will need the EaseUS Data Recovery Wizard program. How to use it when recovering data from raw – read below.
Step 1. Recovering data from a RAW disk or partition
EaseUS Data Recovery Wizard is quite a suitable program:
- To recover data from raw disks,
- If the SD card or flash drive in raw format is not formatted
- To search for deleted hard drive partitions.
Data Recovery Wizard is a paid program when it comes to full-featured use.
Advice. Alternatively, you can try free apps like Recuva or the ones we suggest in [this review].
1. First, download the program from the developer’s website:
The program is compatible with Windows 7/8/10, although it can be installed on earlier versions of the OS.
2. Launch EaseUS Data Recovery Wizard and in the window that appears, select the file types to recover (or activate the “All file types” option). Confirm the operation by pressing .
3. If a disk partition is deleted or detected in Explorer as RAW, use the Lost Disk Drives option.
Select the problematic disk with deleted data (Section “Lost disks”) and click the Scan button.
EaseUS Data Recovery Wizard will search for files available for recovery on the specified disk or SD card.
4. Once the scan is complete, a list of found files will be displayed. Check the required ones and click the Recover button to restore.
Important! Always save files to another drive to avoid overwriting.
Step 2. Convert RAW to NTFS file system without data loss
After recovering files, the raw disk needs to be formatted in order to be used further for storing files. Read how to do this correctly.
By the way. Windows OS allows you to format a disk to NTFS using the built-in Diskpart formatting utility via the command line.
Thus, if you recover data from a raw disk in advance, you can safely return the NTFS partition and format it. If you first format the disk and then try to recover the data, the likelihood of recovery will be significantly reduced.
If you are unlucky and accidentally formatted a raw partition, losing data on it, use the Auslogics File Recovery program (it is useful to read the article at the link).
Other useful programs for raw disk recovery
In addition to the EaseUS Data Recovery Wizard, you may find other tools useful for recovering raw partitions.
TestDisk
The free console utility TestDisk allows you to find lost file volumes. This way you can return files from the raw partition.
You can return ntfs using TestDisk as follows:
- Run the TestDisk utility
- Select Create → recovery disk → file system type
- To start searching, select Analyze → Quick Search from the menu
- Press P to search for files and Write to write the results to a table on disk
Minitool Power Data Recovery
Power Data Recovery has tools for searching for deleted/lost partitions: Lost Partition Recovery. With this feature you can quickly recover a raw partition.
Unlike the TestDisk console utility, Power Data Recovery has a very clear interface. Thanks to this, you can recover files and then format the problem area of the disk in FAT or NTFS.
HDD Raw Copy
The Hdd Raw Copy program (developed by Toshiba) is designed for low-level and sector-by-sector creation of a disk image. It will be useful when creating a complete copy of a hard drive or SSD. Having created a duplicate disk, you can safely experiment with the RAW partition: restore files on it, format and convert to other file systems.
In addition, the HDD Raw Copy utility will be useful for backing up, creating duplicates, restoring information and migrating data.
Question answer
The next time you turned on the external HDD on USB, the OS “advised” to format the disk. I checked the controller itself, installing another HDD in it - it works. The problem is in the HDD itself. Please advise what to do.
Answer. If the OS advises you to format your hard drive, there may be a partition table violation. Try restoring the raw disk system using the TestDisk console utility.
RAW problem
Not a single modern computer can function without a disk or data storage. Sometimes it may experience an unexpected failure which will cause a logical partition error and make its file system a RAW system which is unreadable in Windows and hence you lose access to all the data on the media. The only way to recover such a drive is to perform a full RAW patch format to FAT32, NTFS, or another system with which the operating system can communicate. But what about data that can never be lost?
Starus Partition Recovery will help solve the issue of data recovery. This software is designed not only to provide the user with the opportunity to recover lost data, but also can easily restore the logical partition of any disk - HDD, SSD, SD card, etc.
Symptoms of a RAW disk or partition
When the following symptoms of computer problems occur, you can be sure that these messages are coming straight from the hard drive that needs urgent attention.
- Invalid media type reading drive - when trying to format the drive using the command line.
- Displays the media file system as RAW.
- Windows may prompt you to format the disk, saying “Your disk is not formatted. Do you want to format now?
- The file names on the media contain “strange” characters.
- “Sectors not found” message.

If, after reading the above-described symptoms of a logical partition/disk error, you have no doubt as to the cause of their occurrence, use the effective solutions below for recovering information from the media.
How to recover data from RAW disk?
A situation in which your hard drive, for certain reasons, becomes unreadable for the system is not a big deal, and formatting will definitely help fix the file system, but what to do with the files on it? Therefore, it is highly recommended to extract data from raw drive partitions before formatting.
Step 1. Recovering data from a hard drive partition with the RAW file system.
Starus Partition Recovery is the optimal solution for recovering information from any type of disk. The program is compatible with all versions of Windows, including Windows 7, which allows a large number of users to easily recover lost data from their drives.
1.
Launch Starus Partition Recovery and select the disk partition on which important information is stored, or the disk itself, and left-click on it to launch the Analysis Wizard.
Choose a scanning mode depending on your needs. Quick Scan is useful for lightning-fast analysis of a partition, but keep in mind that it will not be as deep as Full Analysis.

2. Once the scan is complete, you can preview your lost data and recover it by selecting the required files, right-clicking on any of them and clicking Recover to save the information to any other safe location on your PC.

Step 2. Formatting the RAW disk.
Having recovered valuable data, there is nothing left but to format the device. The built-in Windows utility will cope with this task perfectly, which will help you clean up the disk and create the correct layout for its logical partitions.
Open My Computer, right-click on the RAW disk and select Format from the menu that appears.

Once formatting is complete, your disk will be usable again.
Updated: 2019-11-04 / Victor Trunov
 Let's imagine a situation: you purchased a new or connected an old HDD to your computer. But for unknown reasons, the operating system begins to display it in RAW format and refuses to work with it. Quite a non-standard situation, would you agree?
And before we talk about what to do and how to restore the previous NTFS file system, I suggest you familiarize yourself with general information about the little-known format.
What is the RAW format and under what circumstances does it appear?
The standard file systems for hard drives are NTFS and FAT. But under certain circumstances it may change to RAW. In turn, this indicates that due to certain reasons (we will discuss them below), the OS is unable to correctly determine the type of file system of the hard drive.
Main reasons:
In rare cases, the OS marks the hard drive as RAW format when the “FS” file system of the media is not supported by the current operating system. Then the situation can be corrected by changing the OS or FS of the drive using formatting.
Now let's get straight to the point and figure out how to convert RAW back to NTFS. In this case, several methods will be considered: without data loss and with loss, when the data is not important.
Checking components
The first thing to start with is checking the components and installed drivers.

Reconnecting the device
The HDD may not be working properly due to an incorrect connection. This point should be excluded.
For this:

All that remains is to turn on the computer and check for the problem.
Perhaps the HDD drive is detected in RAW due to a broken SATA cable, then replacing the old cable with a new one will help correct the situation.
With a laptop, everything is much more complicated; for some models it is enough to remove the bottom cover covering the media compartment, while for others you will have to remove the entire body. you can glean useful information on parsing.
Checking for errors
If the operating system can be loaded, then do the following:

The problem must be resolved.
Otherwise, you will see the message "CHKDSK is not valid for RAW drives." This suggests that this method is not suitable for file system recovery.
If the OS does not boot, you can use a Windows recovery disk or bootable USB flash drive. Let's look at the procedure for launching the command line in the second case.

After this, either the file system will successfully change from RAW to NTFS, or you will see a notification that this command is not suitable for working with such a drive. Then move on to other options.
Formatting
This method will be an excellent solution if the information on the hard drive is not important. Since formatting will completely erase it and in the future you will need to recover data using special programs. And this is a rather long process, which is not successful in all cases.
We do the following:

If for some reason the HDD disk cannot be formatted, then right-click on it, select the “Delete volume” option, and then click on the unallocated area and create a new volume.
DMDE
Everything becomes much more complicated if the hard drive, which became RAW, contained important data and their . For this we will use the DMDE program (dmde.ru). It is capable of not only returning single lost information, but also entire sections. Works with all operating systems, including Windows and MacOS.
Let's do everything in order:

You can also use DMDE. To do this, you need to connect the media to another computer and follow the steps above. It should be noted that most likely after performing this procedure you will need to return the Windows bootloader.
TestDisk
An absolutely free program with which you can change the file system back from RAW to NTFS and recover all lost data. It works with all versions of Windows and in some cases shows much better results than the previously reviewed program.
Before starting work, I recommend saving all important files to another drive, stocking up on a Windows recovery disk or a distribution kit with an installation OS (you may need to restore the bootloader, especially if you are working with GPT media).

If everything is done correctly, the file system will be overwritten and the volumes will again become available for work.
We use additional programs
Those users who have not decided to use previous programs can use other software, for example, “Hetman Partition Recovery”, “Recuva”, “Minitool Power Data Recovery” or “hdd raw copy tool”. Below I will look at an example of file recovery in the first program. Unfortunately, it is paid, but it is effective.
Then the procedure will be as follows:
- Install “Hetman Partition Recovery” and run it.
- Open “My Computer”, right-click on the problematic media and select “Format”. Leave the default values and start the process.

- Move to the utility window, click on the formatted HDD and click on the “Wizard” button.

- Click “Next”.

- Select the former RAW disk (now it is already in NTFS format) and click “Next”.

- Activate the “Full analysis” item and click “Next”. The scan will start, its duration depends on the condition and size of the hard drive.

- After the search process is completed, the lost data will be displayed on the screen, select the ones you need and click on the “Recover” button.

- Specify the save location and click “Next”.

- Specify the path and confirm the action.

After completing the procedure, go to the save location and make sure that all the necessary files have been saved.
The main disadvantage of this program is that it is not able to find and save the complete HDD structure. It finds deleted files and places them in a directory called “Folder (some kind of serial number)”, and then you have to go into each directory, pull out the necessary files from there and resave them to another location.
Despite all the disadvantages, using such programs is one of the safest methods that should definitely help you.
Visual video on the topic of the article
Professional help
If you are unable to resolve the problems yourself,
then most likely the problem lies at a more technical level.
This could be: a failure of the motherboard, power supply,
hard drive, video card, RAM, etc.
It is important to diagnose and repair the breakdown in time,
to prevent failure of other components.
Our specialist will help you with this.
Leave a request and receive
Free consultation and diagnostics from a specialist!