If you bought a new scanner and connected it to Windows 10, then after installing the latest drivers there will be no problems using the device. However, if you have an old scanner and Windows 10 does not see it when connected to a PC, you can configure it in the following ways.
Installing drivers for the scanner on Windows 10
If your scanner is more than 3 years old and the installation disk does not match the bit depth and version of the operating system, you should go to the website of the official device manufacturer and download new drivers. We have prepared for you a list of sites where you can download the necessary software:
Download the drivers, connect the scanner to the PC and start installing the drivers. Reboot the PC and check the device for functionality. If this method did not work and the scanner does not work on Windows 10, then you should try the following methods.
Troubleshooting problems with a connected scanner
If the connected scanner on a computer with Windows 10 is not detected, try the following method to solve the problem:
- Let's go to Explorer. Find the scanner and right-click on the model name. From the list, select “Troubleshooting”.
- The tool will launch. Follow the prompts of the utility. The printer or scanner must be connected at this time.
If the utility did not help solve the problem and Windows 10 does not see the scanner, it is worth checking its installation. To do this, follow the following instructions.
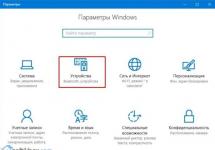
- Click “Start”, “Settings”, “Devices”.

- In the menu on the left, select “Printers and Scanners”. Click on the cross “Add a printer or scanner”.

- A new window will open. Select the item “My printer is quite old...”. Click “Next”.

- We are waiting for the system to find and install the PC to the printer and begin to see it.
What should I do if there are conflicts between the standard Microsoft utility and the manufacturer's scanning program?
If you have figured out the problem of how to connect the device, but scanning a document is impossible due to a conflict between the standard Scanner application from Microsoft and a native program from the manufacturer of the device itself, then follow the following instructions:
- Click “Start”, “Control Panel”, “Programs and Features”, and select “Turn Windows features on or off” from the menu on the left.

- Find the “Document Printing Services” branch. Here you need to uncheck “Scan and Fax Service”, “Windows Fax and Scan”.

- Reboot your PC for the changes to take effect.
Now the scanner can be used without compatibility problems between the two programs.
To learn how to connect a scanner to Windows 10, watch the video:
Before you begin, make sure the scanner is properly installed and turned on.
- All programs and click Windows Fax and Scan or use the search.
- New scan.
- In the dialog box New scan list Profile select Documentation. The default settings for document scanning are automatically displayed and you can use or change them.
- To see what your document will look like after scanning, click the button Preview.
- Click the Scan button.
Notes:
- To crop document New scan
- Some scanners allow save individual pages scanned document as separate files. If your scanner provides this option, check the box
- To change default file name scanned document or photo, right-click the document in the Scan view and select Rename.
- To organize scanned documents or images, right click the folder Scanning in the left pane and select New Folder. To move a scanned image or document to a folder, right-click and select Move to folder and select your destination.
- Scanned documents are saved in the Documents folder, in the Scanned Documents folder.
- If you create a new folder in the Scanned Documents folder, it won't appear in the Scan view of Windows Fax and Scan Services until you close and reopen the window or collapse and expand the folder list.
- Scanned documents can be automatically forward to an email address or network folder. To select a forwarding option, from the Tools menu, select Scan Routing. Select an option, enter the information, and click the Save button.
Scanning images using a Windows service
Before you begin, make sure the scanner is properly installed and turned on.
- Click the Start button, select All programs and click Windows Fax and Scan or use the search.
- At the bottom of the left pane, click the Scan button.
- On the toolbar, click the button New scan.
- In the dialog box New scan list Profile select Photo. Default settings will be displayed automatically for scanning photos, which can be used or modified.
- To see what your photo will look like after scanning, click the button Preview. If necessary, change the scan settings and view the image again.
- Click the Scan button.
Notes:
- To crop the image before scanning, click the Preview button in the dialog box New scan. In the preview area, drag the crop tool marks to resize the image.
- Some scanners allow you to save individual scanned images as separate files. If your scanner has this option, check the box View or scan images as separate files. Otherwise this option will not be available.
- To change the default file name of a scanned document or photo, right-click the document in the Scan view and select Rename.
- To organize your scanned documents or images, right-click the folder Scanning in the left pane and select new folder. To move a scanned image or document to a folder, right-click and select Move to folder and select your destination.
- Scanned documents are saved in the Documents folder, in the Scanned Documents folder. If you create a new folder in the Scanned Documents folder, it won't appear in the Windows Fax & Scan Scan view until you collapse and then expand the folder list.
- Scanned documents can be automatically forwarded to an email address or network folder. To select a forwarding option, from the Tools menu, select Scan Routing. Select an option, enter the information, and click the Save button.
There is a scanner in almost every home. If you have one too and want to unlock its full potential, we recommend downloading VueScan Pro for Windows 10. It is a free program that is both a scanner driver and a scanning program. Using this software, and not a standard driver, you can unlock the potential of your device. Many users note in reviews that scanning has begun to be clearer and faster. You won't need to fine-tune VueScan Pro, although that is also available. All you need to do is download the utility for free and put it to work.
Download VueScan Pro to configure your scanner
You won't have to wonder what scanners VueScan Pro works with and what it supports. The latest version 9.1.20 or 9.1.24 Final supports all modern scanners. Not even the most famous manufacturers. Older models are also supported, including those for which there are no longer official drivers. And if there are drivers for your device, then the manufacturer itself recommends not removing the standard drivers. And use them together with VueScan Pro, and you can get:- Fine-tuning scanning;
- Improved picture quality;
- Increased scanning speed;
We have been using this program personally for many years. It is indispensable for setting parameters. The standard capabilities of Windows 10 32/64 bit do not have everything that is available to you in this scanner program. If you already have an outdated model, like ours, download VueScan Pro - this is the only solution on how you can make friends between your Windows PC and your device. We are posting a version in Russian, so you won’t need a dictionary
A scanner helps you create copies of documents, photographs or any written records on your computer. It analyzes the object and reproduces its digital image, after which the created file is saved on the PC. Many users purchase such equipment for personal purposes, but they often have difficulty connecting. Our article is aimed at telling users in as much detail as possible how to connect the scanner to a PC and configure it for operation. Let's move on to consider this topic.
First of all, even before connecting, you should allocate the device its place in the workspace. Consider its dimensions, the length of the cable included in the kit, and how comfortable it is for you to scan. After the equipment is installed in its place, you can proceed to the beginning of connection and configuration. Conventionally, this process is divided into two steps. Let's look at each one in turn.
Step 1: Preparation and Connection
Pay attention to the scanner package. Read the instructions for use, find all the necessary cables, make sure that they are not externally damaged. In addition, the device itself should be checked for cracks and chips - this may indicate that physical damage has been caused. If everything is fine, proceed to the connection itself:
This completes the first part of the whole process, but the scanner is not yet ready to perform its functions. Without drivers, such equipment cannot work. Let's move on to the second step.
Step 2: Installing Drivers
Usually the scanner comes with a special disk with all the necessary drivers and software. When checking the package contents, find it and do not throw it away if your computer or laptop has a disk drive, since this method will be the easiest to install the appropriate files. However, not all companies now use CDs, and modern computers are less likely to have a built-in drive. In this case, we recommend that you review our article on installing printer drivers. The principle is no different, so you just need to choose the appropriate method and follow the instructions given.

Working with the scanner
Above, we examined in detail the two steps of connection and configuration, now you can move on to working with the equipment. If this is your first time dealing with such a device, we recommend that you refer to our material below to familiarize yourself with the principle of scanning to a PC.
The scanner is a hardware part of your PC and must be purchased separately. However, you can download applications for Windows 10 that will allow you to work better and more efficiently with the Scanner.
It is worth considering that without hardware, many applications will simply be useless to you. Of course, you can download any other OCR solution, but this is the maximum you can do without additional hardware. But if you have a device, even if combined with a printer or even a fax, then you have all the possibilities.
Many users at certain times need to scan some documents or materials in paper form. To do this you need a special device and software for it. If with the first everything can be more or less clear, then not everyone understands what software is required for this. Therefore, we propose to consider this issue in a little more detail.
Is it possible to get by with Windows 10 scanning tools?
Let us immediately note that you can download the scanner for Windows 10 from our portal and use it at your own discretion. But many users who have worked with document scanning equipment know that for this procedure it is possible to use exclusively the tools of the system itself. Therefore, third-party applications are optional here.In the system, find a tool with the approximate name “faxes and scans”. It is very easy to use and the standard instructions for it explain everything in quite detail. However, the standard capabilities are enough only for the most basic tasks. If they go beyond your limits, you will need to download additional software. The good thing is that most of them are free.

Scanning documents in the "top ten"
In order to scan a document or just a study note, sometimes you need to download a scanner for Windows 10. This is a separate application and is not installed by default in all versions of Windows 10. If you are interested in whether it is in your build, then you need to select the “options” menu and then “change computer settings”. Select “computer and devices” and then “Devices”.If you have such a device, then it will definitely be displayed in the selected section. In the corresponding window with the options for this device, select “New” or “New scan”. Next, you will have access to all the settings for the scanning process, which are not difficult to understand.

What to do if Windows 10 does not see the scanner
To configure the operation of the device itself, which is not yet in the system, you need to download the scanner application for Windows 10, which in this context is a driver. Everything here is very similar to the situation when you install a webcam or any other peripheral device. After setting it up, perform the following steps:- Connect the device to a network router or directly to a PC, turn it on to the network. Separately, you have to deal with wireless scanners;
- Install the appropriate drivers, which sometimes have to be downloaded separately;
- In the “Computer and Devices” menu, select “Add a new device”;
- Then select your device from the list proposed by the system.