All the best!
Quite often you need to burn some kind of ISO disk image to a flash drive, for example, when installing Windows, when creating an emergency flash drive, for a hard drive, etc.
Moreover, the same installation of Windows from a CD/DVD takes longer (and they fail more often than flash drives). Not to mention the fact that not every new PC/laptop has a disk drive installed. That is why using a flash drive is preferable (and more universal - it can be connected to any PC with a USB port).
In this article, I will look at a couple of programs that can easily and quickly burn any disk image in ISO format to a USB flash drive.
Note: ISO is the most popular disk image format. It distributes more than half of all kinds of images that can be found on the Internet.
Burning an ISO image to a USB flash drive
Method No. 1 - PowerISO
![]()
PowerISO is a very powerful program for working with ISO images. Allows you to open them, edit them, extract files from them, add files to ISO images, compress them, burn them to CD/DVD disks and flash drives, etc. Also in PowerISO you can make an image of any of your disks, test it, get a checksum (to assess whether the file is broken...).
In general, how to write an image to a flash drive using PowerISO.
1) The first thing you do is open the image. To do this, click the button "Open", or open the file menu, and then specify the image file. You can also use keystrokes Ctrl+O.

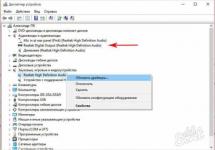
2) If the image was opened and the program did not issue any warnings, go to the menu "Tools". Select a feature such as "Create a bootable USB drive" (see arrows in the screenshot below).

3) In some cases, the program will ask you to give it administrator rights. We just agree: the program will restart and you will continue the recording process.

4) In the recording settings window, you need to:
- in the column "USB drive" indicate your flash drive (Caution! Do not mix up the letters, because during the recording process, all data on the flash drive will be deleted;
- burning method: if you are burning a bootable ISO image, select the burning method "USB - HDD"(for example, for recording images from Windows);
- the file system column can be left as default;
- next click "Start";
- By the way, please note that at the bottom of the window there are links to instructions (several links, depending on the image being recorded).

5) The program will warn you again that all data on the selected flash drive will be deleted!

- loading your computer with extraneous tasks (I recommend turning off everything unnecessary: at least torrents, games, video editors, and other programs that put a lot of stress on the PC);
- size of the recorded image;
- speed of the USB drive and the flash drive itself.
7) If the recording went well and without errors: you will see a message "USB drive writing completed successfully" , as in the screenshot below.

Method number 2 - UltraISO
![]()
UltraISO is the most famous program for working with ISO images. It can do almost everything with them like the first one: open, mount, edit and modify, burn bootable flash drives, external hard drives, CD/DVD drives, etc.
It is as easy to use as the first one. Both, by the way, fully support the Russian language.
And so, let's start working in UltraISO
1) First, download (link above), install and run the program. There is nothing special to comment here, except for one thing - run the program as an administrator (otherwise the option to write a USB flash drive may not be available!).
Note! To run as administrator: just click on the UltraISO program icon and select “Run as administrator” in the context menu, as shown in the screenshot below.


3) If the image has opened, open the "" menu (see screenshot below).

4) Then you need to set the recording settings:
- disk drive: select the letter of your flash drive (the data on it will be deleted, so be careful and attentive!)
- recording method: either USB-HDD+ or USB-HDD (this is for writing bootable media, which is what is required in most cases) . It’s quite difficult to say specifically what to choose; in most cases, USB-HDD+ works - but if suddenly your BIOS version does not see it, rewrite the flash drive in USB-HDD mode;
- then click the button "Record" .

Note! In normal mode, UltraISO automatically formats the media into the FAT32 file system (even if the flash drive was previously NTFS). In order for NTFS to remain, you need to select ExpressBoot, then click on ExpressWrite. Bottom line: when you unpack the image onto a flash drive, the file system will remain unchanged.

6) If everything went well, you will see the following message in the program message: "Cache synchronization. Writing complete!" . Please note that there are no errors in the list of program messages, otherwise your boot image will simply give an error when installing Windows 👌.
An example of a successful recording is shown in the screenshot below.

Greetings to all of you, my young system administrators, regular readers and just blog visitors!
Since in my articles I often touch on the topic of installing different versions of the operating system, I decided that you would be interested in learning how you can make a multiboot device with different OSes. Today we will look at how to write several windows onto one flash drive. Go!
Why is this necessary?
Let's imagine that in your house there is a laptop, a netbook, a desktop computer, and even a PC at work, etc. Will you really always carry around a case with blanks on which different versions of the operating system will be recorded?
And if suddenly some bug happens, for example, with the same hard drive and you have to diagnose it, but the OS has not yet been installed, what should you do? That’s why they create multiboot media with operating systems and additional software that can be used even before the system starts.


Such a flash drive will be useful always and everywhere.
- Firstly, to restore Windows.
- Secondly, for diagnosing any PC.
- Thirdly, if you catch a virus that transmits information to the network, you can easily get rid of it by booting from such an emergency device.
By and large, an external gadget will definitely be useful to you and you won’t have to dig through the Internet every time in search of any software.
What do you need to prepare?


Let's go point by point. Of course, you need a flash drive with a size of 16 gigabytes or more. This is the basis of our step-by-step plan. Now on to the distributions. I suggest loading three operating systems at once.
Download from here- Windows XP.


A from here— load the seven.


A Here- take eight.


Right here Let's take Dr. Web.


Here GOD32.


Reliable Kaspersky.


Acronis to backup your data. It will help if the old operating system comes to an end, but the information needs to be preserved.


Acronis Disk Director for working with hard drives.


ERD Commander 5.0 Windows XP recovery system.
(MSDaRT) 7.0– to restore the seven in case of critical bugs.


(MSDaRT) 8.0- to restore the eight.


Linux Ubuntu, for those who fumble around in Unix systems and know their usefulness.


Victoria program for working with hard drives, if suddenly it starts to stall and become dull.


AntiWinLoker will help if you suddenly catch a banner.


So, in addition to this, we need a program that will allow us to implement this entire step-by-step plan. We could use the MultiBoot USB software, but according to professional system administrators, it is better to use WinSetupFromUSB. Download here.
Recording operating systems


And so, open the software and do the following. First, select our flash drive. Check the Autoformat box. Then in the NTFS parameter, since this is needed to work with seven and eight. Next, in the bottom line, click the checkbox that starts with Windows 2000. Then click on the button with three dots on the right to select disk images.


Now you need to load the image with the XP distribution into the virtual drive, go into it and select all the files. Then right-click on them and select the copy option. Go to your hard drive and create a Windows XP folder and paste the data there.


Now in the WinSetupFromUSB explorer, select this very folder.


Click the OK button and click this button in the pop-up window.


Now let's start recording.


In this window, click YES.

And in this too.


The first phase of our phased plan will begin.


We are waiting for a sign like this, which signals that the burning is complete.

Open WinSetupFromUSB again and set the parameters - just like in the picture. Similar!


We select our image with Windows 7.


Click GO.


The burning process will begin again.


We are waiting for the end.

Recording additional software
And so, we figured out the operating systems. And quickly, although if we wrote via MultiBoot USB, it would take longer. Now we will integrate all the software there. Open WinSetupFromUSB again. Put a checkmark in the line with Linux, then click on the three dots.


Now we select our program that we will integrate. Let it be NOD32. Click OK.


In the next window, click OK again.


In the main interface, click GO.


The burning process will begin.


We are waiting for a sign like this.

Let's boot from the flash drive and check if the program appears in the list. It should be like this.


And in the download list, after all the actions and completion of the step-by-step plan, we will see this column of names.


That's it, our super flash drive is ready.
Conclusion
Well, here I’ll draw a line under this text... I hope it will be very useful for you, so share it with friends, colleagues and acquaintances on social networks.
Also, subscribe to my blog updates to know about the release of new materials that I prepare especially for you! All the best to you and see you in touch!
This article addresses questions that users of our site asked in the article: Creating a bootable USB flash drive using WinSetupFromUSB. For example, there was a question about how can I write two Windows 7 axes onto one flash drive? or “what if you want to install two axes on a flash drive at once: for example, Windows XP Home and Windows XP Prof, then how can this be done so that this choice of operating systems is also displayed on the netbook when booting?” . We did not answer the questions raised as quickly as some of our visitors would like, but in this article we will offer a solution to the questions raised.
The question is also relevant because the memory capacity of our flash drives is constantly increasing. It makes no sense to create a bootable USB flash drive with one image recorded on it, given that there is still a lot of free space left. (Creating “regular” bootable flash drives was discussed in the following articles: Create a bootable USB flash drive using Novicorp WinToFlash, How to make a bootable USB flash drive? and How to make a bootable USB flash drive with Windows 8 ). Therefore, it would be logical to do this option: write several versions of Windows onto one flash drive and, if necessary, choose what to install.
Let's begin to implement the issues raised. Our task will be to write two operating systems on one flash drive at once - Windows XP and Windows 8 so that after booting from the flash drive, we can choose which one to install. And for this we need a small portable program YUMI. You can download it from these links (version YUMI 2.0.1.5):
After downloading the archive with the program, unpack it and run the file. A window will appear:


Creating a bootable USB flash drive is broken down into a few simple steps. The first step is to specify the flash drive. Of course, the flash drive must be connected to USB. It needs to be formatted, preferably to the NTFS file system.
The program allows you to format it in FAT32, but since this file system does not work with files larger than 4GB, it is better to manually format it in NTFS. If you still won’t write images larger than 4GB, you can try FAT32.
How to format a flash drive in NTFS was discussed in the articles: It says that there is not enough space on the flash drive, although there is space and How to format a flash drive.

So, we have completed the first step, we have specified the flash drive, we move on to the second step - we need to choose what we will write to the flash drive. We recommend choosing the penultimate option .

We've come to the third step - select an ISO image to burn to a flash drive. To do this, click Browse.

We have specified the ISO image, now click , that is, Create.

Click Yes

We see that files are being copied from the image to the flash drive.

All files from the image have been successfully copied to the USB flash drive, click Next.

This is a very important point. The program asks if you want to add another ISO image. If we want to write only one image to a flash drive, then click No. But our task is to write another image to a flash drive, so click Yes.

Here we repeat the previous three steps again. This is what the result should be:

We recorded two images on a flash drive and this is enough for the example. Since we are not copying any more disk images to the flash drive, we click No. You can write as many iso images onto a flash drive as the size of your flash drive allows.

The program reports that everything was recorded perfectly. To finish the job, click .
Now everything is ready. To get started with our flash drive, configure the BIOS to boot from a USB port. After booting from the flash drive, you will see a menu where its items will be the names of the images that you recorded on the media.
This is how a multiboot flash drive is created or, in other words, in this way you can write several operating systems onto a flash drive at once.
Write about how successful your work is with the proposed program or your own methods for creating multiboot flash drives in the comments to the article.
There are now more than a billion computers in the world. Each computer runs on a specific OS, be it a system Linux or system Windows. Many system administrators and advanced users are faced with replacing the OS with a large number of computers. Therefore, each system administrator has at hand several disks and bootable flash drives with different operating systems.
In this material we will try to simplify the life of a system administrator or an experienced user. We will describe the installation process multiple OS images on one bootable USB flash drive. That is, after reading the article you will be able to do bootable USB flash drive with different operating systems.
The first way to create a multiboot drive
For the first method we will need two utilities RMPrepUSB And Easy2Boot. You can find them on their official websites www.rmprepusb.com and www.easy2boot.com. Immediately after downloading, install the utility RMPrepUSB. To do this, run the installer.

Now click the main button Install, after which the program will install and immediately notify you about this in the final installation window.
Close the installer window and paste USB drive. Then launch the utility from a shortcut on the Desktop.
Before creating a bootable USB flash drive, we will need ISO system images for example. Window 7, Windows 10 And Windows XP. You can make them from licensed disks using utilities Alcohol 120% or CloneCD. If the iso images are ready, you can immediately begin directly preparing the multiboot drive. To do this, check all the radio buttons as shown in the figure and specify the path to the archive with Easy2Boot.
Having placed all the switches correctly, feel free to press the button Prepare disk. The process of writing the necessary data to the drive should begin.
Now let’s go to the USB drive in the “_ISO\WINDOWS” folder and write iso images of our systems to the appropriate folders:
- Windows XP in "_ISO\WINDOWS\XP";
- Window 10 in "_ISO\WINDOWS\WIN10";
- Window 7 in "_ISO\WINDOWS\WIN7".
After the images are written to USB drive, you need to do the last operation by pressing the key combination Ctrl + F2. In a couple of minutes, your multiboot drive will be ready. You can check its performance in the built-in emulator RMPrepUSB. To launch it, press the F11 key. After pressing the button, the emulator will start loading with your drive and after a few minutes you will see the bootloader menu.
As you can see from the example, this method of creating a multiboot USB drive may seem a little complicated. But if you follow the instructions, then after just a few tests of this method it will be very simple for you, like any other. In addition, with its help you can make a boot menu with different pictures. For example, like in the picture below.
You can also find ready-made pictures on the website www.rmprepusb.com.
The second way to create a multiboot drive
For this method we need the utility WinSetupFromUSB. You can download it from the official website www.winsetupfromusb.com. The utility is distributed as a self-extracting archive. Therefore, you just need to download it and unpack it to a place convenient for you. If we compare this method with the previous example, this one will be much simpler and especially suitable for beginners. Before creating, also prepare two OS images of Window 7 and Ubuntu 14. Install the formatted flash drive into your computer and run the utility.
Now select the OS ISO images as shown in the image below.

At this point, all the settings for creating a bootable drive are ready and you can press the GO button, after which the recording of a multiboot USB drive will begin.
If you want the created multi-boot USB flash drive to boot into a virtual machine, then before pressing the GO button, check the “ Test in QEMU».
The example shows that any user can handle this application. But in WinSetupFromUSB There are also options for advanced users. To use them, check the box " Advanced options».
If you want to burn another similar operating system onto the media, for example, Windows 7, then do the same operation with the image Windows 7 in the considered example on the same flash drive. After completing these steps when booting from a drive, you will receive two versions of the system Windows 7.
An example of launching a multiboot flash drive in a laptop
For example, we will use the disk we just created using the utility WinSetupFromUSB and laptop Lenovo IdeaPad Z570. In order for our laptop to see the bootable USB flash drive, we need to boot from it. To do this, before booting the laptop, press the F11 key, which will launch the bootable media selection utility.

Select our media and press Enter. This will launch our drive menu.
For example, let's choose to install Ubuntu 14 and press Enter. The installation process will begin Ubuntu 14.
The seven installation process is similar Ubuntu 14.
As you can see, launching the media on a laptop is quite simple and even a novice user can handle it. The process for starting the drive on other laptops and desktop computers may be slightly different. You can find out how to load the boot media selection menu in the manual that came with your laptop or motherboard.
Summarize
In our material, we looked at the most popular utilities for creating multiboot drives. In addition to the two programs RMPrepUSB and WinSetupFromUSB, there are also such utilities as:
- SARDU;
- YUMI;
- XBoot.
Each of these utilities has both pros and cons. These utilities are not as popular as RMPrepUSB and WinSetupFromUSB, so we did not include them in the review. If you have a desire, you can always familiarize yourself with them, since there are a lot of materials on the Internet with reviews of these programs. Another advantage of these utilities is the ability to install images boot antiviruses or program images backup. Therefore, using a multiboot flash drive, you can always scan your hard drive for viruses and make backup copies before installing the OS.
I would also like to note that we have described only part of the functionality. RMPrepUSB And WinSetupFromUSB. Therefore, if you want to gain advanced skills in the functionality of these utilities, we recommend visiting their official websites. Here you will find all the necessary manuals that will help you create a multiboot flash drive that meets your requirements.
We hope that this article has helped resolve any issues that have arisen.
Video on the topic
May 16, 2015 | comments: 1
It is convenient to have a flash drive with you that allows you to install an operating system (Linux or Windows), or run various system utilities and anti-virus scanners. In today's mini lesson, we'll show you how to create such a flash drive.
YUMI(Your Universal Multiboot Integrator), is a tool for creating a multiboot USB Flash Drive containing multiple operating systems, antivirus utilities, disk utilities, diagnostic tools, and much more. from the official website.
For a list of distributions we support, go to the pictures page (the list is constantly being updated).
Working with the utility is quite simple; the first step in the “Step1” menu is to select our flash drive. Next is “Step2”, here we select which distribution needs to be added to the flash drive. Finally, select the image in *.iso format, this is step “Step3” and click “Create”. After completing the process of creating the bootloader and writing the necessary files to the flash drive, you can add the next distribution or close the program.
You can watch the detailed process of how to write several images onto one flash drive in the video clip.
How to check a bootable USB flash drive?
You can check the functionality of the flash drive and menu using the MobaLiveCD program.

A program that can be used to check a bootable CD or USB drive. Launch the program and click the “Launch LiveUSB” button. In the window that appears, select the desired USB Flash Drive and click “OK”. In the next window, click Yes and specify the storage location for the virtual hard disk. After everything, the BIOS emulation window will open and if the flash drive is working, you will see its boot menu.