Imagine the situation: you turn on your computer, speakers, are looking forward to watching a new movie, and suddenly it turns out that after the update, the sound of Windows 10 disappeared. At the very least, this will be upsetting. What if you have important negotiations coming up or watching a live broadcast of the World Cup semi-final? Almost a disaster. We'll tell you what you can do if you experience sound problems after updating Windows 10.
The easiest
First, check the functionality of your speakers and headphones. You can try to adapt external devices to another PC or gadget. Inspect all wires to make sure the plugs fit tightly into the ports.
If the equipment is working properly, use the system service. Hover your mouse over the tray icon and right-click.
Wait for the diagnostics to complete and read the recommendations.

Follow the steps suggested to you to solve the problem when the volume is lost. In our case, let's try to turn off all sound effects. This can help when the sound becomes quiet after updating Windows 10. What to do if - follow the link and read detailed instructions on how to solve this problem.

Verify that the correct devices are listed as active.
Go to the “Sounds” section by right-clicking on the mixer icon.

On the tab "Playback" select the required equipment.

Reinstalling drivers
If there are no apparent reasons, but after updating Windows 10 the sound does not work, we look for problems in the drivers. They will be found in device manager(right-click on the main button).

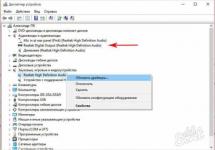
In the audio equipment section you should see the normal name of the equipment.

If you only see the device type and signature "Device supporting High Definition Audio", this is an indicator that during the update the system was unable to determine the model and manufacturer, and universal drivers were installed that do not work with your devices. And as a result, the audio disappeared.

You need to download the correct “firewood”. Look for them in a search engine. Enter the name of the laptop or motherboard and the word “support”.

Follow the link and act according to the requirements of the site. For Lenovo, for example, you need to specify the serial number or full model. After which a list of software will be provided. Look for the right one. If you do not yet have Windows 10 OS installed, we advise you to enable it.
Attention! The drivers will not necessarily be written specifically for Windows 10. If they are not there, don’t worry, download the latest version. Check if the bit depth matches: 32 or 64.
Download and install. Check if nothing has changed and the audio signal has disappeared, you should run the installation in compatibility mode for the system for which the drivers were written.
- Open the folder with the executable file and open the properties window.
 2. On the panel "Compatibility" Click the checkbox and select the appropriate OS version.
 3. Apply the changes and run the file again.
If everything remains unchanged and the situation where there is no sound after updating Windows 10 (unexpectedly disappeared) remains, do the following:
- Go to task manager.
- Remove from sections "Audio Inputs and Outputs" and "Sound, Game and Video Devices" all devices marked as unidentified.
 3. Run the legacy-compatible installation again.
This method of solving the problem of no sound after updating drivers on Windows 10 especially often helps with Realtek devices.
Reducing the volume level
When, after updating Windows 10, the sound became quieter or the volume gradually disappeared by itself, in the properties window, go to the Communication panel.

Click "No action required".
An inscription appeared on the screen, you will learn what to do and how to remove the inscription forever in another article on the site.
And the last reason why, after updating, Windows 10 does not work well or the sound has disappeared completely is disabling the “Windows Audio” service.
- Press WIN+R and enter services.msc .
 2. The Microsoft Services window will appear. Scroll to the line you want and make sure everything is included.

We hope this information helps you!
Hello friends. If after installation there are problems with the sound on the computer, that is, it completely disappears or it is only absent in headphones or does not play in games, then the reason lies in the fact that the sound drivers were not installed. It’s difficult to say why this happens, I didn’t have any problems with this, only with , but the drivers for the video card did not install. Now let's see what can be done about this and how to correct the situation.
No sound in Windows 10. What to do
Before we get into the thick of things, let's take a look Windows 10 sound settings, maybe you just need to increase the volume of the speakers. And even if 5.1 sound is not transmitted via HDMI. First, right-click on the speaker icon in the tray (bottom right) and select: Detect sound problems.  If the troubleshooting module has identified the cause, it will write what the problem is. But most likely the audio service is not running or the drivers for the sound card are not installed. Then it will be clear in which direction to move. If nothing was found, then open Playback devices. Double-click on Speakers.

We need the Levels tab. We check that all sliders are at the proper level.

By the way, Realtek High Definition Audio in Windows 10 is installed automatically with all updates. Let's go to Start - Settings - Update and Security and looking for updates. If it finds something, it will be clear what it is. You may need to restart your computer, during which all necessary updates will be installed, along with the drivers.

Windows 10 sound drivers
If all else fails and the sound still does not work on the computer, then let's check if the audio drivers are installed. It doesn’t matter which one is in the case, Asus or some other, if you think that they need to be downloaded, then no, we will use the automatic search for drivers.
They are not on the official website, and from others it is extremely unsafe to download them.
Next to Start there is a search button, click on it and write: Device Manager. Let's choose it. We are interested Sound, gaming and video devices. Expand the list and if there is nothing there, right-click and select: Update hardware configuration. If there is something, then click update drivers. We do the same where: Audio inputs and audio outputs.  After the manipulations have been done, everything should work as normal and without failures. Those of you who updated Windows 8.1 or 7 to version 10 and lost sound, write in the comments whether my instructions helped you or not. If yes, then feel free to share this post on social networks. Here
Many users who upgraded to Windows 10 or after a clean installation of the OS encountered a variety of problems with the sound in the system - some simply lost sound on their laptop or computer, others - the sound through the headphone output on the front panel of the PC stopped working. Another common situation is that the sound itself becomes quieter over time.
This step-by-step instruction describes possible ways to fix the most common problems when audio playback does not work correctly or the sound simply disappears in Windows 10 after updating or installing, or simply during operation for no apparent reason. See also: , .
The most common variant of the problem is that the sound on the computer or laptop simply disappears. In this case, as a rule (let's look at this option first), the speaker icon on the taskbar is fine, the Windows 10 Device Manager for the sound card says “The device is working normally,” and the driver does not need to be updated.
True, at the same time, usually (but not always) in this case the sound card in the device manager is called “Device with High Definition Audio support” (and this is a sure sign that there are no drivers installed for it). This usually happens for Conexant SmartAudio HD, Realtek, VIA HD Audio sound chips, Sony and Asus laptops.

Installing sound drivers in Windows 10
What to do in this situation to fix the problem? The method that almost always works consists of the following simple steps:
- Enter in a search engine Your_laptop_model support, or Your_motherboard_model support. If you encounter problems discussed in this manual, I do not recommend starting to search for drivers, for example, on the Realtek website; first of all, look at the website of the manufacturer, not of the chip, but of the entire device.
- In the support section, find audio drivers to download. If they are for Windows 7 or 8, and not for Windows 10, this is normal. The main thing is that the bit depth does not differ (x64 or x86 must correspond to the bit capacity of the system currently installed, see)
- Install these drivers.
It would seem simple, but many write that they have already done this, but nothing happens or changes. Typically, this happens because even though the driver installer walks you through all the steps, the driver is not actually installed on the device (easy to check by looking at the driver properties in Device Manager). Moreover, installers from some manufacturers do not report the error.
There are the following ways to solve this problem:

Even if you couldn’t find official drivers, still try the option of removing the sound card in Device Manager and then updating the hardware configuration (point 2 above).
Sound or microphone stopped working on Asus laptop (may work for others)
I would like to separately note the solution for Asus laptops with a Via Audio sound chip; it is on them that problems most often arise with playback, as well as connecting a microphone in Windows 10. Solution:
- Go to Device Manager (right-click on Start), open “Audio inputs and outputs”
- By right-clicking on each item in the section, delete it; if there is a suggestion to delete the driver, do that too.
- Go to the “Sound, game and video devices” section, remove them in the same way (except for HDMI devices).
- Download the Via Audio driver from Asus from the official website for your model, for Windows 8.1 or 7.
- Run the driver installer in compatibility mode for Windows 8.1 or 7, preferably as Administrator.
I will note why I am pointing to an older version of the driver: it has been noted that in most cases VIA 6.0.11.200 turns out to be workable, and not newer drivers.
Playback devices and their additional parameters
Some novice users forget to check the audio playback device settings in Windows 10, which is better to do. How exactly:

After completing the specified settings, check if the sound is working.
The sound becomes quiet, wheezing, or the volume automatically decreases
If, despite the fact that the sound is played, there are some problems with it: it wheezes, is too quiet (and the volume can change itself), try the following solutions to the problem.

Apply the settings you made and check if the problem is resolved. If not, there is another option: try using the device manager to select your sound card - properties - update the driver and install not the “native” sound card driver (show a list of installed drivers), but one of the compatible ones that Windows 10 itself can offer. In this situation, it sometimes happens that the problem does not appear on “non-native” drivers.
Additionally: check if the Windows Audio service is enabled (press Win+R, type services.msc and find the service, make sure the service is running and its startup type is set to Automatic.
Finally
If none of the above helped, I also recommend trying to use some popular driver-pack, and first check whether the devices themselves are working - headphones, speakers, microphone: it also happens that the problem with sound is not in Windows 10, but in themselves.
At times, when upgrading to Windows 10 or installing it clean, users encounter problems with the sound system. It malfunctions or stops working completely. It happens that the sound disappears completely, sometimes its volume becomes quieter gradually. In some cases, the headphone output on the front of the computer stops functioning normally. The reason that the sound disappeared after installing Windows 10 may be a combination of several factors. This article is a continuation of how to get rid of it and eliminate the consequences of the failure.
The least effective way is to use the system service for troubleshooting OS audio playback. However, he should also pay attention. To do this, you need to find the speaker shortcut, right-click to open the menu and select “Detect sound problems.” There are no guarantees that it will work, but in this way the most obvious system malfunctions, which involve wear and tear of computer components and their replacement, are eliminated.
The second standard method is to use the device manager. When a malfunction occurs during the next OS update, the user's sound card is selected by right-clicking on the Start menu. Next, right-click to open the menu, find the “Driver” tab and click “Roll Back”. Disabling automatic IT product updates for your sound card can also prevent problems with it in the future.
Negative impact of installing and updating the OS on sound
The cause of the audio playback malfunction is not immediately apparent. Often, when the sound disappears, the speaker shortcut on the taskbar reacts late. It continues to show that everything is normal, the "Device Manager" message remains "The device is working normally", and no OS update is required.
The only hint for an experienced user is the designation of the sound card as “Device supporting High Definition Audio.” This name is a reliable indicator of the lack of necessary IT products. More often, sound chips in Asus and Sony laptops are susceptible to malfunctions. These include Realtek, Conexant SmartAudio HD and VIA HD.

Installing a sound driver in a new OS
There are several effective ways to troubleshoot the problem. The most effective includes the following:
- In the “Search” enter the Model_of_your_laptop_support or Model_of_your_motherboard_support. It is better not to look for an IT product on the resource of the chip manufacturer, in particular, Realtek. It is recommended to visit the online platform of the manufacturer of the entire device.
- The user support section contains the necessary software for download. IT products for Windows 7 and 8 are compatible with the latest version of the OS. A prerequisite is that the bit depth (x64 or x86) of the driver matches the currently installed system. Information on how to identify them is publicly available.
- Next, the drivers are installed.
At first glance, it is simple, but in practice some difficulties arise. Some users report that after completing the procedure, nothing has changed. The reason is that at times the software does not actually load. In this case, the system does not signal a failure. It guides the user through all the steps and completes the procedure, but after looking at the driver properties in Device Manager, the corresponding changes cannot be found.
The described incident is resolved as follows:
The installer runs in compatibility mode with an earlier version of the OS. This measure is the most effective. In particular, Conexant SmartAudio and Via HD are loaded onto a laptop in this way. In this case, this method is applicable, but does not guarantee success.
In more difficult situations, it helps to first remove the sound card (“Sound and game video devices”), as well as components and other software from the “Audio inputs and audio outputs” tab. In Device Manager, right-click the element to select and delete it. Continuing, the installer runs in compatibility mode. When the driver still does not install, in Device Manager, select Action and Update Hardware Configuration. In Realtek, this method works relatively more often.

If you end up installing the previous driver, you should right-click on the sound card, and then click “Update driver” and “Search for drivers on this computer.” Then you need to check whether a new software product compatible with the system has appeared in the list.

If the official IT component was not found, the above algorithm of removing the sound card in the device manager and updating the hardware configuration is still worth applying.
Troubleshooting audio or microphone problems
The method described below is suitable for many laptops, but is especially popular among Asus owners. The reason is that the Via Audio sound chip more often has problems with playback in Windows 10, and with the use of a microphone.
The following measures must be taken:
- “Audio inputs and audio outputs” opens. To do this, right-click “Start” and click “Device Manager”.
- Each item in the section that opens is deleted, including the driver, when a corresponding proposal is received from the system.
- Next, you need to go to the “Sound and game video devices” section and clean it in the same way (HDMI components must be left).
- Then the Via Audio driver from Asus is loaded. It can be found on the official resource. The choice is great, since each laptop model offers a corresponding software product, separately for Windows 7 and 8.1.
- Next, the driver installer is launched in compatibility mode for the selected OS. This action is performed as an administrator.
It is worth noting that the choice of the previous driver version is not accidental, since VIA 6.0.11.200 is often more efficient than its modern analogues.
Key parameters of playback devices
Most novice users do not attach due importance to the need to thoroughly check the system. Particular attention should be paid to the additional parameters of audio playback devices in the new OS. This is done as follows:
Right-click to select the speaker shortcut located at the very bottom of the notification area. Click "Playback Devices".

You should then ensure that the correct hardware is installed by default. If not, select what you need and click “Use as default.”

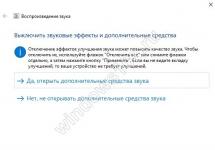
If headphones and speakers are installed by default, as expected, you need to right-click them, click “Properties” and go to the “Advanced Features” or “Enhancements” section. It notes "Disable all sound effects."

After completing the described procedure, you need to make sure that the sound is working.
Troubleshooting
It happens that the recording is played back, but very quietly, and the volume is randomly reduced. At the same time, the user does not influence the dynamics of these changes in any way. The sound may begin to crackle and the volume may vary uncontrollably.
For this problem, the following action algorithms:

The "Additional Features" or "Enhancements" checkbox says "Disable all sound effects." Next, you need to apply the settings and then return to the list of playback devices.

After this, the “Communication” tab opens and “No action required” is set. The option to reduce the volume or mute the sound should be removed.

- Through the “Device Manager”, select the sound card, then “Properties” and “Update driver”,
- A “non-native” IT product is selected from the list of installed drivers. A prerequisite is compatibility with the OS. The system itself can provide one of them.
It is rare, but it happens that a “non-native” IT product is able to eliminate a malfunction that no longer appears.
In circumstances where the above examples of solving the problem of sound reproduction did not help, it is worth trying one of the currently popular IT products - a driver pack.
Another aspect of the issue is the condition of the microphone, headphones and speakers. It is necessary to check their performance, since they may simply be faulty. Sometimes the problem is not with the Windows 10 operating system, but with them. If a malfunction is detected, you should transfer them to one of the appropriate service centers, which are now in abundance both in megacities and in small towns.
Windows users often encounter a problem: suddenly the sound on the computer disappears completely or distorted sound appears that hurts the ear. How to return everything to its place as soon as possible? What causes such problems on a PC?
What to do if there is no sound on Windows 10
There are many reasons for sudden loss of sound. Before performing the steps described below, you must first make sure that your speakers or headphones are working properly: if possible, connect them to another gadget, for example, a smartphone. If everything works, proceed to follow the instructions.
Adjusting the sound volume
The user may not hear the sounds of the system due to the fact that the operating system is currently set to the minimum volume level. The sound can also be turned off. This problem has a very simple solution:
- Pay attention to the lower right corner of the display. Among the icons in this area, find the icon in the form of a loudspeaker. Its name is “Speakers”. Click on it with the left mouse button. Click on the loudspeaker icon located next to the clock and date in the lower right corner of the screen
- If there is a cross next to the icon, it means that the sound was accidentally turned off. Enable it in the panel that appears.
- To do this, press the slider with the left key and hold your finger on it. Move the slider to the right to the desired volume level, but we recommend doing the maximum and checking the sound right away. If there is no cross, try first lowering the volume by moving the slider to the left, and then increasing it again.
 Move the slider to the right to increase the volume
 - If the sound is barely audible, right-click on the same “Speakers” icon. In the list, click on the first item “Open volume mixer”.
 In the context menu, click on “Open volume mixer”
 - Check the volume level for individual utilities that are currently open on your PC. The browser volume can, for example, be much lower than the system sounds. Set it to maximum and make sure that the sound now works as before.
 Increase the volume for each type of sound
Running the troubleshooter
Perhaps there was some kind of isolated failure in the system - which is why the sound disappeared. In this case, simply restarting the device through the Start menu can help. If it doesn't give any results, run the special Windows tool to fix audio problems:
- Right-click on your speakers icon again. This time, opt for the last option, “Troubleshoot audio problems.”
- The system will immediately begin to look for existing problems. Wait a bit.
 Wait until the system detects sound problems on your PC
 - The tool may find some problems. The message will include specific recommendations to resolve the problem. They can be different (depending on the cause of the problem). Follow the recommendations. For example, the tool might tell you to simply turn up the volume. Use the instructions described in the previous section of this article.
 Troubleshooter asks to increase audio volume in mixer
 - Click on "Next". The tool will continue to look for problems.
 The tool can detect other problems that are related to the lack of sound
 - The tool can also detect a problem with the audio driver. In this case, you will be prompted to reinstall it. Click on “Play test sounds”.
 Click "Play test sounds"
 - The system will try to play sounds. Depending on their quality, select a rating in the next window. If it was difficult to hear or there was no sound at all, the system will reinstall the driver. After that, restart your PC and check the sound. If the sound was good, the OS will continue to use the current driver.
 Rate the sound the system just played
 - After checking and performing troubleshooting steps, the tool will provide you with a short progress report.
 Check out the tool's progress report: it will contain information about detected problems and their solutions
Absence or irrelevance of the driver
A common reason for no sound is an out-of-date audio driver. In this situation, it is necessary to update it to return the sound. This can be done in a standard Windows window called “Device Manager”, through special update utilities, for example, DriverPack Solution, DriverBooster, SlimDrivers and others (download them only from official sources). It is also possible to download audio drivers from the official resource of your PC manufacturer. Let's look at installing new drivers using the example of a laptop from Asus:
- In any browser we will open the official Asus company page. In the upper right corner, click on the magnifying glass icon and begin entering the model name in the line. Our device is called X555UB. Click on the desired model in the search results.
 Enter the name of your PC model in the search bar
 - Switch to the third tab “Support”.
 Switch to the "Support" tab in the upper right corner
 - Now we need the first section “Drivers and Utilities”. We left-click on it.
 Go to the “Drivers and Utilities” section to open the list of available “firewood”
 - In the drop-down menu, select your OS version. In most cases this is a “ten”. Don't forget about the bit depth - it also needs to be taken into account.
 Select your operating system from the drop-down menu
 - We are looking for Audio in the list. The driver will be located almost at the very beginning of the list. Click on the corresponding blue “Download” button and wait for the download to complete - it will take some time depending on the speed of your Internet.
 In the list of available drivers, find Audio
 - Launch the downloaded archive with the audio driver suitable for your model. We find in it a file called Setup.exe - an installation document.
 In the downloaded archive, find and run the Setup.exe file
 - Click “Yes” to launch the installer and allow it to make changes to the device.
 Click on "Yes" to allow the driver installer to make changes to your PC
 - Click “Next” on the initial screen of the audio driver installer.
 In the initial installer window, click “Next” to proceed to the next instructions
 - Click on “Next” again to begin removing the previous driver.
 First, the installer will remove the old driver, and after restarting the system, install the new one
 - We are waiting for the uninstallation procedure of the old driver to complete.
 The installer will take some time to remove the old audio driver
 - After this, we immediately reboot the system through the appropriate item in the installer window.
 Check the box next to “Yes, restart your computer now” and click on “Finish”
 - After restarting the PC, the new driver will be installed automatically.
Video: how to update the audio driver for a Realtek sound card
Rolling back or uninstalling sound drivers
If you have problems with sound after any updates to the system, in particular, an audio driver update, the driver may have been installed incorrectly or it turned out that it does not suit your equipment for sound playback. In this case, it is recommended to roll back the sound “firewood”:
- First, call up the necessary window - “Device Manager”. In the tenth version of Windows, this is easiest to do: right-click on the “Start” icon and select the appropriate item from the list.
 From the Start button context menu, select Device Manager
 - If the Start context menu does not appear, use the Search panel (the magnifying glass icon on the Taskbar). Start typing a query corresponding to the name of the window - the system will immediately begin to select options for you. Click on the desired result.
 You can open Device Manager through the Windows Search panel.
 - In the list of hardware parts we find the item “Sound, gaming and video devices”. Open it by double-clicking with the left mouse button.
 In Device Manager, expand Sound, Game, and Video Devices.
 - Right-click on Realtek High Definition Audio or another that matches your audio equipment, for example, Conexant SmartAudio HD. In the gray menu, click on “Properties”.
 Open driver properties using the context menu
 - In the second section “Driver”, click on the “Roll Back” button if it is clickable. If not, then this option is not currently available to you.
 If the “Roll Back” button is not clickable, it means that you will not be able to return the previous version of the driver
 - The system will roll back the driver to the previous version. After that we check the sound. If it does not appear, remove the device through the same context menu, which is called by right-clicking.
- Now, on the top panel, click on “Action”, and then select “Update hardware configuration” - the driver will appear in the list again. We check the presence and quality of sound again.
 Click on “Update hardware configuration”
Viral activity
Problems with system components can be caused by malware that has previously settled on the device despite the presence of antivirus utilities. There may be problems not only with sound - there will be a general “slowdown” of the OS.
To rule out this explanation or, conversely, to make sure that the problem is a virus, conduct a full scan. You can use either a third-party antivirus or the built-in standard one - Windows Defender. Let's look at checking and treatment using his example:
- Launching Defender is very simple: it always runs in the background, so its icon is in the Windows tray. Open it and find an icon in the form of a white shield.
 Find the white shield icon in the Windows tray and left-click on it once
 - In Protection Center, open the “Virus and Threat Protection” section.
 Click the Virus & Threat Protection tile
 - On the next page you can start a quick check, but unfortunately it may not give any results. It is still recommended to use a full scan, so click on the “Run a new extended scan” link.
 Give preference to advanced scanning, which will definitely help neutralize the virus
 - Now choose one of three types. The custom scan will search for viruses in specific directories that you specify yourself. Windows Defender Offline will scan for approximately 15 minutes, but the system will have to restart. This option is suitable for removing threats that are best at camouflage. The first item - “Full scan” - will take a lot of time, but at the same time you can continue to work on your PC without worry. After selecting, click on the “Scan now” button.
 Select "Full Scan" if you are not concerned about the time the scan will take and if you want to work on your PC during this time
 - We are waiting for the virus scanning process to complete. The system will present you with a report: if malicious files are found, you will be given the right to choose the action that will be performed with this file. Select deletion. After that, restart the device and check if the sound works. If necessary, update the PC configuration (removing and restoring the driver) using the instructions in the previous section of this article.
 Wait for the system virus scan to complete
Enabling or restarting a service
The system service that is responsible for sound operation may be deactivated for some reason. If it is disabled, the sound, of course, will not work. You can activate it in a special window:
- We call it on the display through the “Run” window: immediately click on the two buttons Win and R, and in the field we paste or type the code services.msc ourselves.
 Write the command services.msc in the “Open” line
 - Another way is the “Search” panel. Click on the magnifying glass on the “Taskbar” (usually it is located next to the “Start” button). We write the request in Russian - “Services”. Click on a section in the search results.
 Enter “Services” into the search bar
 - On the right side of the window, look for the Windows Audio item. If this service is disabled, there will be a “Run” link in the middle part of the window. Click on it - it will start working in a few seconds.
 Using the "Run" link you can activate the Windows Audio service
 - After that, double-click on Windows Audio to open another window. If this click does not work, right-click and click on “Properties”.
 Click on "Properties" in the Windows Audio context menu
 - In the new window, we need a “Launch Type” drop-down menu. In it we select “Automatic” so that the service starts working immediately when Windows boots. Checking the sound.
 For the “Startup type” parameter, set the value to “Automatic”
 - After that, also make sure that three more audio-related services are running on your PC: Media Class Scheduler, Windows Audio Endpoint Builder, and Remote Procedure Call. For all of them you need to set the value “Automatic” for the “Startup type” parameter.
Video: How to start the Windows Audio service
Wrong speaker format
The sound may disappear if you install the wrong speaker format. Switching it will help correct the situation:
- There are also two ways to open the desired window. Call the “Run” panel again (via the Win + R combination): write or paste the request mmsys.cpl into it, and then execute it using the OK button.
 In the “Open” line, write the code mmsys.cpl and click on OK
 - The second method is as follows: right-click and in the list on a dark background, click on “Sounds”.
- In the Sound window, we need the first tab. Right-click on “Speakers” and immediately select “Properties” from the menu. Another way is to double-click on the “Speakers” item or a special button under the panel on the right.
 In the context menu of the “Speakers” item, select “Properties”
 - In the next window with speaker properties, go to the penultimate section “Advanced”. In it, in the drop-down menu, select the format suitable for your speakers (if it was 24 bits, check one of the items with 16 bits). The “Check” button will help you decide on the formats.
 Choose the sound format that suits your speakers or headphones
 - Also uncheck all the boxes in the “Exclusive Sound” section.
 Disable all options under Exclusive Mode
 - Once configured, apply the changes using the button in the lower right corner and click on OK.
Deactivating sound effects
Your audio output device may not work when sound effects are enabled in your speaker settings. To disable them, do the following:

System recovery or reinstallation
If none of the above methods solved your problem, try restoring your system. First, let's look at how to use a restore point, if you have one on your PC:
- To start recovery using a point, we need the System Properties window. There are several ways to open it. The fastest way is through the Run panel. Hold Win and R, paste the systempropertiesprotection code and press Enter.
 Paste the systempropertiesprotection command into the field and click OK
 - If it doesn’t work, open the “Control Panel” through the “Start” menu and find the “Recovery” section there.
- You can also use Windows Search. Use one word “Recovery” as a query.
 In the search bar, type the query “Recovery”
 - Now click on the “Restore” button.
 In the “System Properties” window, click on the “Restore” button
 - On the tool's initial screen, select either the most recent point (recommended value) or check the box next to the second point to choose a state from the list yourself.
 Select the last restore point or check the box next to the second item
 - In the latter case, select a state in the list that appears and click “Next”.
 Select the required restore point from the list
 - Before doing this, you can also familiarize yourself with the list of components that will be restored.
 The tool can show which programs and drivers will be affected by the rollback
 - Now click on “Finish” so that the tool starts restoring the operating system to the previous version - the state when sound was present on the PC.
 Confirm the restore point by clicking “Finish”
 - Confirm your intention to restore by clicking on the “Yes” button. The preparation process for the procedure will begin immediately. After this, the PC will immediately reboot - you will not be able to work on it. All that remains is to wait for the procedure to complete. After that, check the sound.
If you previously made a backup copy of your operating system, you can restore it using it:
- Restart your device. When it starts to turn on again, hold down the key called F8. On the blue screen, click on the “Recovery” button.
- Select your keyboard layout.
 Select your keyboard layout option
 - In the next window, click on “Diagnostics”, and then on the “Advanced options” section.
 In the “Diagnostics” section, open the “Advanced parameters” block
 - Now select the System Image Restore tile.
 In "Advanced Options" select "System Image Restore"
 - The OS will perform the preparatory stage. Wait for it to complete.
 Wait for preparations to restore the system from the image to complete
 - Select your account from the list if there are several. If necessary, enter the password for it.
 Select your “account” and enter its password, if you have one
 - You will see a step-by-step wizard for restoring Windows from a system image on the screen. The tool will default to the last image created. If you want to install another file, manually specify the path to it. Click “Next”.
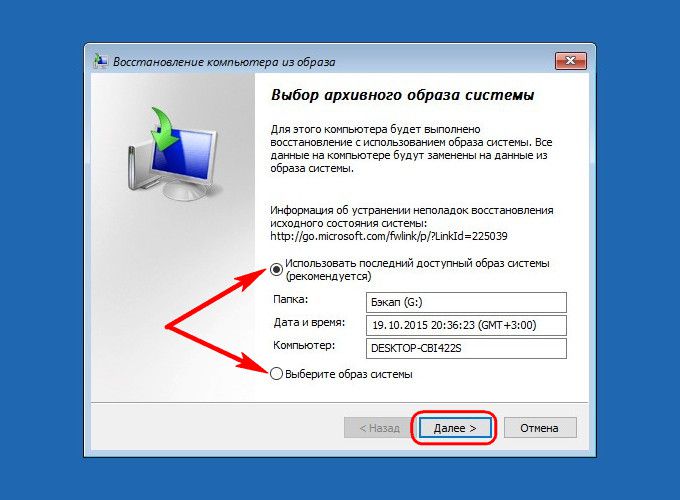 Select the latest image or specify the path to the image stored on your disk yourself
 - Click “Next” again in the next window.
 Click “Next” to proceed to starting the recovery
 - The tool will tell you the date and time the image was created from which the system will be restored. Click on “Done”.
 Click on the “Yes” button and wait for the tool to finish restoring
 - Click on “Restart now” so that your PC will restart and all changes will take effect.
 Click on "Restart Now" to restart your device
If you don't have a restore point or backup, your only option may be to reinstall the operating system. If you are a beginner, it is not recommended to do it yourself - contact specialists at a computer service center.
What to do if the sound on Windows 10 wheezes or automatically changes volume
There may be sound on the computer, but its quality may not please the user: wheezing, interruptions, and random changes in volume can be heard. What to do in these cases? You can use some of the solutions from the previous sections of this article, such as disabling sound effects, updating drivers, and restoring the system using a point or backup. The first two will be effective for constantly changing volume. Recovery will be a universal method for most problems.
Solving the problem using the Command Line
If the sound on your computer is wheezing, follow these steps:

Settings in the “Communication” tab
In the “ten”, by default, a function is activated to reduce the volume of sounds played on the PC when using the device as a phone, that is, for conversations. In some cases, the option may not work correctly. As a result, the sounds on your device are muffled even when you are not using it as a mobile device. In this case, you can do the following:
- Through the “Run” window (Win + R combination) and the mmsys.cpl command, open the “Sound” panel on the display. You can also open it through the “Control Panel”.
 Open the Communications tab in the Sound window
 - Set the last value to “No action required” and click “Apply”. Check the sound.
 Set the value to “No action required” and click on “Apply”
Flash Player Update for Browser
If you are listening to music or watching videos through your browser and the sound is constantly interrupted, it may be an outdated Flash Player. Despite the fact that this technology is now being replaced by HTML5, there are still sites that run on the Flash Player component. We'll tell you how to update it in the instructions:
- In the browser in which you listen to the audio recording, open the official Adobe Flash Player resource. Select your OS type in the first drop-down menu - Windows 10/Windows 8.
- In the second step, choose one of the player types depending on your browser. Before downloading, make sure that in the middle part of the page you do not have a checkmark for installing additional software, in particular McAfee antivirus. Click on "Download".
 Select your OS and browser type and click on “Download”
 - Now wait a while while the browser downloads the installation file.
 Open the downloaded file through the "Downloads" panel
 - In the installer window, check the box next to “Allow Adobe to install updates” or, as a last resort, select the second option with notifications about the need for an update. Click on "Next".
 Select the first or second value and click “Next”
 - Wait again for the download and installation process to complete.
 Wait for Adobe Flash Player to install on your PC
 - Click “Finish” to close the installer window.
 Click “Finish” to close the installer window
 - In the browser that is installed on your system as the default browser, a thank you page will open for downloading and installing the component. Check whether the sound on your PC works well.
 A page with thanks from the developers for installing Adobe Flash Player will open in the browser.
 - If this does not help, update the browser itself, if the sound is played poorly only in it. This can be done through the “About the Browser” section, which can be found in the program menu itself.
 Find the “About Browser” section in your browser menu.
 - The utility itself will begin searching for available updates and download them if necessary. Wait for the procedure to complete - it will take a minimum of time. If there are no updates online, the browser will report that the current version of the program is currently being used.
 In the “About the Browser” section, the program itself will begin searching for updates and, if available, install them on its own.
Video: How to update Flash Player
Heavy load on the processor or other hardware components
If your audio is stuttering on your PC, it may be due to excessive load on your hardware resources. The processor may not have time to process all the tasks assigned to it. In this situation, you need to reduce the load by disabling unnecessary programs and processes:

If you suddenly lose sound on your PC, the first thing you need to do is make sure that the volume is at maximum and then run the troubleshooter. Check if the appropriate audio service is enabled on your device. Update your audio drivers or rollback them if problems arise after updating them. Setting the speakers to a different format and turning off all sound effects may also help. Check your PC for viruses and if there is no result, restore the system using a restore point or OS backup. If the sound quality deteriorates, run special codes in the “Command Line” and update the programs for sound playback.