Let's figure it out, is installing Kali Linux on the Windows 10 operating system worth our time?
Quite a long time has passed since the ability to install . The prerequisite for this was the Linux kernel, which was discovered in Windows 10 with the first updates. I would like to say right away that after installation you will not get a full-fledged Kali Linux with the Gnome environment or any other. It will become possible to work with the terminal and all possibilities will be open. For some users, this will be quite enough, because if you know the terminal commands, you can do almost everything, even open a browser or play.
If you want to learn terminal commands, go to where we left a good book for you.
Let's answer the question, why install Kali Linux on Windows 10, if you can put them side by side and get two full-fledged operating systems.
- Saving hard drive space – it’s not always possible to install two operating systems on one PC, especially if you only have 500GB or 1TB. Programs on Windows sometimes take up 50 and 100GB of memory. Personally, I have several of these and installing Kali Linux on the Windows 10 operating system doesn’t seem like such a bad idea anymore.
- Convenience – despite the fact that we don’t receive Xs, at the start, it will still be possible to install them. However, to run scripts, various environmental software in the terminal is quite enough, since in Kali Linux you almost always work with the terminal. And for the browser and other things, you can easily use Windows 10.
- Speed of work - you do not need to reboot every time from one OS to another; work productivity with shared operating systems increases and this is logical.
- Learning – No matter how it sounds, you can learn a lot. If you haven’t used Kali Linux yet, then it doesn’t make sense to immediately install it as your main OS, as this will only scare you away and you’ll switch back to Windows. This applies to all Linux systems, not just the one being reviewed. You can also easily learn terminal commands while remaining in your familiar environment.
These are 4 advantages that indicate that it is still possible, and maybe even necessary, to install Kali Linux on the Windows 10 operating system.
Installing Kali Linux on Windows 10 operating system
Installing Kali Linux on the Windows 10 operating system is as simple as possible for the user. Much easier than installing a full-fledged OS on a PC and setting it up, I would say so.
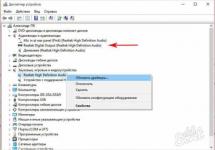
The first step is to enable the Linux subsystem for Windows in “Programs and Features” -> Turn features on or off. Find the Windows Subsystem for Linux box and check the box next to it.
As you can see, installing Kali Linux on the Windows 10 operating system is very simple and fast, which is also a definite plus for the user.
After installation, you need to run standard commands that will update the distribution and that’s it, welcome to Kali Linux.
Sudo apt-get update sudo apt-get upgrade
I would also like to say right away that there is no point in doing a separate article, it will be too short. Very often in Kali Linux the error “the following signatures were invalid” occurs. To fix it, run the following command in the terminal:
Wget -q -O - https://archive.kali.org/archive-key.asc | apt-key add
Today we talked about how to install Kali Linux on the Windows operating system, whether it’s worth doing, and we solved a popular problem. Subscribe to site updates, as well as
Good news for those involved in penetration testing, and possibly hackers, because Kali Linux is now available in the Windows Store.
Previously, such systems as: , SUSE, and Arch Linux have already been added. And now Kali is joining them.
Over the past few weeks, the developers have been working with the Microsoft WSL team to add Kali Linux to the Microsoft App Store as an official WSL distribution, and finally today, the availability of the Windows "Kali Linux" application was announced. For Windows 10 users, this means you can simply enable WSL, search for Kali in the Windows store, and install it with one click. This is especially exciting news for security and penetration testing professionals who have limited tools due to corporate compliance standards.
While Kali on Windows does have a few downsides to running it (such as the lack of raw-socket support), it does lead to some very interesting features, and you'll have access to an extended set of security tools, and a complete set of command line tools that are present in Kali.
How to Install Kali Linux on WSL
A brief description of the installation process will be provided here.
1. You must update your Windows 10 to the latest version. Next, open PowerShell and install the subsystem using the command below. Once completed, a reboot will be required.
Enable-WindowsOptionalFeature -Online -FeatureName Microsoft-Windows-Subsystem-Linux
2. After rebooting, open the Windows Store and search for the “Kali Linux” application. Install the application and enjoy Kali!
In this video, you will see how to do this
How to update Kali Linux in WSL
Updating Kali Linux in WSL is no different from any other Kali instance
You should just enter the commands
Apt-get update apt-get dist-upgrade
Installing Penetration Testing Tools in Kali
Installing tools from the Kali Linux repository is usually done using apt commands. For example, to install Metasploit Framework you just need to enter the commands
Apt-get update apt-get install metasploit-framework
Note. Some Kali tools are identified as malware by antivirus software. One way to deal with this situation is to allow antivirus exceptions in the directory where the Kali chroot is located. The following video shows how to do this
Recovering Kali WSL
Sometimes you may unintentionally kill your Kali WSL instance due to an incorrect command, an unintentional action, or even Kali or WSL bugs. If this happens, you can restore the system to default. Note: This process will destroy your Kali WSL chroot and re-fetch a new copy. Any changes made to the file system will disappear and be reset to default.
Conclusion
The availability of the Kali Linux platform and toolset on Windows 10 brings with it many exciting features. Although it is not officially supported by WSL, the developers have tested running the XFCE desktop environment and it seems to work well
How to install Kali Linux on a laptop?
Hello everyone, in this article from Computer76 I will show with my example how to install Kali Linux on a laptop. Installing the Linux operating system implies, I think, first of all, the fact that Windows is preinstalled in the laptop. Our task is to install Kali Linux on a laptop as a second system so that both OSes do not interfere with each other.
A few nuances. But they exist. What do you need to know to install Kali Linux on a laptop?
There won't be many difficulties. The installer of Kali, downloaded from the official website, knows Russian perfectly, and writes correctly and logically. Our task is to carefully read the manager’s advice. Installing Kali Linux on a laptop will not be more difficult than Windows.
So, I have a laptop with pre-installed Windows XP, Windows 7 and Windows 10 operating systems (you don't need to have that much). I'll put Kali Linux on the fourth one.
The first thing you need to do is prepare a place for Kali Linux. To do this, use a free program for working with AOMEI sections (or from offsite). Immediate advice from the bottom of my heart: a single-core Kali processor will not cope, and if there are 2 or more “stones” on board, then there are no options - download ONLY 64 bit version of Kali Linux. You will still remember this advice...
Read: 373
Nowadays, many modern laptops do not have a DVD drive, so it is impossible to install the operating system from an optical disc. This is not a problem, since the installation can be completed entirely from a USB drive, including a regular flash drive.
We will need an installation image of the operating system (.iso file) and a flash drive with at least 4 Gigabytes in size.
Download Kali Linux from the official website: https://www.kali.org/downloads/
If you are having trouble deciding which version to choose, read about their differences.
Now you need to burn the Windows image to a USB flash drive. This needs to be done correctly - simply copying the file is not enough. To make a flash drive suitable for installing an operating system, you need a program like . This is a free program - download and install it.
Connect the USB flash drive to your computer and launch Win32 Disk Imager.
Specify the image file (switch to view all files):
and select the correct Device (i.e. flash drive):

When everything is ready, press the button Write. Remember that all data from the flash drive will be deleted!
How to boot from a Kali Linux flash drive
Disabling Secure boot in BIOS
While the flash drive is being written, we need to disable the Secure Boot option in the BIOS.
Turn on your computer. If it does not have an operating system, then you will immediately be taken to the BIOS. If the operating system is already installed, press the button many times as you boot the computer. Esc Delete) and select Enter Setup(automatic entry into BIOS may occur):

Click F7 to go to Advance Mode and there select the tab Security. Find the option Secure boot:

Disable it (select disabled):

To save the settings, click F10.
Look for the option Fast boot- if you have it, also disable it ( disabled).
Booting from a Kali Linux flash drive
When recording to the flash drive is finished, insert the flash drive into the laptop slot and turn it on - if the message “ Please press any key for boot from CD or DVD", then press any button. This message translates to “please press any button to boot from CD or DVD. Despite the fact that we boot from a flash drive, this suits us.
If the operating system is already installed, press the button many times as you boot the computer. Esc(on some computers you need to press Delete). If boot options appear, select the option that corresponds to your flash drive.
If such a menu does not appear, then go to the BIOS and select the USB flash drive as the boot disk.
Step-by-step instructions for installing Kali Linux on your computer
In this window, select Start Installer:

Choose language:

Select Yes:


Choose according to your preferences:

A message about the need for a driver for a Wi-Fi card, I don’t have this driver, so I’m skipping it. You may not see a message like this at all:

I continue as is:

I skip setting up the network:

Enter hostname:

Superuser password:

Timezone:

The most crucial moment is the selection and layout of disks. If you select the wrong drive, you may lose data (for example, uninstalling another operating system):

As you can see, I already have another operating system installed.

If you want to remove the previous system and install Kali Linux instead, then erase the partitions from the old OS, create a new partition in the free space and select it to install Kali.
If you have several disks, you can install Kali Linux on any unused one.
I will install Kali Linux directly on the main partition. To do this I will resize the drive where Windows is installed.


and in the free space I will create another partition, which I will install a new OS.


In addition to the main partition, it is proposed to install a swap partition (like a swap file on Windows). For these purposes, you can allocate a separate disk - depending on your needs, it can be 2-8 GB. The swap partition is used if the operating system does not have enough RAM - data not currently in use is dumped onto this partition. That is, it is like additional RAM that works slower than the main one. I have 16 Gigabytes of RAM, so I don't create a swap partition.

Confirm the changes made:

We are waiting for the data copying to complete:

If you have an Internet connection configured, you can choose to download packages from the network (more recent versions)

Wait until the system starts to reboot and remove the flash drive:

After installation, Kali Linux will create its own GRUB bootloader. If you have other operating systems on your computer, this bootloader will find them all and display them in the boot menu for you to select.

Remember that the original Windows boot loader is not erased. That is, if you want Windows to boot by default, then go to the BIOS and there select the desired disk, which should boot automatically.

GRUB display resolution is incorrect
Usually the GRUB boot loader menu has the wrong display resolution. In the vast majority of cases, this is not a problem - the menu items are still visible, and savvy Linux immediately changes the resolution to the correct one as soon as it takes over control.
But this is not the case with Windows. If you booted Windows using the GRUB bootloader with the wrong resolution, then Windows in this session will no longer be able to set the resolution to the correct one, even if you go to do it manually.
The easiest way to fix the situation is to change the GRUB screen resolution. First, you need to find out what resolutions your computer supports. To do this, hold down the key while loading starts. Shift. When the GRUB boot menu appears, click c, and then enter the command in the console:
Videoinfo

Remember the highest display resolution that your video adapter supports.
Then boot into Linux. There, open the file for editing /etc/default/grub.
Find the line in it
#GRUB_GFXMODE=640x480
Uncomment it (remove the hash at the very beginning) and replace 640x480 with the maximum resolution that your computer supports. Usually this is 1920x1080, so it should look something like
GRUB_GFXMODE=1920x1080

Save and close this file.
Update bootloader settings:
Sudo update-grub
The next time you reboot, you will be able to enjoy tiny letters in the upper left part of the screen, but Windows will now have a normal resolution.
Microsoft recently announced Windows Subsystem for Linux (abbreviated WSL). The new subsystem, as you might guess, allows you to run Linux distributions directly in Windows 10 without, moreover, without a “dual boot” and without the need to create a virtual machine.
Moreover, thanks to the efforts of Offensive Security and the Microsoft WSL development team, Kali Linux can now be downloaded simply from the Microsoft Store.
In fact, like the most common application...
And now, first of all, Kali Linux right from the start it works normally and without known problems with Wi-Fi (which are familiar to anyone who has at least once tried to launch a virtual machine with Kali before), secondly, the OS gets full access to the available computer resources (since there is nothing to “virtualize” necessary), and thirdly, we repeat, it starts immediately, and you no longer need to restart the computer every time when you need to switch from to Kali or vice versa. In general, further about...
how to install and configure the Kali Linux subsystem on Windows 10