But, in that article it was only about deleting classic programs. While in Windows 10 there is another type of programs, namely applications from the Microsoft Store. And these applications cannot be removed using the methods that we described earlier.
Therefore, in this article we will talk about how to delete an application in Windows 10. Here you will learn two ways in which you can get rid of applications downloaded from the Microsoft Store.
Uninstalling apps in Windows 10 using the Settings menu
The operating system has a new tool for managing your computer. This tool is simply called Settings and can be opened from the Start menu or by using the Windows key + i key combination.
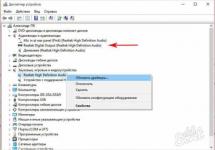
Among other things, you can use the Settings menu to remove applications, as well as classic Windows programs. In order to access this feature, you need to open the “Options” menu and go to the “System - Applications and Features” section. In this section you can see a list of all installed applications and classic programs. To remove one of the applications, find it in the list, select it with the mouse and click on the “Delete” button.

When you try to delete an application, the Windows 10 operating system will once again warn you about deleting and ask you to confirm the action.

This will begin uninstalling your selected app from Windows 10. Once the app is uninstalled, it will disappear from the list of installed apps.

It should be noted that some applications are protected by the operating system and cannot be deleted. For protected applications, the “Delete” button is not active and cannot be clicked.

For example, you won't be able to uninstall the Microsoft App Store.
Uninstalling apps on Windows 10 using PowerShell
PowerShell is a tool for automating a variety of actions with the Windows operating system. This tool has a command line interface, so all interactions with it occur using commands.
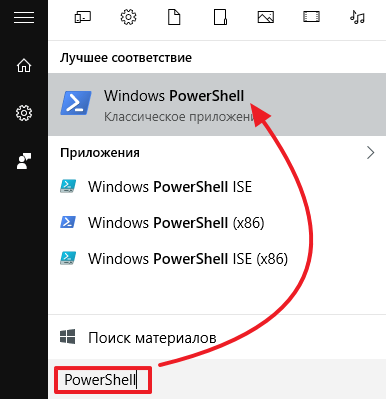
To launch PowerShell, open the Start menu and search for "PowerShell." After the system finds the desired program, right-click on it and run “as administrator”.
After opening the PowerShell command prompt, you need to run the command “Get-AppxPackage”. This command will display a list of all applications from the Windows 10 store.

If the list of applications is too large, then you can specify the request using the command “Get-AppxPackage -Name *News*”. Just replace “News” with the name of the application you want to remove. For example, if you want to remove the Evernote application, then you need to run the command “Get-AppxPackage -Name *Evernote*”.

After executing the “Get-AppxPackage” command, information about applications appears on the screen. In order to delete an application, you need to copy its full name, which is indicated opposite the “PackageFullName” parameter. This can be done simply by selecting the desired text and pressing CTRL+C.

Once you have found out the full name of the application, you can begin uninstalling it. To do this you need to run the command “ Remove-AppxPackage full application name" For example, in order to remove the Evernote application, we copied its full name and pasted it after the “Remove-AppxPackage” command. As a result, the command to remove this application looks like this: “Remove-AppxPackage Evernote.Evernote_3.3.0.102_x86__q4d96b2w5wcc2”.

After running this command, the application is automatically removed from Windows 10.
Hello friends! In this article, we will get rid of all types of universal Windows 10 applications, namely: those that are simply pre-installed as part of the system, and those that are part of the system itself. The first ones are such as “News”, “Weather”, “Skype”, “Advice”, “Feedback Center”, etc. - are installed with the system, but can later be removed. This can be done, for example, in the context menu called up on the tile in the Start menu.
But the Mail, Calendar, Movies and TV, Calculator, etc. applications are part of Windows 10 and cannot be removed from its environment through regular uninstallation. They must be removed using special tools. We will consider such tools below. We will first remove uninstallable universal applications using PowerShell, then we will consider alternatives in the form of third-party software with a usable interface. So command line haters, after reading the precautions, can immediately proceed to the second part of the article.
A major update to the operating system further strengthened the position of universal (shipped from the Windows Store) operating system applications and their dominance over desktop software. True, so far only in the minds of Microsoft developers. In the “Applications” section of the standard system settings, we can observe discrimination against desktop software: if necessary, the computer administrator can prohibit their installation and allow the installation of only universal applications from the Windows Store.

Precautionary measures
- Removing some universal applications may result in disruptions in the operation of others, as well as causing problems in the functioning of the Store itself. Before you begin to follow the instructions below, you must.
PowerShell: Uninstalling individual applications
You can get rid of uninstallable universal apps using the new PowerShell command line format. We launch it as an administrator from the search results by name or in the Win+X menu.

To remove, for example, the Photos application, enter the command in the PowerShell window:
Get-AppxPackage *photos* | Remove-AppxPackage
and press Enter.

Everything in this command is generally valid except for the *photos* value displayed in white font. This is the technical name of the application in English. The value is surrounded by asterisks on both sides, and inside these asterisks (without a space) to remove other applications, you must substitute their technical names, respectively. These names (even with asterisks for ease of insertion) are given in the table below. The values on the right need to be substituted into the PowerShell command above.
| Uninstallable Windows 10 apps | Value to insert into PowerShell command |
| 3D Builder | *3dbuilder* |
| OneNote | *onenote* |
| Paint 3D | *mspaint* |
| View 3D | *3dviewer* |
| Xbox | *xbox* |
| Alarms and clocks | *alarms* |
| Voice recording | *soundrecorder* |
| Calculator | *calculator* |
| Camera | *camera* |
| Cards | *maps* |
| Cinema and TV | *zunevideo* |
| People | *people* |
| Music Groove | *zunemusic* |
| Mail and Calendar | *communicationsapps* |
| Messages | *messaging* |
| Photos | *photos* |

During the uninstallation process, PowerShell may report operation errors, but problematic applications will still be uninstalled.
PowerShell: Uninstall all applications
Using PowerShell, you can remove all standard Windows 10 applications along with the Store with one command. But you shouldn’t use this opportunity unless absolutely necessary. PowerShell also provides commands for the reverse action - restoring both the Store itself and its content. However, it is not at all a fact that these operations will be successful. Still, a Windows backup will be a more reliable means.
So, to remove all universal applications from the system along with the Store, enter the following into the PowerShell window:
Get-AppxPackage | Remove-AppxPackage

PowerShell: Uninstall applications for all computer accounts
Using the methods described above, universal applications are removed only for the current account. In order for the operation action to be applied to all computer accounts, the “-allusers” parameter must be included in the commands. When deleting individual applications, this will be, accordingly, a command like:
Get-AppxPackage -allusers *3dbuilder* | Remove-AppxPackage

And when deleting the Store and all applications:
Get-AppxPackage -allusers | Remove-AppxPackage
Uninstalling Windows 10 apps with third-party programs
IObit Uninstaller
The simplest and safest way to remove Windows 10 applications is included in the functionality of the free uninstaller program IObit Uninstaller. Its huge advantage is the ability to batch uninstall software. Launch the program and go to its “Windows Applications” section. Here you can get rid of uninstalled applications. And to remove undeletable ones from the system, expand the list at the top.

We check the boxes next to everything that we don’t want to see in the system and click the “Delete” button.

We confirm.

Create a restore point and click “Delete” again.

We destroy entries in the registry.


CCleaner
The famous cleaner-optimizer CCleaner can also remove universal applications. Unlike the previous IObit Uninstaller program, it does not provide for the creation of a restore point, does not support batch mode, and does not clean up the remains of deleted software. Nevertheless, he can directly perform operations to remove universal applications - each individually. In the CCleaner window, you need to go to the “Tools” section, select the unwanted application and click the “Uninstall” button.

Recovering deleted applications
If we later suddenly regret deleting a universal application, you can return it using the Store. In the search, enter the name of the application and install it.


And disable updates for content from the Windows Store.
A thorough solution for haters of modern Windows 10 functionality
Users who, in principle, do not accept the modern concept of the operating system from Microsoft can initially work with a “cleaned” build of Windows 10 LTSB. This is an official assembly of the Enterprise system edition, in which modern functionality such as that is removed.
Over time, a huge number of installed but unused programs accumulate on the system. Unnecessary applications take up a significant portion of the memory on your hard drive and significantly slow down your computer. This problem is especially relevant when each of these applications strives to get into startup and launch along with the OS. Often the user is not even aware of this. Today we’ll talk about how to remove a program in Windows 10 and make the “life” of your own PC easier.
Uninstalling unnecessary components is as important a procedure as removing trash from an apartment. In this manual, we will look in detail at all removal methods, including those tools that were already pre-installed on the system. There are many ways to uninstall programs in Windows 10:
- using section ;
- using the uninstallation service generated during application installation;
- applying Windows 10 settings;
- using the delete option via the menu;
- using PowerShell;
- downloading special tools.
Let's move on to consider each method and draw some conclusions about their convenience and effectiveness.
Manual removal (including removal of pre-installed programs) is the first group of options that does not require the installation of additional software. Let's look at several types of actions.
Through
One of the simplest and most familiar methods from previous versions of Windows. The uninstallation sequence (except for standard utilities) in this case can be represented as follows:
- Go to the control panel. To do this, click on the search icon next to the menu and enter the corresponding query, after which we go to the first result:

- Among the numerous blocks we find and go to it:

- The system will compile a list containing all applications, among which you need to find the one you want, click on it and press the button. The application will be completely uninstalled from the computer:

As you can see, removal in this way occurs as quickly as possible and does not require any additional actions. Let's move on to another method.
Through the uninstallation service of the program itself
To use this option, you need to find the folder with the installed program on your hard drive. By default, any component on Windows 10 is installed in the folder « ProgramFiles" to the system disk. If the user did not change the installation path, the application will be installed in this folder.
Knowing the location of the desired folder, you need to carry out the following sequence of actions:
- Open the folder and find a file called « exe":

- Let's run this file. The uninstallation wizard will open:

- We follow all the instructions of the master.
This method will be useful when for some reason the desired application is not displayed in the automatically generated list.
Let's move on to an alternative course of action.
Through system parameters
Any application can also be deleted through the system settings. This option was added to Windows 10 and could not be used on previous versions of the OS. To implement it you need to follow the following instructions:
- Open the menu and click on the gear symbol to go to the OS parameters:

- Opening the block:

- In the proposed list, find the desired option, click on it and click on . If the list is too large, you can find the application you need using the built-in search bar:

You can also open this menu by pressing the Win + X key combination on your keyboard and going to the item:

You can also get to this menu by request in the search bar located directly next to “Start”:

In essence, this method is similar to uninstallation through the control panel. Let's go to consider another option.
Via the menu
In this case, everything is simple - so much so that there is no need to even write separate instructions.
- To remove it through the Start menu, simply find it among all the items, right-click and select:

- A window will open, instructions for uninstalling through which are located two points above:

Let's look at another, more non-standard way to remove programs on Windows 10.
Via Windows PowerShell
Windows 10 comes to the user with a huge number of built-in components and applications (for example, the Photos application or the Calculator utility), which do not have an uninstaller and cannot be removed through the general ones (they simply do not appear in such lists). Let's figure out how to remove built-in applications in Windows 10.
You can remove standard programs using the PowerShell technology provided by the developers. To take advantage of this opportunity, you must carry out the following set of actions:
- Click on the search icon next to Start and enter the appropriate query, then select the first result, right-click and select the item:

- We register Get-AppxPackage | Select Name, PackageFullName to get a list of all installed programs. Press Enter. The most important line for us will be PackageFullName, because it contains full names:

- Find the full name of the required component from this list and enter the command to remove it Get-AppxPackage APPLICATION_NAME |Remove-AppxPackage –package(the application name must be taken from the listPackageFullName). This method will remove even those programs that cannot be removed using standard means. Press Enter and the removal from the PC will be carried out without any accompanying notifications. There is no need to worry - the uninstallation is not complete, because you can restore deleted programs of this kind by simply downloading them from the official store.
PowerShell is extremely interesting because it can be used to, for example, remove an application from the Microsoft store. In fact, this is the only way to remove such programs. It is recommended for more experienced users to use it, since a person takes responsibility for such changes in the OS.
Let's move on to the next group of methods.
Removal using additional tools
There are a large number of programs designed to uninstall components in Windows 10 and clean the OS as a whole. Let's look at the most popular and user-tested options. All of them can be used on systems of any bit size – both x32 Bit and x64 Bit. It is only important to remind you that you should not use unlicensed programs, because removing software is an operation that has a direct impact on the OS.
– an extremely convenient program for removing any Windows components. In order to take advantage of its capabilities, you must follow the following instructions:
- Open the application. The bottom part of the window displays the number of installed programs and the amount of memory they occupy:

- Right-click on the component that needs to be removed and click on « :

- Select the removal mode. By default, normal is activated. It is recommended to use this:

- The process of creating a system restore point will start, after which the standard uninstall wizard window will open, with the help of which you will need to carry out the uninstallation procedure.
Let's move on to the next utility for removing installed programs.
– the most simple utility that does not require any additional knowledge from the user.
- At the first launch, a list of installed applications is generated, among which you need to select the one you want, click on it and press the button in the top menu:

- The removal process is no different from the standard one. The point of using such utilities is only that many of them remove all connections left by the program being removed and compile the most complete lists of available applications.
Let's move on to the last utility.
is undoubtedly the most popular utility for cleaning the system, excluding startup from startup, and removing components, among other things. In order to use it, you do not need to read separate instructions - you just need to open this tool, go to the section "Service", stay in tab "Remove programs" and select the one you need there. Having selected, click on the button "Uninstallation" in the right menu. The removal process is similar to the previous ones:

At its core, the process of using CCleaner is similar to using the control panel built into the system.
Removing uninstallable programs
A situation may arise when the application is simply not uninstalled. The only way to remove an uninstallable program is to remove data about it from the registry:
- Open the system registry. To do this, press the combination Win + R on the keyboard. A window will open where we enter the command « , then click on "OK" or Enter :

- Be sure to make a backup copy of the registry before making any changes. To do this, go to the tab "File" from the main menu, click on , select the location to save the copy and create it:

- Let's go along the path:

- We find the name of the required component in this list or select it from among the numerous codes. If the name is not specified in the folder, it will be displayed in the key « DisplayName":

- Double click on the key « and copy its value:

- Press Win + R again and paste the copied data, then press "OK" or Enter. The program will be removed from the PC:

It is necessary to clarify that changes to the registry must be made with extreme caution. It contains a large number of keys, and therefore the user must know exactly which ones can be deleted and which ones are best left untouched, because forcibly deleting important components can lead to OS instability. However, the registry option can help remove spyware from the OS.
Results and comments
We have fully covered how to uninstall unnecessary and remove standard applications from a PC. All of the above options are effective and can be used in a specific situation. Choosing one of them is a decision for each individual user, since all methods are convenient in their own way.
Video instruction
For clarity, we recorded a separate video with an overview of how to remove any program installed on a computer or laptop.
Windows 10, just like its earlier versions (Windows 8), has a number of pre-installed applications that, according to the developers, are simply necessary for every PC user. These include Calendar, Mail, News, OneNote, Calculator, Maps, Groove Music and many others. But, as practice shows, some of them are of interest, while others are completely useless. As a result, a number of applications simply take up space on your hard drive. Therefore, a completely logical question arises: “How to get rid of unnecessary built-in applications?”
It turns out that getting rid of unused applications is not so easy in many cases. But it is still possible if you know some tricks of the Windows OS.
It is worth noting that uninstalling standard applications is a potentially dangerous action, so before starting such tasks, it is recommended to create a system restore point, as well as a backup copy of important data.
Method 1: Uninstall stock apps using CCleaner
Built-in Windows 10 OS programs can be uninstalled using the CCleaner utility. To do this you just need to follow a few steps.

Method 2: removing built-in applications using standard Windows tools
Some of the pre-installed programs can be easily not only extracted from the OS start menu, but also removed using standard system tools. To do this you need to press the button "Start", select the tile of the unnecessary standard application, then right-click on it and select "Delete". You can also perform similar actions by opening the full list of applications.

But, unfortunately, only a limited list of built-in applications can be uninstalled in this way. The remaining elements simply do not have a “Delete” button. In this case, you need to perform several manipulations with the PowerShell shell.

The operation of removing built-in applications occurs only for the current user. In order to uninstall it for everyone you need to add the following key
An important point is that some applications are system applications and cannot be removed (an error will appear when you try to uninstall them). These include Windows Cortana, Contact Support, Microsoft Edge, Print Dialog and the like.
As you can see, removing built-in applications is a rather non-standard task, but having the necessary knowledge, you can uninstall unnecessary programs using special software or standard Windows OS tools.
The Windows 10 operating system includes quite a few applications - Mail, Calendar, People, Camera, 3D Builder, Photos, etc., and some of them (or even all) may seem unnecessary to one user or another.
The simple way to remove it is to right-click on the tile of the unwanted application and select “Delete”. Unfortunately, this deletes the application tile, but its files remain, and with a lack of space, which is typical primarily for tablets, this method of “uninstalling” is not optimal. This is where PowerShell can come to the rescue - a powerful automation tool from Microsoft, consisting of a shell with a command line interface and an accompanying scripting language.
So, find PowerShell (Find -> PowerShell), right-click on its shortcut and select “Run as administrator”.
First, you can see what built-in applications are available in the system. The command for this is:
Get-AppxPackage -AllUsers
After this, you can start removing unnecessary applications.
Commands to remove built-in "modern" Windows 10 apps:
Uninstalling 3D Builder
Get-AppxPackage *3d* | Remove-AppxPackage
Uninstalling Finance / Sports / News / Weather applications
Get-AppxPackage *Bing* | Remove-AppxPackage
Uninstalling Music Groove and Movies & TV apps
Get-AppxPackage *zune* | Remove-AppxPackage
Uninstalling the People app
Get-AppxPackage *people* | Remove-AppxPackage
Uninstalling the Photos app
Get-AppxPackage *photo* | Remove-AppxPackage
Uninstalling Mail and Calendar apps
Get-AppxPackage *communi* | Remove-AppxPackage
Removing the Solitaire game pack
Get-AppxPackage *solit* | Remove-AppxPackage
Uninstall Phone Manager app
Get-AppxPackage *phone* | Remove-AppxPackage
Removing a Camera
Get-AppxPackage *camera* | Remove-AppxPackage
Uninstalling Xbox
Get-AppxPackage *xbox* | Remove-AppxPackage
Uninstall all applications with one command
Get-AppxPackage -AllUsers | Remove-AppxPackage
Please note that when you create a new account on your PC, all uninstalled applications will be installed again for that account. To prevent this, enter the following command in Powershell:
Get-AppXProvisionedPackage -online | Remove-AppxProvisionedPackage –online
P.S. In the future, if necessary, any of the remote applications can be installed through the Windows Store (all of them are free).
Attention! Running the two commands below removes all “modern” applications available in Windows 10, including the Windows Store (return only through reinstalling the operating system):
Get-AppXProvisionedPackage -online | Remove-AppxProvisionedPackage -online
Get-AppXPackage | Remove-AppxPackage