Hello dear readers. Lately, we have often talked about various software problems and their solutions. Now, let's pay a little attention to the internal hardware of the computer, such as the CD\DVD drive.
Despite the enormous popularity of flash drives, this device still remains very popular and is used even now by a huge number of people. Personally, with or some other system, I only use a CD drive and on rare occasions I use my own.
But, over time, some users have a problem that the drive simply stops opening or does not respond in any way to pressing the eject button. As a rule, this problem occurs mainly on old computers or laptops that are more than 5 years old. There can be many reasons for this malfunction, for example: the ejection button has stopped working, the belt has stretched, or the electric motor has broken.
But, now I will show you how many alternative ways you can open a CD\DVD-ROM and remove the disk stuck there.
Oh yes, I almost forgot. This instruction is also suitable for those users who, after turning off the computer, forgot to remove the disk from the drive. And in order not to turn it on again, you can simply use an alternative method of physically removing the CD. For example, I always forget these disks and most often take them out when the computer is turned off.
Well, okay, let's see what can be done if the CD-ROM does not open.
Opening a non-working CD drive
So, here are some tips for you:
- If nothing happens when you press a button located directly on the CD drive, this is most likely the cause of the problem. Therefore, from the operating system we go to “ My computer" and here, calling up the context menu of the drive, select the "Remove" item. What will force it to open if indeed the whole problem is only in the button.
 Otherwise, if when you press the tray eject button, the indicator starts to blink or a characteristic sound of an attempt to open the drive appears, then you definitely need to move on to the next step. Since any sound and light effects mean that the button is fully working.
 - In the second option, we will open our CD_ROM using the escape hole. Absolutely all models of CD drives must have a small hole on the front panel, which is intended for emergency opening of the drive in the event of a failure or breakdown of the device. All that is required of us is to take some thin object, such as an unbent paper clip or a needle, and with slight pressure insert it into this hole until it stops.
 As a result, the tray should protrude from the body by several mm. Now, remove the tray by hand until it opens completely.
  On my own behalf, I recommend doing this with the computer turned off. Because, in my practice, there were many cases where when removing a disk at the moment of rotation, its surface was completely scratched, after which the disk was simply thrown into the trash.
 - Laptops also have these holes. And all extraction actions are identical to those that I described in the second paragraph.

- Well, and finally, the most extreme option is to disassemble the CD drive housing. In fact, it is much simpler than it seems; all disassembly comes down to the fact that you will need to unscrew a few bolts and remove two plastic panels. So, first we remove the front part of the tray itself. Open the CD-ROM using the second step and unbend the three latches and remove the panel.
 Next, take a small screwdriver and disconnect the main front part of the drive. To do this, we just need to squeeze out a few plastic latches that are located on the case. For example, I had three of them, two on the sides and one on the bottom of the lid.
  Now, having removed all the plastic elements, unscrew the four small screws.
  Next, carefully, without applying much effort, release the drive from the metal casing and remove the remaining disk.
  Taking this opportunity, you can clean the drive mechanisms from dust. Also, try connecting the CD-ROM to the computer in disassembled form. If the situation repeats and it still does not open, then first of all check whether the belt is in order, since the most common reason is its damage. If it is stretched or torn, then simply replace it and perhaps this will restore the functionality of your drive.
  Also pay attention to whether the electric motor works when the power is connected. If not, you can immediately say that everything is sad and the drive will have to be taken to a service center. But, with current prices, it is easier to buy a new one than to repair an old one, so here, think for yourself who is comfortable with what. When assembling, we perform the same steps, only in reverse order.
Using one of these methods, you will clearly be able to open a broken CD-ROM and remove the disk stuck there. Or maybe some, using the fourth point, will be able to restore its working condition. But, if you have any questions, leave them in the comments and I will definitely try to help you.
Although modern technologies in data storage have made great strides forward, optical disc drives are still used on computers and laptops. In laptops, disk drives are located on the right or left side. The button for opening the drive is located either on the front panel of the device itself, or nearby in the laptop case.
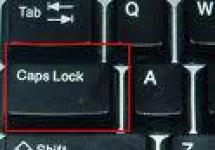
There are also models from some manufacturers where this button is located on the keyboard, as a separate key, or as a functional one that works in combination with the Fn key. But in such cases there is a special icon on the key.
The disk drive on the computer does not open, what should I do?
 And from time to time the user encounters a problem that the device does not open, but there is still a much-needed disk left in it. What to do in such a situation and how to cope with this malfunction? There are two ways to solve this issue:
- using special programs;
- physical impact on the drive.
Opening with programs
First you need to try to use standard Windows tools. To do this, you need to go to the “my computer” function and see if there is an icon depicting a DVD drive. There is an icon - right-click on it, and in the context menu you need to click “extract”. The tray should open. If this does not happen, then it is quite possible that some program running on the computer is blocking this action.
Next, open the “task manager” and there, close all applications that can use the DVD drive and block its opening. Now you can try opening the device again. If it still doesn't open, you should log out of Windows and restart your computer or laptop to reset any running control commands. If all these manipulations do not lead to the desired result, and the drive still does not open, all that remains is a mechanical effect on the opening mechanism.
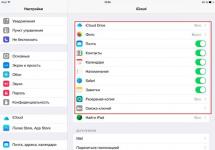
 There are also cases that when you go to “my computer”, only the displayed hard drive (hard drive) is visible there, and there is no trace of the disk drive icon. The absence of a disk drive icon, despite the fact that the device is actually present, can be caused by several reasons:
- If in the operating system Disk drive display is disabled. This can often be encountered in Windows 8.1 and Windows 10. These new versions recognize optical drives as obsolete and may not show them. To solve this problem, you need to change the entry in the registry editor and do the following. Press Win + R and enter the following path in the command line: reg. exe add “HKLM\System\CurrentControlSet\Services\atapi\Controller 0” / f / v EnumDevice 1 / t REG_DWORD / d 0 x 00000001. Press the enter button and send the computer to reboot.
- The optical drive is dead, that is, it has failed. To check, during the reboot, pay attention to whether CD - RW or DVD RW drives are displayed in the BIOSe; if the drive is not working, it will not be displayed.
- Drivers started working crookedly for the disk drive. To check this, you need to open the “my computer” function using the right mouse button. Select “properties” from the menu there. In the open “window”, find “device manager”. The list will include disk devices, among other things. If there is a yellow exclamation mark next to this line, then the drivers are installed incorrectly. Reinstalling the driver solves this problem. Again, right-click on the device and select the “update driver” option from the drop-down menu. Now everything is ready.
- Cannot be ruled out factor such as cable damage or disconnection. Solved by replacing or connecting the cable.
If all these tricks do not help, and the drive stubbornly does not open after pressing the corresponding button, all that remains is a mechanical effect on the drive.
Physical methods
 You can turn off your computer or laptop for a few minutes. Then, when you turn it on and before the Windows system boots, press the button to open the drive.
If it doesn’t work, then you will need some kind of thin, hard rod to open it. You can use wire, a needle or a simple paper clip.
All optical drives have a small access hole in case the eject mechanism gets stuck. On computers it is located on the drive housing below the ejected carriage, and on laptops it is on the front panel of the drive. Carefully insert a rod or paper clip into this hole and press with little force. The latch of the mechanism will work and the drive will open slightly, but this will be enough so that it can be opened by hand.
There is, of course, another way to open the drive, but it is “barbaric” and can lead to permanent damage to the drive. You need to press the opening button and insert a knife blade into the gap near the lid and try to help the mechanism work if it jams. If in doubt, it is better to do without experiments and contact a specialist at the service center.
When you manage to open the drive and remove the stuck disk from the tray, it is better to immediately determine the cause of the problem.
- One of the reasons The reason why the device does not open is due to damaged teeth on the tray.
- TO floppy drive cover may jam due to a faulty latch.
- If the belt is stretched with the help of which the tray moves out, the mechanism does not work and the drive does not open, the belt needs to be replaced.
- Trite: from time to time the mechanism may become clogged with dust or a small foreign object may have entered the drive. Basic cleaning can sometimes solve all problems.
If all this does not help and the drive does not want to work properly, then it’s a direct route to the workshop for repairs.
At one time, CDs and DVDs were the most popular and convenient storage media. Gradually, the whole world is moving away from using disks, opting for USB drives or cloud storage services. However, despite this circumstance, some users still actively use CDs and DVDs. Of course, it is not always possible to avoid problems when using disks. In addition to the integrity of the media itself, it is very important that the drive works. But unfortunately, there are often cases when it simply cannot be opened. What to do in such a situation? In this article, we will take a closer look at how to open a laptop drive if it does not open.
There are several reasons for this malfunction. The button could have simply failed, or the mechanism that pulled out the slot had broken. In more severe cases, the problem may be with the board or an incorrectly inserted disk.
Solution
Method 1
You should start by trying to open the drive through . Go to “My Computer” and right-click on the optical drive. Select “Extract” from the list that appears. If this method does not solve the problem, try the next one.

Method 2
Not everyone knows that any drive is equipped with a special emergency hole, inside which a button to open the drive is hidden. The principle is the same as the Reset button on a Wi-Fi router. Please note that it is better to do this when the computer is turned off. If there is a disk left inside, you risk damaging it when the PC is turned on. Take a pin, needle, or any other object thin enough to press the button. After this, the tray should open slightly. Then you will have to get it out with your hands. There is nothing wrong with this, since it is not difficult at all. If this option does not give the desired result, move on to the next one.

Method 3
You will have to resort to disassembling the case and removing the drive. The drive itself is very easy to disassemble. Just unscrew a few screws. The first step is to reach the front of the tray. To do this, use the emergency button. After this, bend the three special latches to remove the panel. Using a screwdriver, remove the front part of the drive. There are special latches on the top and sides that need to be pressed out. Then remove the four screws located around the perimeter of the drive. Now, using a little force, remove the metal cover. Ready. You can take out your disk. Assembly is performed strictly in reverse order.

Results
Now you know how to open the disk drive of a laptop or computer if it does not open. As you can see, such a problem is not at all difficult to solve on your own at home, without the help of a specialist.
Write in the comments whether this article helped you, share your own experience of fixing such problems with other users and ask any questions you have about the topic discussed.
If your drive won't play discs, don't rush to buy a new one! Discs may not play for a variety of reasons. The problem may not be a faulty drive at all. If the DVD drive fails, there are many ways to restore it to functionality. Below we will look at these methods, and also tell you how you can reproduce scratched discs.
Determining the Nature of the Problem
First of all, you should find out the nature of the malfunction. Check: your drive does not read all or only some discs. If some discs are played by the drive, the problem is in the hardware. If he does not see any disks, there may be a software failure.First of all, you should try to restore the operation of the drive by removing software restrictions. In the event of various operating system failures, disk drives often refuse to play or burn discs.
Software solution to disc playback problem
Do you remember what games and programs you installed on your computer recently? Problems with disc playback may appear after installing virtual disk managers (Daemon Tools, Alcohol 120%, etc.). Also, the above-mentioned problem may appear after installing games that create virtual disks for their needs, which may conflict with each other. Sometimes the drive stops seeing disks after installation Nero– a program designed for burning discs.To make sure that the reason is in the installed software, you should remove these programs. If deleting programs does not bring any results, perform a system restore to the moment when the drive was still working.
If the drive works, we try to install other versions of remote programs that will not interfere with disk reading. All unnecessary software from the computer device should be removed.
Another cause of problems with a DVD drive can be a driver glitch. To solve this problem, you need to enter Device Manager. To get to " device Manager", you need to first go to " Control Panel", and then go to the " System" Or you can use the keyboard shortcut " Win+Pause", then select "Device Manager".

After removing the software mentioned above, virtual disk drives may remain in the device manager, which must be removed with the right mouse button through the menu, then restart the computer and look at the result.
- Going to the “View” menu, select “Show hidden devices”;
- Find the “SPTD” driver in the device tree among “Non-plug and play device drivers”;
- After removing the driver, restart the computer.
If the problem is not resolved:
- Find among the “IDE ATA/ATAPI controllers” the controller to which your drive is connected. To do this, open each channel in turn and check the “Device Type”.
- Next to the “Enable DMA” option, put a checkmark (if there is a checkmark, remove it, restart the computer and then install it again).
- This is often the only possible way to get the DVD drive to function in Windows 7.

If all else fails, try opening your drive in Device Manager and look at what is specified in its “DVD Region” settings. If the region is not selected, do not change anything, but if the left one is specified, change it to your own. Remember that you can only change the region five times!
What to do if the hardware is faulty?
The first step is to replace the drive cable with a known good one, and also change the power plug.The cause of the malfunction may be due to dust accumulation on the laser head. Having disassembled the drive, VERY CAREFUL Clean the laser eye from dust using an ear stick soaked in purified gasoline or water.
To avoid disassembling the DVD drive, you can use a special cleaning disc. Brushes glued to such a disk will clean the laser head of dust. However, be aware that brushes that are too stiff can damage the laser head, so be sure to check that they are flexible enough before use.
![]()
Using a can containing compressed air, you can try to blow the inside of the drive through the open tray. Updating the drive firmware may also help. You can download the new firmware on the DVD drive manufacturer's website. Strictly follow the instructions for installing the firmware.
The reason that the drive does not play discs may be a jammed laser. With such a breakdown, DVD discs may not be readable and CDs may be readable well, and vice versa, since a separate laser is provided for reading each type of disc. If none of the things we listed above helped you, your drive has most likely exhausted its service life and therefore needs to be replaced. Don't worry, disk drives are inexpensive these days.
How can you read a bad disk?
There are situations when the drive is working properly, but the disc cannot be played because there are scratches on its surface. Try sanding the scratched disc first using a soft cloth. It is necessary to grind the disc from the center towards its edges. This will allow you to grind out longitudinal scratches on its surface, which coincide with the tracks, and therefore are the most dangerous. Special devices are available for cleaning discs, but they are of little use; grinding by hand is much more convenient.There are a number of special programs for reading bad disks, for example, free or paid. All these programs repeatedly try to read the bad sector using various parameters. If these attempts are unsuccessful, they simply move on, skipping that sector. Using this method allows you to save as much information as possible. For video and audio files, the loss is usually unnoticeable.
We hope that the information we have provided above will help you save money on purchasing a new drive or finding a way to solve the problem with a DVD drive that does not recognize discs.
Often, laptop users have a seemingly banal problem - they cannot open the disk drive on the device. There may be several reasons. Perhaps the laptop does not have an optical drive at all or lacks a special button. It also happens that there is an open key, but for some reason it does not work. So let’s try to understand all the nuances and understand how to open the drive on a laptop in a variety of ways.
By pressing a button you can open the disk drive on most laptop models. Moreover, from different manufacturers - Lenovo, Asus, Acer, HP, Samsung, Packard bell, Dexp and many others. etc. The button is usually located either next to the side or on the disk drive cover itself. Moreover, we recommend that you first make sure whether the laptop even has a disk drive.
To do this, you can look at the laptop documentation. The exact characteristics of the device are listed there. Of course, there will be information about the availability of CD/DVD Rom. Another option is to carefully inspect the laptop case. Especially from the side. You need to check if there is a rectangle with the word DVD there. The Task Manager will also show your drive model.
If the disk drive has been found, then it’s time to move on to searching for the tray open button. As we have already said, it can be located:
- On any side of the laptop (usually on the right, like the drive itself);
- On the optical drive cover itself;
- Next to the pull-out tray.

The key is indicated by a special symbol – a dash and an arrow on top. We just click on it (sometimes several times) and wait for the drive to open. This usually happens within 1-3 seconds.
What should I do if the drive does not have an open button? It happens. For example, it is not available on Asus x555s, x553m, x551m, etc. (but on Asus x556u it is already available). Then you can try another method. Some laptops have the ability to open the optical drive from the keyboard. Therefore, we carefully look at the function keys (at the very top). Perhaps one of them has an "Extract" icon. Then click on it in combination with “Fn”.
However, do not forget that the laptop may not have a disk drive at all. Still, now the “era” of CDs and DVDs is gradually becoming a thing of the past. Therefore, manufacturers produce models without a drive. For example, the popular series of laptops acer es 15, 17 or lenovo ideapad 100, 110, 300, 310, etc. are generally not equipped with disk drives.
Often, users confuse the drive tray and the regular protective panel on the side. Yes, it looks like a disc container, but there are no buttons or markings on it. Let's take, for example, the same Lenovo b50 laptop. On the side of the device there is a plug that resembles a disk drive cover. If desired, you can remove it and install a CD and DVD reader yourself.
Software methods for opening the drive
Using standard software, you can open the drive on a laptop without a button. This method includes only a few steps:
- Go to “My Computer”. If the OS is Windows 8 and 10, then “This computer”.
- Find the disk drive icon. We right-click on it.
- In the window that appears, select “Extract”. Usually this item is displayed somewhere in the middle.
- After which the drive tray should come out a little. If nothing happens, we reboot the laptop and repeat everything again.

Sometimes the drive does not appear in the “My/This Computer” section. Most often in Windows 8 and 10. What to do in this case?
- Using the secondary mouse button, click on Start.
- Select "Command Prompt (Administrator)".
- Paste into the line “reg.exe add “HKLM\System\CurrentControlSet\Services\atapi\Controller0” /f /v EnumDevice1 /t REG_DWORD /d 0x00000001” and press the enter button.
- Reboot the laptop.
The CD or DVD drive should now appear in the This PC directory. This means you can try to open it programmatically.
Why doesn’t the disk drive on my laptop open and what to do in this case?
The disk drive was found. We press the button, but nothing in response. The disk drive does not want to open. Even the software methods listed above do not help. This problem is quite common. Although there are only two reasons for its appearance:
- mechanical failure;
- software level malfunction.
You can determine why the drive does not open on your own. For example, you can pull out the tray programmatically, but not through a button. This means that most likely the key has failed.
If you have tried all sorts of options, but the disk drive on your laptop still does not open, then we recommend following the following procedure:
- The first thing you need to do is turn off or restart your laptop. Thus, you can reset all software and hardware control commands, due to which the device sometimes does not open.
- Did not work out? We check whether the optical drive is used by some program. Some software may simply block work with the device. Call the Task Manager by pressing the Ctrl, Alt and Del keys. You can also use the Unlocker program. In any case, you need to find applications running from the disk and disable them. Then we try to open the drive. If nothing works, then move on to the next point.
- In some cases, malicious software blocks the drive. Therefore, we update the antivirus and check the system. To no avail? Then there is another option.
- Sometimes windows loses connection to the disk drive. Most likely due to various system errors. Even rebooting doesn't help. You need to unplug the laptop and remove the battery for a couple of minutes. Then we return the battery to its place and turn on the device. Already when loading the OS we try to open the drive.
If all these steps do not help, then you can reinstall or update Windows. But, most likely, the reason why the laptop drive does not open is more serious.
Mechanical opening methods
It also happens that the optical drive does not work. However, you need to remove the disk with important information from the device. What to do in this case? All that remains is to resort to mechanical opening, which can also help if the tray suddenly gets jammed or skewed. However, do not forget that this is quite risky. One awkward move and the disk reader will have to be changed.
You can pry off the drive cover using a sharp object. Then you need to try to pull out the tray. But if the drive is tightly seated, then you cannot pull it out by force! Most likely, the cause of the malfunction is a hardware failure associated with damage to cables, cables, contacts, etc. This is no longer possible without professional repairs.
The easiest way is to open the disk drive on a Lenovo laptop. This manufacturer equips many models of optical drives with a special escape hole. In this case, the user needs to do the following:
- Take a thin wire or paper clip.
- Carefully insert its end into the holes. Just don't confuse it with the LED on the disk drive, which is often located nearby.
- Press lightly. The latch should work.
- After which the cover will open slightly and the drive tray can be pulled out.


By the way, before trying mechanical opening methods,... Then, while loading the operating system, repeatedly press the open drive button. Sometimes such simple steps help to remove the disc without resorting to manipulating a paper clip, knife, or other objects.