Surely not every PC user (especially a beginner) knows that a computer can be safely controlled from a distance, and fully! Those. as if you were sitting and working at your own computer, but from a distance, and doing it, for example, from a tablet or another computer. This can be very convenient and, for example, I use this opportunity regularly. Why do I need it? I work a lot on the Internet, but I can’t always sit at my computer. Sometimes I need to go somewhere or see someone, but some urgent matter comes up and I need my computer to open some program, run something, look at something. Carrying a computer with you always and everywhere is very problematic. It weighs about 4 kg, which feels good when carrying it :) But on the other hand, I always have a tablet or smartphone with me, from which I can connect to my computer at any time and from anywhere, which I leave turned on at home. And this way, I can work on it just as if I were at home. Another reason for remote access is the ability to ask a friend or colleague to help you sort out any problems in the settings or programs on your computer through remote access. You yourself can also help someone solve some problem on their computer by connecting remotely to this person. And one last thing... It happens that the computer you need is in a hard-to-reach place or you need to go to it. In this case, the easiest way is to connect to it remotely and you’re done!
This article of mine will talk about how to remotely control a computer from any device, and with the help of this guide you will learn how to do it easily even if you are a complete beginner! We will consider the most, in my opinion, convenient program for this matter - TeamViewer, and today I will tell you about its main most necessary and useful functions. Yes, it is also free for non-commercial use! There are only 2 conditions for remote device management: the presence of an Internet connection on both devices, and the presence of the TeamViewer program on both devices.
Today, the TeamViewer program is supported, one might say, by all devices:
Smartphones based on Android and Windows Phone 8 operating systems;
Tablets on the same Android and Windows Phone 8 systems;
iPad of all modifications;
Computers based on the operating system Mac, Linux, Windows.
For all these devices, you can download the TeamViewer app for free.
It is also interesting that you can control it the other way around – smartphones and tablets from a desktop computer.
So, let's begin to understand the program step by step, starting with its installation process.
Installing TeaViewer
First you need to download the program itself. It is best to download from the official website, since the latest version will always be posted there. Go to the official TeamViewer website using the link:
teamviewer
At the top of the page that opens, you can’t help but notice the large “Free full version” button. Here we press it:
After downloading the file, find it on your computer and run it. The file will be named: “TeamViewer_Setup_ru”:
The next program window will ask you to select the option to use TeamViewer. These settings can be changed at any time after installation. If you want to control this computer (on which you are installing the program) remotely, then immediately select the appropriate item. Otherwise, simply select Install.
Below, be sure to select the “Personal, non-commercial use” option, since the program is distributed free of charge only for this use case.
At the end, check the “Show additional settings” box and click the “Accept - Next” button:
Windows User Account Control may ask you for confirmation to continue with the installation. Just click “Yes”:
In the next window, check the path where the program will be installed and change it if desired. But I recommend leaving the default path. The options below may not be enabled. All of them, if necessary, can be set after installation. Click the “Finish” button:
A quick program installation process will begin, which will take from a few seconds to a minute.
This completes the installation of the TeamViewer program! Let's move on to its settings and application.
Setting up TeamViewer
Setting up uncontrolled access to a computer:

Now we can freely control this computer from any other device, no matter where we are within the Internet access zone :) But for this, let’s deal with the information that we (or anyone else) need to know so that we can connect to this computer remotely.
Data required for remote control of any device:
Perhaps the most important thing is to know the data by which you can connect remotely to your current computer.
To connect to this computer from another computer / device with TeamViewer installed, you only need to know:
ID of this computer;
Password for accessing this computer via TeamViewer (not to be confused with the password for logging into Windows!).
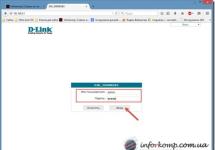
All this data is located in the main program window:
According to my example (see image above), to remotely access this computer, at the moment I need to specify ID: 900 288 832 and password: 6sx71k on the remote device.
The ID in TeamViewer for each specific computer does not change. Those. the one that is indicated in the window you will always indicate during a remote connection. And there are 2 types of passwords in TeamViewer: temporary (random) and personal (permanent). Now more about this:

I hope you understand the difference in passwords :)
Now let's go through the main most important settings of the program.
Basic program settings:
To go to all program settings, open the “Advanced” menu at the top and select “Options”:
We will immediately be taken to the “Main” tab. Here you can enable or disable TeamViewer to automatically start when Windows boots. If you are going to control this computer remotely, then I strongly recommend leaving this item enabled. Then you won’t have to launch TeamViewer manually, and even more so, if you are far away and TeamViewer is not running on this computer, you will not be able to connect to it.
Below you can see a message that you are linked to the account you created earlier. If you click the "Delete" button, you can break this connection.
On this tab, there are no more important settings that are not set by default. Go to the next tab “Security”.
On the “Security” tab we can change the “Personal” password by entering a new one and repeating it at the very top. Below you can set up a “random” password by specifying the number of characters. By default, such a password will always be 6 characters long.
In the last section, “Rules for connecting to this computer,” you can allow or deny logging in remotely using a Windows password. It is safest to leave this parameter set to default, i.e. - "Is not allowed". The easiest way to connect is through a TeamViewer password and it will be safer this way.
“Remote control” tab. There are important settings here. All these settings are global - i.e. for any connection. But if you have created an account for yourself (as discussed), then for each computer added to your personal list, you can set your own connection parameters, but more on that later.
This is what the settings on this tab look like:
At the very top you can adjust the image quality when connecting to a remote computer. It’s better to leave either “Automatic quality selection” or “Optimize speed”. I always set speed optimization to connect to a remote machine and work with virtually no delays, even via mobile Internet. There is only one minus - the image quality (the way we see the remote computer) will not be the best, but sometimes this is not even noticeable.
Below, as you can see, the “Hide wallpaper on the remote machine” option is enabled. This means that when you connect to a remote computer, the desktop background there will become simply black. I always leave this option enabled so as not to waste resources on loading a sometimes large background image.
Even lower are additional settings that can be configured according to everyone’s preferences. For example, if the “Play computer sounds and music” function is enabled, you will accordingly hear all the sounds of the remote computer.
It can be useful to enable the “Send keyboard shortcut” option. If you enable this option, then when you connect to a remote computer, you will be able to use your usual keyboard shortcuts. For example, a quick way to open the task manager is “Ctrl+Shift+Esc”.
In general, here you configure it as you need.
Let’s go straight to the “Computers and Contacts” tab.
The “Computers and Contacts” tab will display your account settings, which will then show all the remote computers and users you have added. On this tab you can change your account information, as well as computer display settings.
At this point we have discussed the basic settings. Now let's move on to the main thing - remote computer control.
The principle of remote computer control
We can, as I already said, control a computer or any other device (TeamViewer must also be installed and configured on them!) from any point where there is access to the Internet and we just need to know the ID of the managed device and its password (random or permanent ). Knowing these 2 parameters, we can control the computer.
Let's try to connect to the computer remotely:
We specify the password if you know the “personal” password of the remote computer. Otherwise, leave the field blank.
Specify the network name of the remote computer (for your own convenience). It will appear in the list of your computers.
If you wish, you can specify a description of the remote computer to be added for convenience if you have a large list of them.
In the Window list, I selected Full Screen Mode. This means that when connected to a remote computer, TeamViewer will display the remote computer in full screen. It will look like you are fully working on that computer. You can select another option, for example “Windowed Mode”, and then the remote computer will be displayed in the window.
In the “Quality” list, I always select “Optimize speed” so as not to sacrifice performance, especially when connected to a slow Internet.
It is better to always set “Identification mode” to “TeamViewer Identification”. Then you will only need to know the password set for a particular computer in the TeamViewer program to connect to it.
In the main TeamViewer window, where the “Manage Computer” section is located, indicate the ID of the computer that we will manage in the “Partner ID” field.
If you created an account, then we can immediately add the computer to our “Favorites” list by clicking the button with an asterisk:
A window for access settings for the computer that we add to the list will open in front of us:
In the image above, I have marked the fields and lists where it is best to make changes:
The remaining settings can be left with the “Inherited” value, because, as a rule, there is no need for them and, in extreme cases, they can be configured at any time.
When the settings are set, click the “OK” button.
The computers that you will add to your list will be visible in a separate window, as in my example in the image below:
In the example, I added a computer named “Test TeamViewer”.
Now that the computer is in the list, to connect to it, simply double-click on its name. If you immediately specified a password, it will not be requested and the connection will occur immediately (within a couple of seconds).
Another way to quickly connect to a computer, if for some reason you did not create an account and do not add computers to your favorites list, is to simply enter the ID in the appropriate field and click “Connect to partner”:
The default mode is “Remote Control”, which is what we need. And we can enable the “File Transfer” mode at any time during a remote session.
Now a window will appear where you need to enter a password to connect to the remote computer:
Enter the password and click the “Login” button.
The connection usually occurs in a couple of seconds, but this depends on the speed of the Internet on both sides. After connecting to the remote computer, the window will look like this:
As you can see, the screen of the remote computer is black. As you probably remember, in the settings we left the “Hide wallpaper on the remote machine” option enabled. As a result, the wallpaper on the remote machine became black, which will reduce resource consumption, and immediately after disconnecting from the remote computer, its desktop wallpaper will return to its previous appearance.
This is how simple and easy it is to connect to a remote computer :)
You will be able to fully control your computer from any distance, and at the same time it will look exactly as if you were sitting at that computer.
Let me remind you once again that the same can be done from almost any device. If you, for example, have an iPad, then download TeamViewer onto it (it’s always free!), enter the ID and password of the remote computer, and that’s it! You will connect and be able to control it directly from your tablet, and it’s also very convenient!
Now let's look at some of the functions available to us during a remote session.
Functions available during a remote computer session using TeamViewer:
So, we are connected to a remote computer. At the top we see a panel with a set of functions. Let's go through the most necessary of them:
The button numbered “1” allows you to immediately terminate the connection with the remote computer.
After any termination of a TeamViewer session on both devices, a window will be displayed indicating that the free session has ended. Just always click "OK":
You can also instantly terminate the connection while on that remote computer. For example, someone remotely helps you set up a system or fixes a problem. If suddenly that person began to do some actions on your computer that, in your opinion, he does not need to do at all, then you can break the connection with just one button in the form of a cross (see image below):
The button numbered “2” allows you to hide this panel of remote session functions.
The button numbered “3” allows you to instantly switch to full-screen mode, which I use in 99% of cases.
A very useful feature is transferring files from a local computer to a remote computer and back. This can be done by simply dragging the necessary files from your computer window to the window of the remote computer.
Another way is to use a special manager – “File Transfer”. It opens from the same panel that is fixed at the top. Select “File Transfer”, and then “File Transfer” again:
A special manager will open - Explorer. There is nothing complicated here either. We indicate from which folder on the local computer the file will be transferred, then indicate the folder where exactly the file will be transferred to the remote computer. Then select the file itself on the local computer that we will transfer and click the “Send” button:
The file will be transferred to the remote computer. In my example, I transferred an image file called "" from the "Downloads" folder to the remote computer's desktop:
After transferring the necessary data, the file transfer manager can be closed, and a window will be displayed with statistics on the transfer of your files, where you need to click “Close” again:
Or you can minimize this window.
There are 3 more very useful features that are available during a remote session. This includes voice communication, video broadcasting and chat support.
All these 3 functions can be activated by selecting the “Audio/Video” menu:
Here you can change the scaling, for example, enable full screen mode. Here, in the “Quality” submenu, you can select the quality you want for displaying content on the remote computer, for example, by turning on “Optimize speed”. Also here you can change the resolution of the remote computer (for example, if the resolution of your local computer is very different) and show / hide the wallpaper on the remote machine. Everything else is not so significant and necessary...
Well, that’s probably all the most useful things you need to know about how to remotely control a computer using TeamViewer :) Cool program, isn’t it? :)
The most important thing is that it is extremely simple, convenient, and even a beginner can handle it. And, of course, it’s free! In general, to be honest, I have not seen a better worthy replacement for the TeamViewer program.
And now I think that in a couple of weeks I will already write an article, and you will be able to familiarize yourself with the next testing of the new autoclicker!
Well, now I say goodbye to you for a week... Good luck to you and always have a good mood! ;)
Hi all! Imagine you are leaving. It doesn’t matter: to the office on the next street for a few hours, on a business trip or on vacation. But you know for sure: you may need the data that is stored on your home computer. For some reason, you can't take them with you: for example, you don't know exactly which books from your huge library you'll need, or which samples you'll want to insert into a song you write on the islands. But you will need access to your home computer.
Good news for you: humanity has long figured out how to remotely connect to a computer via the Internet. True, you need to prepare for this case in advance. In the article below we will tell you how.
2 methods will be used. The first is using standard Windows applications, and the second is using third-party programs.

Remote access to a computer via the Internet using Windows
Remember the jokey lines from old Nokia instructions? Well, yes, “the phone must be turned on to use this function”? You will laugh, but we will also play Captain Obvious: in order for you to connect remotely to your computer, it must remain turned on and connected to the Internet.
But this is an obvious consideration. There are also not so clear ones: for example, the interaction between two computers - your home and the one through which you will connect - is based on the “client-server” scheme, and your home computer will act as a server, and the client will be the one you have with yourself. Before you connect to another computer via the Internet, you need to prepare both.
Let's start with the home computer. Let's assume on it. It must be said that the Home version is not suitable for this function to work: you must have at least Windows 10 Pro.
The first step is to allow remote connection to your computer. This is done using system tools: go to Control Panel/System/System Protection/Remote Access, find the line “Allow remote connection” and check the box there.

The second thing you will need is a static IP address. In the same Control Panel, you need to go to the “Network and Internet / Network Connections” section, find the adapter that is currently in use, and right-click its menu.


Click on “Properties”, select the line “IP version 4” and click “Properties” in the same tab. Here you need, available locally, but not used by the router (the occupied range can be found in the menu of the router itself). In the “Subnet Mask” line, you usually enter “255.255.255.0.”, and in the “Default Gateway” line - the IP of your router. It can also be entered as a DNS server, but there are options here. For example, Google public DNS addresses are also valid: 8.8.4.4 and 8.8.8.8.
For example it could be like this:


You will also need to configure port 3389 on the router (how to do this, read the instructions for the router or in thematic discussions).
However, all manipulations from this point can be avoided if, when leaving, you completely turn off the router and leave the computer connected directly to the provider’s network. Then all you need to do is know yours and check with your provider that it will remain unchanged.
How to prepare a terminal using Windows
By “terminal” we mean the computer from which you will connect to your remote one. All you need for this is an application called “Remote Desktop”. Your version of Windows may already have it. If not, you can download it from the Microsoft app store.

The application is made in Modern style, with touch screens in mind, but it is convenient to work with it in the traditional way. To add your home computer, you need to click the plus button in the upper right corner of the window. In the drop-down menu, select Desktop and enter access data - a local IP address if the computer is on the same network as you, or an external one if you are connecting via the Internet.
To access your computer you will need your account credentials. If you are using a Microsoft account, enter your account information. If local, enter your username and password. Click "Save" to avoid entering data every time you connect. Of course, if you are using the Remote Desktop application on someone else's computer, you do not need to save your login information on it.
If configured correctly, after connecting, you will be able to see the desktop of your computer in the program window and run any programs or open files from it.
We only considered the option when Windows 10 Pro is installed on the remote computer. Other versions of Windows do not have this functionality or require more advanced settings. However, remote control of a computer via the Internet is also possible through universal solutions, which we will consider below.
Third party remote access tools
Although Windows has its own remote access organization, there are third-party programs that do it better. Let's look at a few of the most famous of them.
TeamViewer
One of the first programs that more or less initiated people thought of when they saw the title was TeamViewer. Naturally, we will start with it.
The advantages of this program are not only well-known and popular (and, as a result, commercial success, demanding users and attentive developers, plus support). TeamViewer is a fairly simple, flexible and multifunctional solution. By and large, you don't even need a second computer to connect to your home one: an iPhone, iPad or Android device is enough. Clients exist for most mobile platforms, plus Windows, OS X and Linux.

In addition to remote desktop, the application supports voice and video calls. So, for example, if one of your family or colleagues maintains access to your computer and needs your help, you can communicate as you work directly in TeamViewer, without leaving the session or using other programs.
Your connection will be protected by 256-bit AES encryption, making it virtually useless to be intercepted.
The most valuable feature of the program, which cannot be overestimated, is the ability to turn on your home computer using a signal via the Internet. If there were hours-long power outages in your absence, no UPS will help. But TeamViewer will allow your computer to turn on when requested from outside.
And one more plus - the program is not divided into client and server parts. It is enough to install a single version on both computers. And then everything is configured in a few clicks.
By and large, the program has only one drawback: cost. A license for one copy for a private user costs about $200. But if timely access to a computer is worth it, why not?
Radmin
The name of this product means “Remote Administrator”, which immediately conveys its purpose. In terms of functionality, it roughly corresponds to Team Viewer: you can remotely access your computer, turn it on and off using network commands, launch programs, open files and move data between the remote PC and the terminal.

Radmin is inferior to TeamViewer only in some aspects: it does not offer applications for mobile devices, does not provide simultaneous access to a computer from several terminals, and is not so widespread.
One of the main advantages of Radmin is the price. A single license for the program to access one computer will cost only 1,250 rubles - that’s a little more than $20: ten times cheaper than Team Viewer! At the same time, you will receive all the benefits of commercial programs: constant support,
However, if you need a completely free solution, it is there too.
UltraVNC
Yes, it exists! A free application that works on the same principle as the above. But it provides remote access to a computer via the Internet very well.
Yes, in some aspects UltraVNC is inferior to commercial solutions. So, to provide 256-bit encryption, you will need to install a special plugin. The desktop client is only for Windows, and mobile clients exist only for Android and iOS. There is no built-in voice communication, so remote support will have to be done using Skype or a regular phone, or built-in text chat.
But, on the other hand, a remote access tool for free is not such a frequent pleasure. Therefore, we recommend using UltraVNC first, and then, if some important functions are sorely lacking, turn to commercial products.
Ever since my work as a laboratory assistant in an information center, I have understood one important truth: “the less you work, the better you work.” Any human activity can be improved and even the most hated work can be made enjoyable. Imagine for a moment that you have one computer lab at your disposal. Its maintenance takes relatively little time. All problems that arise can be resolved on the spot simply by going to the appropriate computer.
But one fine day, the staff of equipment increases sharply from the usual fifteen PCs in your classroom to hundreds of computers scattered across several buildings. And now every new owner of a miracle box under his desk calls with the question “how to align a table in Excel?” After talking with such an individual for a couple of minutes and realizing that you need to help, you trudge up the stairs to the poor fellow’s office. Most likely, at first there will be not only a sign on the monitor screen that has moved down, but also a kilo of gingerbread cookies with an invigorating mug of tea. But soon even gingerbread will not be able to sweeten the constant running around, and the calls will cause an involuntary sigh. In such a situation, there are only two options. Find someone who will run for you or come up with a way to combat the blatant computer illiteracy of your employees while remaining within the walls of your office.
Download Radmin Server and Viewer
Remote Administrator is one of the programs for remote PC administration. Such software works on the client-server technology that is already familiar to us. The product is made in Russia and is distributed free of charge. That is, we have the opportunity to download a full-fledged version without limited functionality, which will work for 30 days. Then you should purchase it. You can also use torrents. In their open spaces you will definitely come across a repack from Alker; it works as stably as the licensed version. I’ll probably use the official trial version for this material.
Step 1. First, go to the website and click the big green button “Download 30-day trial version.”

Step 2. Then on the page that opens, click “Download Server+Viewer” in one archive.

Step 3. After the download is complete, we will unpack the installation files from the archive into a separate folder for convenience.

Installing and configuring Radmin Server
First, let's deal with the server part of the program. It is its installation on client PCs that allows us to manage them remotely.
Step 1. On the computer that we are going to manage, run the file rserv35ru.msi and in the first installation window click “Next”.

Step 2. We carefully read the license agreement, accept it and click “Next”.

Step 3. And finally the treasured “Install” button. Click on it and wait for the installation process to complete. During this process, the screen may blink periodically. Don't be alarmed, this is normal, drivers for video capture are just being installed.

Step 4. After the installation is complete, we will not uncheck the “Configure user access rights” checkbox. Click “Finish” and go directly to setting up the program.

Step 5. In the new window, select “Launch mode” and set the value to “Automatic”. This is necessary so that the program starts itself when the operating system is turned on.

Step 6. Then go to “Settings” and in the first tab “General Settings” we do not change anything. We just remember the port that is set by default by the program. We'll need it soon.

Step 7 In the “Miscellaneous” tab, check the “Load Mirror Driver at startup” checkbox. This is necessary so that the screen of the remote computer does not blink every time we connect and the user does not know about our presence. A very useful function for those who like to observe employees and do not want unnecessary suspicion on their part.

Step 8 We're done with the settings. Now let's move on to changing access rights. To do this, click “Access Rights” in the main menu and repeat the command in the window that opens.

Step 9 Until users are created, you cannot connect to this computer. In order to create users, click “Add” and enter the name under which we will log into the computer. As an example, I will create a user "admin".

Step 10 Now we need to give our user certain rights. And since this is an admin, we will give him full access to the remote computer. Click “OK” in this and the next window.

Step 11 If you purchased the program from the developers or downloaded it from a torrent, then it will have another interesting feature. Namely, the “Advanced” button, which allows you to configure hiding the tray icon. When there is no tray icon, the user may not even know that this product is installed on the computer.

Step 12 This was the last step in setting up Radmin Server. Now we will restart the computer for our settings to take effect. After the reboot, go to “START-Control Panel-Network and Sharing Center-Change adapter settings” and right-click on the adapter with which the network connection is made. In the drop-down list, click on the “Status” item.

Step 13 In the next window, click “Information” and look at the IP address of the computer. It will be useful for us to log into this PC using Radmin. But only if this IP is permanently assigned to this computer, otherwise it is better to look at the DNS name.

Step 14 To view the computer name, go to “Start” and right-click on the “Computer” shortcut. In the window that opens, in the “Full name” line we see the name of our PC.

Great. Let's once again recall the information that we will soon need:
- Port for connecting to a remote computer: 4899
- Computer IP address: 192.168.0.51
- DNS computer name: win7
All of your data, except the port, will be different from mine. We have finished manipulating the remote machine. Let's start setting up the client part of the program (Radmin Viewer).
If Radmin Server must be installed on remote computers to which you are going to connect, then Radmin Viewer, on the contrary, is installed on your computer. It allows you to connect to all computers on your network on which the program server module is installed and configured. Let's not waste time. Let's start the installation.
class="eliadunit">
Step 1. On the administrator’s computer from which connections will be made, run the rview35ru.msi file and click “Next” in the first installation window.

Step 2. We accept the license agreement and click “Next”. In the next window, select “install the application for all users of this computer.”

Step 3. Click “Install” and wait for the installation of Radmin Viewer to complete.

Step 4. Fine. Now we need to make sure that our computer is on the same subnet as the remote PC. To do this, go to the already familiar path “START-Control Panel-Network and Sharing Center-Change adapter settings” and right-click on the adapter. In the drop-down list, click on “Status-Information” and look at the IP. The third digit between our computer and the remote computer must match; this is the subnet number. If everything is correct, then we move on.

Connection in “Management” mode
In this mode, all your mouse and keyboard manipulations are transferred to the remote computer. You get the opportunity to remotely control your desktop as if it were right in front of you.
Step 1. Go to “Start” and launch “Radmin Viewer 3”. In the main program window, click “Connection-Connect with...”.

Step 2. In the “IP address or DNS name” line, enter the IP address of the remote computer (in my case 192.168.0.51) and click “OK” and try to connect to the computer in the “Management” mode.

Step 3. In the window that appears, enter the username and password (those set on the remote station). And holding our breath, click on “OK”.

Step 4. The next moment we gain access to the desktop of the remote computer. We can perform any actions on it using the mouse and keyboard.

Connection in "View" mode
In this mode, you can observe all user actions, but do not interfere with the work process. Personally, I often use this mode. He has proven himself excellent in the educational process. When students work on their computers, they often have various questions. In order not to run to each of them, I simply open five Radmin windows on the laptop at the same time and, moving between them, give advice on completing the task.
Step 1. In the main window of the program, click on the already favorite “Connection-Connect with...” tab.

Step 2. Enter your usual username and password combination.

Step 3. And we see the screen of the remote computer. But we remember that this mode allows us only to look, but not to touch.

Connection in “File Transfer” mode
This mode is convenient because by connecting to a remote computer you have the opportunity to download any file from it or transfer your own. In this case, the user will not even feel any manipulation on your part. Another interesting feature is that files can be downloaded from any folders, not just from public ones. After all, we get access to all PC drives (except network drives, unfortunately).

Creating an Address Book
The Radmin address book allows us to save the computers to which we connect in a convenient format. Connections can be distributed into convenient folders based on the structural divisions of the organization. We will not dwell on the address book in more detail. Let me just say that after you have created all the necessary connections and distributed them in the folder tree (on the left in the main Radmin Viewer window). We need to export our settings to a separate file, which we can open on any computer with Radmin Viewer.
Step 1. Click “Service-Export Address Book...”.

Step 2.Set the file name and select its location.

Step 3. We transfer the file to a USB flash drive and launch Radmin Viewer on another computer. Open “Service-Import Address Book...”.
Step 4. We select the address book and after a second we see that all our previously created computers have loaded. By the way, one more trick, if you click on the icon of the same name “Scanning servers in the current folder” (or the F5 hotkey), then on those PCs that are currently turned on, a check mark will appear indicating that the connection is ready.

A spoon of tar
Of the shortcomings noticed during the operation of this product, only three main ones can be identified. Although they are rather not shortcomings, but rather wishes to the developers to improve the program:
- When connected, the Aero style is reset to classic, which immediately tells an experienced user that someone is watching him (this can be solved by forcing the use of the classic Windows theme);
- There is no way to block the keyboard and mouse on a remote computer (and sometimes you really want to catch a student or employee doing something curious);
- Unfortunately, the program is only available for Windows.

Let's summarize. Radmin is great for remotely managing computers. The program is successfully used both to help employees and to modernize the educational process. It is also very convenient to administer the server. After all, if a remote access program is installed on the server, then there is no need for a regular monitor. Within the framework of this article, it was originally planned to talk about how to configure Radmin to connect over the Internet. Namely, do this by forwarding ports on the router. But then it was decided to make a separate material on this topic. So wait, friends.
For those who are interested in improving their professional qualifications, I recommend taking a free online test on the developers’ website. This will allow you to receive a certificate as a specialist in working with the Radmin software product, which can be printed and hung in a beautiful frame above your desk.

Denis Kurets was with you and the release of the information technology blog. Subscribe to updates. Write your comments and wishes. And may your path of knowledge be fast and successful!
class="eliadunit">Programs for remote access in Russian are collected in this section. All programs can be downloaded for free with activation keys.
Dameware Mini Remote Control is a high-powered software that is necessary to remotely control a personal computer. This program is an excellent solution when you need to connect to laptops, desktops, servers in order to solve a specific problem that has arisen for one reason or another. Today, this product has been in demand for more than 10 years among everyone who works in the IT field, since with it you can…
Remote Desktop Connection Manager is an alternative RDP client program developed by Microsoft. The purpose of the application is to conveniently manage a considerable number of remote RDP connections with different servers from one device. Remote Desktop Connection Manager allows you to group computers and workstations into groups, defining individual configurations for a specific group. Download for free Remote Desktop Manager 2019.2.24.0 + activation Password for all archives: 1progs To activate, run Block.bat as administrator, then generate…
TeamViewer is a well-known software that allows you to remotely access your computer via the Internet. This program is one of the most popular for such purposes. In addition, TeamViewer has the ability to share files, make presentations and chat. In order to connect to the computer, this program must also be installed there. It is not necessary to know the IP address. Let's look at the main advantages of this application. Download TeamViewer 15.1.3937 Free…
AnyDesk is a program designed for remotely connecting a PC. It is used for all popular operating systems. Remote control occurs if there is a client program and the user has the necessary data from this device. The advantage of the program is that it does not have to be installed on your computer. A security system has been developed that allows you to safely transfer data between devices. Video docker allows you to optimize the transmitted image from another device. Download for free AnyDesk 5.4.2 Russian version Password for everyone...
Supremo is a multifunctional remote access client that is designed for remote control of a personal computer. In simple words: users will be able to control other devices from their computers if they confirm access to the work and provide a password to confirm this operation. Working with the program is as convenient and simple as possible: just indicate the device ID address, as well as confirm access using a password. Both computers must have this program installed, otherwise synchronization will be impossible. Download…
UltraVNC is a program for remote computer control, it is similar to programs that developers install on various applications to help with settings when downloading it to a PC. This program is convenient if you need to provide assistance when working on a remote device or installing programs. Anyone located at a great distance from their computer can feel the full assistance from such an application. All you need to do is install a “server” on your PC and a “viewer” on your mobile device, then connect to...
TightVNC is an application for remote computer access. This program is used by administrators to search for a computer in a general network. It consists of two parts: the first is the server, the second is the client. To connect, the server side gives an agreement and makes settings; the connection occurs directly and not through the server. The main difference from similar programs is the simplicity of the interface, but despite this it has great potential and enviable stability. Tightvnc can be downloaded for free from the developer’s website, the program is presented…
Splashtop is an application that allows you to remotely control your computer from a mobile device. This program makes it possible to use all the functionality of a computer remotely, for example, via a tablet. The transfer speed is surprising and depends only on the quality of the connection. The application runs on Android, IOS, Windows operating systems on mobile applications. This application is widely used in listening to music and watching videos. You can also play games and open applications with it. The tablet appears...
How can you keep an eye on your child if you are not nearby? Easily. There are programs that allow you to view the screen via the Internet by linking to an account. Moreover, in addition to the tracking function, each of these programs has a lot of additional functions. Let's look at the most popular software for tracking and remote control.
NeoSpy is a program for remote monitoring of a user's PC with an online screen viewing function via the Internet (linked to an account). With this software product, you can always view the screen of your home or work PC not only from another computer, but even from a phone or tablet via the Internet. The program is easy to install: you download the installation wizard from the official website, which downloads the program itself and installs it (by the way, there are no advertising or intrusive toolbars, which even large software companies have been guilty of lately, in the distribution). Next, after installation, go to settings and link the program to your account, after which the online screen viewing function will be available.
NeoSpy spy program
In addition to regular viewing, you can choose what to watch: windows that open, text typed on the keyboard, sites visited by the user, as well as correspondence in instant messengers installed on the user’s PC.
As can be seen from the screenshot of the settings, the program provides a lot of opportunities that everyone chooses for themselves, based on their goals and objectives.
Linking your account is very easy. Select “View via Internet”, enter your username and password, and click “Connect”. Turn on tracking.
Now go to the program website, enter your username and password, go to the “Account” tab and click on “Your computers”.

Online tracking in your account
In addition to viewing the screen itself, you can connect to your webcam, which will help you monitor not only the actions on the computer, but also around it. You can monitor whether your child is doing his homework.
If the program is on a portable device, the program shows on the map the geographic location of your device at the time of use.
It should be noted that of the programs of this kind considered, it is NeoSpy that makes it possible to conduct hidden online tracking and allows you to save video from the screen in your account. It is also possible to skip rather than watch the entire video. Unlike NeoSpy, other programs do not save video, and tracking requires you to be constantly connected to the screen.
An important difference between NeoSpy and other programs presented is completely hidden surveillance, that is, the user does not see messages about your connection on his screen, as, for example, in TeamViewer and other programs, thanks to this your child will not know that he is being monitored.What else can be done with NeoSpy?
Traffic encryption. All data transmitted through the server is securely encrypted. They are almost impossible to decipher. NeoSpy uses AES encryption of data transmitted over the network (image screen, motion indicator, keyboard signals, etc.). Double password protection. The first is the online account: the password that is used to log into the online system. This only allows you to view a list of computers previously added to the online system, but does not allow you to contact them. The second password (and most important) is the access password, which allows you to connect to the computer and see sensitive data.

Main window interface
Remote Access Alerts
When using the "Messages" option, you can notify the user about something. Other security features:
The user cannot delete or close the tracking module even through the task manager.
When controlling a remote PC, the screen of that computer (via the Internet or local network) is displayed on your own monitor. That is, you will be able to see everything on the remote PC as if you were sitting in front of it, regardless of the distance between the PCs.
The program allows you to work with various remote PCs simultaneously, from anywhere in the world.
How is Remote Desktop in NeoSpy different from other programs?The main advantages of NeoSpy remote monitoring software are:
- Built-in keylogger;
- High speed and performance;
- Internet gateway allows you to connect to a remote PC behind a firewall or when there is no routing IP address or the IP address changes dynamically - this is a unique feature of the program!
- Low network load due to optimized data compression algorithm. The encryption algorithm makes using the program absolutely safe;
- Multiple simultaneous connections. With this feature, the network administrator can effectively view various remote computers at the same time;
- The graphical interface is convenient and intuitive;
- Remote Desktop is easy to install. You don't need to be a computer expert to set up and operate this software.
UltraVNC - this program is effective and simple, and, no less important, it is free. It displays the desktop of a remote PC (via the Internet or local network) on your computer screen. The program allows you to use your mouse and keyboard to control the remote computer you are connected to. You can manage this computer as if it were your own. This program will be especially useful for technical support workers, because... will help you quickly gain access to the client’s PC and carry out the necessary operations, no matter where the client is located. The program does not require particularly complex actions from the client and is launched from a file. UltraVNC works perfectly under almost all operating systems (Windows: from Windows 95 to Windows8, Linux, Mac OS) x32 and x64. Using the built-in viewer, you can share files between computers.

UltraVNC interface
Who will benefit from UltraVNC - for those who need support for remote Windows users. The products have been specially developed to meet the needs of:
- Help Desk;
- IT departments;
- Users who want to help their relatives and friends, or access home PCs from work or an Internet cafe.
DameWare Mini Remote Control
Powerful remote control software for PCs running on Windows, Linux and Mac OS. DameWare Mini Remote Control (MRC) is one of the best software for remote software management. DameWare Mini Remote Control is available from DameWare Central Server and Administration Console for advanced management. MRC is licensed based on the number of equipment in your organization. The program was created more than 10 years ago and since then thousands of IT administrators have received an ideal connection to remote servers, PCs and laptops thanks to DameWare Mini Remote Control. DameWare MRC provides remote management for Mac OS X, Windows and Linux systems and includes many great features for remote PC management.
Clear control interface. You can receive information from remote computers that can be located anywhere: in the same building, on the other side of town, or all over the world. DameWare MRC makes remote desktop sharing incredibly fast.
Advantages of DameWare Mini Remote Control:
- Remote control of Windows, Mac OS X and Linux systems. Connection via MRK, RDP or VNC from one console. Each user has their own separate screen for easy remote troubleshooting. File transfers are possible during remote control sessions Mini Remote Control can be deployed with a DameWare central server and administration console that provides advanced management capabilities from a central location. You can reboot your computer and turn on sleeping computers, remotely edit BIOS settings, and create Mount ISO images on remote PCs. It is possible to install or reinstall the OS remotely.
With DameWare MRC's chat feature, you can chat online with remote users to configure their computer. DameWare MRC allows you to define rules for accessing remote PCs for different types of users: require non-administrators to obtain permission for remote connections; allow administrators to connect without permission; Manage access rights using Group Policy. Automatically deploy remote control: DameWare MSI Builder is included with the MRC, allowing you to create an MSI package for installing the Agent Client Service MRC, including any custom settings. DameWare Mini Remote Control supports authentication and remote connection using a smart card. MRC is included in the DameWare Remote Support (DRS) system administration tool. In addition to the RTO, the DRS software package includes DameWare Mobile, Windows administration, Active Directory, management, configuration and export tools. However, please note that to download the trial version you will need to fill out a registration form.
Radmin 3 is a program for remote control of your PC running Windows OS. The program makes it possible to work on several computers at once quite fully, simply by connecting to the desktop of a remote PC. The software allows you to use many languages and exchange files. The ability to work in Telnet mode makes it possible to manage a large organization remotely without problems.

Remote management Radmin
Program features:
- The program is compatible with all versions of Windows OS.
- Excellent operating speed.
- Secure connection.
- Supports Intel® AMT features.
- Works under Windows 8 x86 and x64.
- Support for multi-user chats, both text and voice.
- Work with multiple monitors.
- Easy and simple to install.
- File transfer is protected.
- Does not require a lot of system resources.
- Supports multiple connections simultaneously.
- Technical support is free.
Additional features:
Ability to select screen color transmission mode: from 2 thousand to 16 million colors.
- Mouse wheel support.
- Support for keyboard shortcuts.
- There is no limitation on the screen resolution of the remote PC.
- The viewer is compatible with Wine (runs under Linux OS).
- Clipboard support.
- Unlimited address book.
- Built-in search for Radmin servers.
- Excellent information.
- Work in TelNet mode.
- Possibility of remote shutdown of the PC.
- Logging of all connections.
Another program that allows you to easily connect to any computer that has Internet access is TeamViewer. All you need is an ID and password, because the program can be launched even without installation. TeamViewer is a program for managing a PC, showing a specific window from your screen to other users, which helps to train employees, hold meetings, listen to employee reports, and simply discuss and plan work without leaving the computer.

Remote control via TeamViewer
You can create an account on the program website and add any computer to your address book. Lists inside the book are supported, which will allow you to connect to the desired computer in just two clicks, simply by selecting the desired PC name from the list. For permanent connections, you can set a permanent password and save it in your address book. This will allow you to quickly connect to the desired computer without entering a password. Advantages of TeamViewer: The program has a conference mode (but there is a limit of 25 participants). There is support for mobile devices. You can take screenshots in real time. TeamViewer guarantees connection security. The program is shareware and has restrictions on free use. Paid options are more suitable for large companies. However, there are some connection issues between different versions. A user with version 9 will no longer be able to connect to a user with version 4.
Anyplace Control is a remote control program. The program displays the remote desktop of the client's computer on your screen and allows you to control it remotely using your own mouse and keyboard. Some of the popular software applications include remote support within a corporate environment or simply working from home with remote access to office computers.
Transfer files between PCs Anyplace Control provides a simple and secure option for transferring files between PCs using an interface that is similar to Windows XP Explorer. Anyplace Control file transfer software is very fast and reliable. Even if the network fails, it will resume transmission at the location where the failure occurred. Thus, there is no need to start the procedure again. There is no need to configure a router or firewall. You will be able to connect to the remote desktop in three different ways: "Connection IP", "Account Connection" and "Computer Connection ID" Anyplace Control provides access to remote PCs over the Internet that do not have external IP addresses. You can easily connect to other PCs with dynamic IP addresses or internal (192.168.xx) addresses without any additional network configurations. You can easily connect to your PC over the Internet, even if it is behind a router, firewall, or proxy server. There is no need to open firewall ports or configure a router.

Anyplace Control Interface
You can connect to your client in a few clicks. Anyplace Control does not require any special computer skills. If the standard installation of the host module is too complex, then the remote user can manually download the software by clicking on a special link that has a pre-configured host module (does not require installation or any additional configuration).
To summarize, we can say that most programs support the most necessary functions - direct control of a remote PC. Some are free, some will have to be purchased. Some programs support creating accounts, which greatly simplifies remote management in the future. Often you can simply view the screen of a remote computer without taking over control of the latter. However, not all programs are multiplatform. Some work exclusively under the control of only one operating system, which is not very convenient in a large organization. For such purposes, it is much more advisable to use paid global products that support the creation of accounts and lists of PCs, saving passwords, run most of the most popular operating systems and are easily integrated into a large organization. If you just need to periodically monitor the screen of your home PC remotely, there is no point in buying expensive software, most of the functions of which you will not need. It is also worth paying attention to the operation of the program itself: some clearly show your remote presence on the computer, and some do not show themselves at all, which will be very useful for covert monitoring of the computer.