In order to use your computer's resources more efficiently, you need to correctly configure your PC's energy consumption settings. Windows 10 in terms of energy saving settings is not much different from previous versions of the operating system.
In order to go to the required “Power Options” section, you need to go to the control panel. This can be done, for example, by right-clicking on the Start button. And select “Control Panel” in the context menu or - if you have a laptop - right-click on the battery icon in the system tray. After that, find the “Power Options” item. To make it easier for you to search in the control panel, in the “View” item, switch the view from categories to icons.
By default, Windows has three performance modes. The “Maximum Performance” mode allows you to enjoy the system to the fullest - however, the energy consumption in this case will be considerable. On the contrary, “Power Saver” allows the device to run longer on battery power. True, at the expense of power. The third option is a trade-off between energy consumption and power. Each mode can be customized at your own discretion. To do this, determine the required scheme and select “Configure power supply scheme”.

Basically, adjusting the power settings is for configuring the computer's sleep mode: you select the optimal time interval for the PC to go to sleep and turn off the display to reduce the computer's power consumption.
Additional power settings allow you to fine-tune your power consumption. For example, you can clarify whether your system will require you to enter a password when waking up, after what period of time the PC will go into hibernation, whether you need to leave power to the USB ports in sleep mode, how the system will react to pressing buttons on the system unit.

If you want to create a power plan from scratch, you need to select the “Create a power plan” option. This item can also help if your power settings go haywire when booting the system. The Setup Wizard will prompt you to select one of three default modes you want to edit and allow you to select a schema name. By optimally customizing each item of additional system settings, you can extend the battery life of your laptop or reduce the amount of energy consumed by a powerful desktop PC.
Type the word "Scheme" into the Start menu text box and select "Change power plan." Alternatively, right-click the Windows icon and navigate to the Power Options menu bar. Here, in the “Power and sleep” section on the right side of the window, click on “Advanced power settings”.
By default, the system is set to a balanced power supply scheme, that is, a balance is set between performance and energy consumption. The “Energy Saving” scheme is provided for the battery mode. In this mode, the screen turns off faster and the device goes into sleep mode.
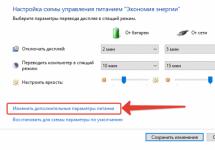
 If you want to customize power consumption, click on the “Customize power plan” link. In the window that opens, you can change the preset time or completely disable some options. This prevents, for example, the device from going into sleep mode or turning off the screen completely. Click on “Save Changes” and the settings will be instantly activated.

Additional settings can also be found under Change advanced power settings. In "Advanced Settings", for example, you can select the option to turn off the hard drive after a certain period of time. This saves battery, but when returning to work you will have to wait a few seconds for the device to “accelerate”.

The Power Buttons and Lid option lets you choose what happens when you close the laptop's lid. Select from the following options: No action required, Sleep, Hibernate, or Shut down.
If there is no activity for more than three hours, Windows will in any case send the device to hibernation mode, regardless of whether it is powered from the network or from the battery.
If you want to disable this option, then find the “Sleep” and “Sleep after” item in the settings and set the “Never” option. Confirm the settings by clicking on “OK”. If you click on the “Restore Defaults” button, you can undo the changes you made.
Photo: manufacturing company
Whatever version of Windows is installed on the computer, the user will want to configure it in such a way as to get maximum performance. This issue is especially acute for owners of weak hardware, which requires maximum free resources for stable operation. Therefore, tuning Windows 10 for maximum performance is an excellent priority for them when purchasing new components such as a processor or video card.
Disk Defragmenter
When adding a large number of files to the hard drive, information is not written sequentially, but in fragments on different parts of the disk surface. In this case, fragmentation occurs, and when requesting data, the computer takes longer to process it because it needs to put all the “pieces” together. To minimize such situations, defragment your disk. This is done using standard utilities.
Good to know! In Windows 10, disk defragmentation occurs automatically once a week at a set time. But you can start this process after adding a large amount of information to your computer in order to optimize the disk.
Important! In the "Disk Optimization" window, you can enable/disable and configure automatic defragmentation.
Startup optimization
In many programs, when they are installed on a computer, the function is enabled during system startup. They may not be used by the user, but, working in the background, they take up computer resources, so its work slows down. Applications that you do not use should be disabled or completely removed from your computer if they are not needed.

Alternative options for disabling programs in startup can be seen in the video.
Disabling unnecessary services
Just like programs in startup, some Windows 10 services load computer resources, which leads to slowdowns. Disabling them will increase system performance.
- In the Run window, enter the command services.msc.Alternative option: Control Panel > Administrative Tools > Services or open System configuration (in the Run window, enter msconfig) and go to the Services tab.

- RMB > Properties > Startup Type > Disabled.

- When using the Computer Configuration utility, uncheck the required services and save the changes.

- Restart your computer.
Video
In the video you can learn more about which Windows 10 services can be disabled and how to do it.
Setting up visual effects
In Windows 10, a lot of PC resources are used to create interface visuals. Disabling some performance parameters (visual effects) will increase the speed of older computers. But they will have less effect on modern gaming PCs.

Disable windows and taskbar adaptation to the desktop background color, as well as Windows animation.

Indexing speeds up the search for files stored on your computer. But this function constantly scans them, monitors changes, and therefore uses system resources.
Important! You should only disable indexing when you are not using search on your computer.

Driver setup
One of the problems with slow operation of Windows 10, which is encountered by a large number of users, is non-original or outdated drivers. This problem is especially relevant for a video card. Look at the driver provider and their version in Device Manager.

Cleaning the Temp folder
The Temp folder in Windows 10 is used to store temporary and intermediate files created by the system and programs. Therefore, to speed up your computer, clean it:

An alternative way is to use the built-in Disk Cleanup utility.

Power settings
By default, Windows 10 is set to Balanced power mode, which reduces processor speed when the device is idle or does not require maximum hardware. To speed things up, set your computer to High Performance power mode.

Cleaning from viruses and malware
If after following the steps above, your PC still slows down and you don’t understand why this is happening, viruses or malware are probably the cause. Check Windows 10 with antivirus programs such as DrWEB Cureit or Malwarebytes Anti-Malware.
Conclusion
Setting your Windows computer to perform at its best can help it run faster. To do this, you need to disable all visual effects, remove viruses, and also change your PC settings: disable indexing and some services, update drivers.
Change how your computer uses power when plugged in or running on battery power, and learn about your shutdown and sleep options.
Modify power management schemes to suit your needs
Power plans are sets of software and hardware settings that determine how your computer uses power. Choose from preset power plans to consume less power, maximize performance, or find the perfect balance between the two. You can also create custom schemas to suit your performance needs.
Windows enables normal shutdown mode for faster shutdown, or full shutdown mode for long-term storage, updating components, and diagnosing problems.
Using sleep mode
If the computer is idle for a period of time, the computer enters a sleep mode that uses less power. In this mode, all applications remain open for quick launch when the user returns to the computer. This mode uses lower power consumption and is recommended when the user is away from the computer for a while. You can manually enter sleep mode or set the computer to automatically enter sleep mode after a period of inactivity.
To manually enter sleep mode, click the Windows icon, click Power Options, then click Sleep. Follow these steps to change when your computer automatically goes to sleep.
Using Hibernation Mode
If the computer is inactive for a while, hibernation mode turns off the computer but leaves some applications open for quick launch when the computer turns on. Hibernation mode uses less power than Sleep mode. This mode is recommended if you plan not to use the computer for some time. Add Hibernation Mode to the power menu and set your computer to automatically go into hibernation mode after a period of inactivity.
Change what happens when you press the power button
Choose options for sleep, hibernation, display, and shutdown when you press the power button.
This compact review is entirely dedicated to the new custom mode " Battery Saving"(Battery Saver) in, which can extend the battery life of a laptop (tablet). It automatically turns on when the charge level reaches a critical level. Battery Saver is a simplified analogue of standard power management schemes, but with its own useful “tricks” (for example, it is possible to find out which programs consume the most energy), which you can read about in interesting detail below.

What does Battery Saver mode do??
Function Battery Saver was borrowed from Windows Phone (Mobile) and Android. By default, when the battery charge drops to 20%, the economy mode turns on automatically, and:
- display brightness decreases;
- disables the work in the background of universal applications and sending push-notifications.
Important!
Push-notification – pop-up informative message about important system events and updates.
How to enable battery saver

The mode can be activated manually in exactly two mouse clicks. To do this, click on the battery icon in the notification area, and in the window that appears, click on the " tile Battery Saving". When the mode is enabled, a green leaf will appear on the icon.
Another way to launch is through the Action Center Windows 10, i.e. Click on the notification icon in the system tray (tray) and then on the voiced tile.
Setting up the "Battery Saving" mode"

For settings Battery Saver open the menu " Start" and select " Options" → in the panel, go to the section " System" → "Battery Saving", where check that the corresponding mode of your laptop is enabled.
Let's start getting acquainted with the applet's capabilities by clicking on the bottom link " Battery saving options". Here it makes sense to experiment with the charge level at which the described mode is activated - for example, for a new laptop (battery), try setting the mark to 15%, and for a “dying” battery it would be logical to increase the threshold from the default 20 to 30 or 40 percent .

If you want a utility for daily use, such as , to continue running in the background even in economy mode, in the “Always Allowed” section, click on the button “ Add application"→ find what you need in the list provided, mark it and click " Add".

Returning to the subsection " Battery Saving", let's get acquainted with the latest "delicacy" of the monitored power supply mode in Windows 10, namely with software ranked by time and amount of energy consumed (see " Battery usage").
By selecting a suitable period of time (say, a day), you can see all active applications and the extent of their impact on the battery charge. If some program that is not important to you consumes too much energy, you should disable it from running in the background by clicking on it and clicking on " Intelligence" and in the new window set the desired restriction.

It is also better to deactivate the work in the background of “Calendar”, “Alarm Clock” and other one-time use software that reduces the operating time of the device away from sockets.
About the usefulness of the "Battery Saver" applet"
The issue is controversial, at least in its current, option-poor form. With standard OS tools, mode Battery Saver looks like a “fifth wheel” or, more precisely, like a “blank” in the future for a convenient and ergonomic bonus tool for managing the energy consumption of your laptop, netbook or tablet.
Perhaps a major update will bring additional functionality to the hero of the publication Windows 10 Anniversary Update, which we will find out about very, very soon...
Dmitriy dmitry_spb Evdokimov