And, thanks to its affordable price and a fairly wide number of options, it immediately won the sympathy of many consumers. However, it is no coincidence that experienced users of inexpensive gadgets are obviously interested in the question of how to flash a phone. It's no secret that factory firmware does not last forever, and over time its performance can deteriorate significantly. If you become the owner of an inexpensive Tele2 Mini smartphone, you will most likely need firmware.
Of course, don't flash your device if it's not necessary. You should do flashing when the gadget starts to freeze or turn off for no apparent reason. For example, if its battery is charged, but the shutdown happens anyway. Also, one of the signs that the factory settings are not in order may be frequent and spontaneous rebooting of the smartphone. Most often, in all the described cases, an update of the firmware version is required, which does not have to be carried out in a workshop.
The firmware version, which anyone can use at home, can be downloaded to your computer for free. It is easy to find both official and unofficial firmware programs on the Internet.
How to prepare your phone for firmware update
Before starting the firmware, be sure to check if your Tele2 Mini is charged. It is advisable that the battery is fully charged. After checking the battery level, you need to turn off the smartphone and connect it to the cable. Then you should open the battery compartment at the back, remove the battery for a few seconds and put it back. Also, if you have to connect the gadget to your PC for the first time, do not forget to download and install the drivers first. This will greatly facilitate the entire work process.
And of course, install the program in advance SP Flash Tool to your personal computer.

Precautionary measures
If the firmware is carried out incorrectly, it can lead to irreparable consequences. It should be remembered that it is not recommended to use unofficial programs created by PC enthusiasts. If you flash your phone using the wrong utility, there is a high probability that all programs will completely fail, and there may simply not be a second attempt.
How to install archived data from Firmware
Before you start flashing your smartphone by working with Flashtool, with Firmware it is necessary to download archived data. This will help make the firmware as correct as possible. The archive can be easily found by going to the manufacturer’s website or on special forums. For example, there is an electronic service designated 4pda: it contains software for all types of phones, including Tele two. The descriptions contain detailed algorithms of actions, which will not be difficult to use. At the same time, on the forums you can read reviews from other device owners.
Then you will need to do the following:
- Install drivers for your phone on your personal computer. As a rule, they are supplied in one set with the gadget when purchasing it. If they are not included in the package, they can be downloaded from the Tele2 website, or go to the official page of the Tele2 Mini phone.
- After installing the drivers, find the FlashTool utility on the Internet. If it starts to slow down when starting, hover the right mouse button over the exe file. In chapter "Properties" find the tab "Compatibility" and configure the program’s compatibility settings with your computer’s operating system (Windows XP or other OS).
It would be useful to remind you that before connecting the USB cable to the computer The smartphone must be fully charged : If the battery of a gadget connected to a computer stops working, serious problems may occur with it.
Now it won't hurt you copy all important personal data to another electronic medium , because the upcoming firmware may destroy the valuable information available in your gadget. After copying the data and downloading the drivers, make additional settings for your phone (this will be necessary in order to download the Firmware).
Additional phone settings
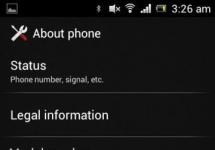
- in point "Options" find the sub-item "About the device";
- click on build number specified in the subparagraph;
- After a few clicks the following message should pop up: "Developer settings activated" , then return to "Parameters";
- in the menu, click on the item "Functions";
- click on the check mark when you see the inscription "USB debugging";
- now we need turn off smartphone , remove the battery from the compartment and insert it back after 5-10 seconds .
Only after all the settings have been completed should you finally connect the phone to your personal computer via a USB cable.

After connecting the phone to the computer, wait until the PC sees the new electronic device, detects and installs drivers. As a rule, this does not take very long. The main thing is to be patient and calm and not to press unnecessary buttons during the process.
Now go to the section "Control Panel" on your computer, find the sub-item "Sound and Equipment" , and in it click on the inscription "Device Manager" . Carefully review the list you see, find it has its own device model . Pay special attention to which port the phone connects to: loading Firmware via SP will depend on this port. Now disconnect the phone from the computer, and one or another version of the software will help you complete further steps.
How to flash your phone in a different way: use the “classic” version of FlashTool
For this:
- just run the utility FlashTool;
- V "Options" select the port to which your phone is connected (it can be ComPort or another);
- in point "Download Agent" find the file with the bin extension;
- click on the inscription "SCATTER-LOAD...";
- select text file "Device model" in the directory where the firmware is located;
- disconnect the device , remove the battery from the compartment , insert it again ;
- connect your phone via USB cable to your computer ;
- in this case Windows XP or another OS will launch the Firmware automatically ;
- now turn on your phone And wait some time until the finished firmware is loaded.
If you have a Tele2 Mini phone, its firmware should be flashed following the recommendations of only official utility developers. This is the most reliable way to avoid unnecessary program freezes and irreparable malfunctions of your smartphone. If you cannot install the firmware, check the status of the drivers and operating systems of both your phone and your computer yourself. Most likely, it's them. As a last resort, try using other software.
Are you planning to flash your smartphone? We'll tell you how to update firmware on Tele2 Mini (1.1). We have written detailed instructions for you.
Why update the firmware on Android

Everyone is motivated by different reasons.
- Problems with the camera, blurry macro photography, for example.
- There is a problem with the display response, or more specifically, with the response speed.
- I would like to see the new Android Pie 9.0.
- I'm tired of the old version of Android and want to expand its functionality.
- The smartphone does not turn on or is terribly glitchy.
- The phone battery has stopped charging.

- First you need to download the firmware by selecting one of the options below. Along with it in the archive is the necessary set of programs (TWRP and others).
- Next, unpack the archive and find the file “instructions_rootgadget.txt”. The archive can be unpacked using any archiver (7ZIP, WinRar and others).
- The firmware file contained in the zip archive must be downloaded to a memory card or smartphone memory.
- For other information and sequence of actions, see the text instructions.
Tele2 Mini firmware (1.1)
- Android Pie 9.0 - one might say the flagship OS, but still a little unfinished
- 8.0 Oreo is an excellent option, with a minimum of bugs and rich functionality, but version 9 is certainly better.
- 7.0 Nougat is a stable version in all respects, it works even on low-power hardware.
- 6.0 Marshmallow - versions 5 and 6 are already really old, although they were once the pinnacle of progress. But if you switch to them from versions 3 or 4, then of course the difference is very noticeable.
Root rights

If you want to get root access, you can use a universal program Rookthp Pro 2.4, Website address: rootkhp.pro. Instructions for using the program can be found. We can also recommend universal ones ZYKUroot version 2.2. You can find out information about him at zykuroot.info
We won’t even talk about more popular programs; Kingo and Framaroot are always popular, although they are losing ground a little
How they find us
- tele2 mini firmware
- tele2 mini 1 1 firmware
- Tele2 mini update v1 01 24052017
T2 RTK Holding (Tele2) begins selling smartphones under its own brand Tele2 Mini. Tele2 Mini will soon appear in Tele2 operator showrooms in 31 regions of the country.
The device will cost approximately 1890 rubles. and according to the operator’s plan, it should become the cheapest offer on the operator’s smartphone market. Previously, the Tele2 operator offered only 3G and 4G modems and routers under its brand.
The smartphone was manufactured by the Chinese company Haier, installed the Android 5.1 Lollipop operating system, equipped with a dual-core MediaTek processor, a four-inch screen with a resolution of 800x480 and two cameras: the main one with a resolution of 2 MP, the front one with a resolution of 0.3 MP.
The device has slots for two SIM cards and, as written above, the first slot can only work with a Tele2 SIM card. 3G mode is supported only in the first slot, and the second slot only works in GSM mode. You can unlock your phone with a code. The cost of the code is 250 rubles.
Type: Smartphone
OS version: Android 5.1
Type of shell: classical
Case material: plastic
Control: touch buttons
Number of SIM cards: 2
Multi-SIM operation mode: alternating
Weight: 111 g
Dimensions (WxHxD): 64.5x125.4x10.9 mm
Screen
Screen type: color, touch
Touch screen type: multi-touch, capacitive
Diagonal: 4 inch
Image Size: 800x480
Pixels per inch (PPI): 233
Multimedia capabilities
AndCamera: 2 million pixels
Front-camera: yes, 0.3 million pixels.
Audio: MP3, FM radio
Headphone Jack: 3.5 mm
Connection
Standard: GSM 900/1800/1900, 3G
Interfaces: Wi-Fi 802.11n, Bluetooth, USB
Satellite navigation: GPS
Memory and processor
CPU: MediaTek MT6572, 1300 MHz
Number of processor cores: 2
Video processor: Mali-400MP
Built-in memory capacity: 4 GB
RAM capacity: 512 MB
Memory card slot: Yes, up to 32 GB
Nutrition
Battery capacity: 1500 mAh
Charging connector type: micro-USB
Reset settings (Hard Reset) Tele2 Mini
1.
Turn off your phone
2.
Press the button " Volume +" and the " button Inclusion"
3.
As soon as the Tele2 logo appears, release the "Power" button
4.
In a few seconds, an android with an open belly will appear
5.
Press the " Inclusion" and press briefly " Volume +"you will be taken to the standard Recovery menu
6.
Use the Volume buttons to select " wipe data/factory reset" and confirm with the " button Inclusion"
7.
Then select " Yes -- delete all user data" and confirm with the " button Inclusion"
8.
After the inscription " Data wipe complete", select the item " reboot system now"
To reset the settings, you must boot the device in mode Recovery. You can do this as on other Androids - you need to enable Tele2 mini, while holding down the Power and Volume Down (-) keys. You need to keep pressing until the device turns on.
After loading, the engineering menu will appear in Chinese. Need volume buttons ( + / - ) select the third menu item from the bottom (the only one where Latin characters are present - “ eMMC") and the Power button to confirm your choice.
After a reboot, the device starts in its original state - the same as it left the factory.
Unlocking / Unlocking Tele2 Mini
1. To get the unlock code you will need to find IMEI slot No. 1 your device. The IMEI of the phone can be found on the sticker under the battery or by entering the following combination on the phone: *#06#
2. Pay for the goods (if you pay through an external payment system ( trading platform) and upon completion of payment you will see a button "
The easiest way to solve this problem is to contact any cell phone store, where an employee will unlock the phone themselves or submit a request to the service center. But it may happen that the Tele2 Mini mobile device requires unlocking urgently. There are several ways to unlock your phone for free and handle the task yourself.
For Tele2 Mini, unlocking will be required if you decide to insert a SIM card from another operator into the phone. The whole problem lies in the NCK code, which is a kind of copyright protection - when installing a SIM card that is not similar to the brand of the device, a block occurs. After entering the code value, the connection will be unlinked, and the phone will become operational for all global operators.

Brief instructions on how to flash your phone:
- Charge batteries must be more than 50%.
- Turn off the device , the cable must not be connected to the USB connector.
- Remove and reinsert the battery .
- Make sure installation on PC all necessary programs.
- Launch and MT-6572-Android-scatter. Look for the main files for unlocking the phone in the folder with the firmware.
- Press the button downloads.
- To plug phone to computer via USB cable. The firmware should start automatically.
- After finishing the firmware, turn off the phone .
To flash the firmware, you need to know the make and model of the smartphone, the processor, the LCD driver version, preferably the Kernel version - this can be found in the device settings or the official instructions.
After this manipulation, the slot fits well with all SIM cards of any operator, without requiring a code.
As you know, any phone has a “Settings” section, in which you can change certain characteristics: set the screen brightness, volume, set the date and time, and much more. This menu is available to any user when the phone is turned on. However, there is another menu that allows you to use a more extensive list of settings. Gaining access to this section is called the phrase “get root rights”. Through the same section, you can also reset the settings to factory settings (hard reset). This operation may be required if you are preparing the phone for sale, or the device has become unstable, which may require a complete cleaning. During a hard reset operation, the phone is cleaned of everything that has accumulated on it during use and returns to its original state. In this article you will learn how to root Tele2 Midi. We will look at an example of using the extended menu and reset the settings.
Getting Root rights to Tele2 Midi
As we have already said, Root rights are full access to the phone system. To get it on Tele2 Midi we will use third-party programs. There are programs for computers and for Android OS. Below are their names and 2 installation examples.
But first you need to connect the device to “USB debugging” mode and give permission to install applications from unknown sources. How to do it?
Access to installation from unknown sources
Settings - Security - Set the “On” position next to the “Unknown sources” section.
USB Debugging
The instructions are similar for any Android OS:
1. Section “Settings” - then “Special features” - look for the item “For developers”.


2. The switch opposite the “USB Debugging” item must be turned on.


3. When you connect your smartphone to your computer, you will see a notification on the screen indicating that debugging is enabled.
Programs
As mentioned above, there are PC programs that help you obtain Root rights to Tele2 Midi. Here are some of them:
- Kingo Android Root (via PC)
- OneClickRoot (on smartphone)
- King Root (on smartphone)
Instructions for Kingo Android ROOT
- Download and install the Kingo Android ROOT application on your computer.

- Enable USB debugging mode and give permission to install applications from unknown sources.
- Run Kingo Android ROOT. Only after this, connect your device to your computer via USB.

- After all the drivers are installed, click “ROOT”. This will trigger a system hack. When it is done, you will need to reboot the device.


We hope you were able to Root your Tele2 Midi.
Instructions with Kingroot
After this, the phone will reboot and reset its settings. After a reboot, a block from Google or the so-called FRP may work. In this case, you will see a notification on the screen of your gadget: Account confirmation. “The device has been restored to its default settings...” Below there will be a field for entering the email and password that you specified when initially registering your phone in PlayMarket. If you do not remember this address and password, you need to bypass the blocking. Below are 2 ways to bypass it:
Method 1
- Click on the “Phone and email address” field so that the italics blink, and then hold down the round button at the bottom of the phone. You have a new menu in which you need to write “settings” and follow this request. This will take you to the Settings menu.
- Then scroll down the menu and go to the “About smartphone” menu.

4. Click on "developer options".
5. Re-check the “allow bootloader/OEM unlocking” box.
6. Then go to "Backup and Reset".
7. Then click "Reset settings".
After this, all settings will be reset.
Method 2
First of all, you need to download frp tele 2 midi zip to your computer. You just need to enter the name of this program into any browser, and the search engine will give you sites on which this archive is present. You will also need programs that you can download at: https://dfiles.ru/files/f9d6r1585%C2%A0com.sika524+StartSetting+ES_Exp.zip
The second method is done through a computer. Follow these steps:
- Prepare a cable connecting the computer and the phone connector.
- Turn off your phone. Then take out the battery and put it back in. Leave the switched off phone with the battery in front of you so that you are in front of the computer next to the cable. The cable must be plugged into the computer.
- Unzip the downloaded archives on your computer. Open the folder obtained from the archive that you downloaded from the address indicated above. It should contain 4 files.

- Open the “MTK-ADB-SDS Driver” file. Inside it, run the @MTK Drivers after installer file." Install it (hereinafter with all the agreements). At this point, you have installed the necessary drivers.
- Next, in the first archive, go to the “SP FLASH TOOL” folder.
- In it, run the flash_tool.exe file. A window will open in front of you.
- In this window on the right, click scatter loading. A window will open in front of you, in which you need to go to the FRP TELE 2 MIDI folder that you downloaded earlier. In it you will find the file “MT 6580_Android_Scatter.txt”. Click on it and the “open” button.
- You will be taken to the main program window with the checkboxes unchecked.
- Go to the “Format” tab.
- Check the box for Manual Format Flash. An additional menu appears.
- In this menu, the region item should say EMMC_User. In the “Begin address” item enter: 0x4fa0000, and in the “format length” 0x100000
- Click Start in the top left corner and then connect the cord to your phone.
- If you did everything correctly, then in the program on the computer a red bar will run first, followed by a green one. Next, a green “OK” check mark will appear. After this, you will no longer need a computer to unlock it.
- Now disconnect the cable from your phone. Take the battery out and put it back in again. Turn on your phone.
Conclusion
After this, the phone's FRP lock will be removed and you will perform a factory reset on the 2 midi body. The phone itself will make the initial necessary settings upon startup and offer you the opportunity to register a new Google account. Then you need to go to the settings menu and repeat the following points:
- Scroll down the menu and go to the “About smartphone” menu.
- Then scroll down the menu again to Build Number. Click on the “build number” item 7 times in quick succession. If nothing happens after that, then the phone is still locked. In this case, refer to method 2. If this item worked, then the “Developer Options” button will appear in front of you.
- Click on "developer options".
- Uncheck the "Allow bootloader/OEM unlocking" box. This item is sometimes referred to as "OEM Unlock."
Factory reset complete!