We use various computer programs every day to perform a wide variety of tasks. Some of them have a large number of settings and capabilities, and in order to use them all, you need to perform a lot of manipulations. For example, you regularly use several operating modes of the application, enter your username and password, or use special modes. In addition to office workers, computer game lovers often need such opportunities. All these manipulations can take a significant amount of effort and time, and are simply annoying.
Reflecting application start conditions in a shortcut simplifies working with programs.
It is worth noting that such a need, which was mentioned above, arises extremely rarely, and for the most part is solved effortlessly by the application or game settings themselves.
Based on this, the whole issue should be considered only as an additional opportunity for extended software launch, because the feasibility of such actions is questionable, and they certainly will not save time for the user.
The Windows operating system provides each user with the opportunity to specify launch parameters in the program shortcut. As part of the issue under consideration, instead of switching between menu items, you can create several shortcuts with the necessary parameters once, place them on the desktop or taskbar, and in Windows 8 and 10 on the start screen, and launch the program with the necessary parameters with one click buttons.
All these parameters are written in shortcuts, which are special files with a link to the executable file. You do not need to go to the folder where the software is installed each time and look for the launch file. In this article, we will look at how to significantly expand your capabilities when working with software and learn how to enter launch parameters in the command line of the desktop shortcut. We will divide the entire procedure into two stages.
Stage 1. Select the executable file and transfer the shortcut to the desktop
Despite the fact that in the vast majority of cases, when installing software, the launch icon is placed on the desktop, in some cases this does not happen. Then you need to find the executable file yourself. How?
- When installing an application, pay close attention to which folder the installer prompts you to select. Typically this is C:\Program Files or C:\Program Files (x86). Most developers provide the opportunity to independently select the default folder, but if you do not change the proposed option, the program will be installed in the specified folder.
- Using Windows Explorer, go to the directory where the software is installed and find the startup file. It has the extension exe. Often its name coincides with the name of the software itself. If you can’t decide, try to find out this information on the developer’s official website in the help section or in technical support.
- Right-click on the file name and select the “Create Shortcut” function.
- Confirm the system prompt “Windows cannot create a shortcut in this folder. Should I place it on my desktop?”

If you don’t remember in which folder the software is installed, you can do the following:
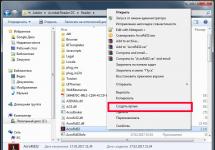
- Go to the Start menu, find the software you need in the list (you can even use the search function to speed up the process).
- Right-click on the name and select Send - Desktop (create shortcut).
If you use Windows 10, the procedure will be slightly different:
- Go to the start screen by clicking the Start button.
- Find the program launch icon in the list of all applications or on the home screen.
- Right-click, select Advanced - Go to file location.
- After the Windows Explorer window opens, copy the icon to your desktop via the context menu or simply by dragging it to the desired location.
Step 2: Specify startup options
After we have successfully transferred the icon to the desktop, we will begin specifying the necessary parameters in its properties. To do this you need:
- Right-click on the icon and select “Properties”.
- In the menu that opens, go to the “Shortcut” tab and find the “Object” line. You will see that the input field in it is active. This is where we will enter the necessary commands.
- After entering the required data at the bottom of the window, click Apply - OK.

What commands to write
Having figured out how to write launch commands, let's try to figure out what exactly to write. Unfortunately, there are no universal commands that work for absolutely all programs. Therefore, if you want to create shortcuts for quick launch with the specified parameters, you will have to study the program help or contact the developer technical support service.
Very often such information is indicated on the official forums of the application or game. More experienced users or representatives of developers or copyright holders publish detailed information there.
Returning to what was said at the beginning of this article. Specifying parameters became most relevant during the period of mass interest in the game called “Counter-Strike”. Why this interest has become so widespread specifically in “CS” is an ambiguous question; some used it solely for entertainment, others (like, for example, some professional players) in order to individualize the gameplay as much as possible.
For example, here is a list of options for the game "Counter-Strike: Global Offensive" that some users use when starting:
| Parameter | Meaning |
| -novid | Disabling the intro video |
| -w 640 -h 480 | Installing the extension |
| -console | Console activation |
| -freq 120 | Setting a screen refresh rate limit |
| -high | Run with higher priority |
| -condebug | Saving logs |
| -low | Run with reduced priority |
| -noaafonts | Disable antialiasing |
| -nosync | Deactivating Vsync |
| -fullscreen | Run in full screen mode |
| -language English | Setting the language |
Conclusion
To what extent the given procedure is appropriate and relevant for the middle of 2019 is up to everyone to decide for themselves, and in the comments we invite you to discuss this topic, as well as talk about what programs you are launching, indicating the launch parameters. This data may be useful to someone.
Instructions
The shortcut can be placed on the desktop, in the main menu of the operating system, or in one of the folders on any of the computer drives. To open the settings window, you need to gain access to it. Everything is simple with the desktop, with the main menu too, and to access folders on disks you will have to use the standard file manager - “Explorer”. You can call it by double-clicking on the “Computer” icon on the desktop and single-clicking on the item with the same name in the main OS menu.
Go to the desired shortcut in Explorer and right-click on it to bring up the context menu. If this object is placed in the main menu or on the desktop, the method for accessing the menu will be the same. Select “Properties” - this is the lowest line in the list - and the shortcut settings window will appear on the screen.
Depending on the version of the operating system used, the number of tabs in the properties window may vary - from three to seven. Most often you need to change the settings placed on the “Shortcut” tab. In the “Object” field you can add additional application launch keys. In the “Window” drop-down list, you can select how the program window should appear on the screen - maximized to full screen, minimized to tray or medium size.
On the same tab there is a “Change Icon” button - if you want to change the image of this object, open the search dialog for a new icon by clicking on this button. The “Location” button opens the “Explorer” window in the folder where the file linked to the shortcut is located, and the “Advanced” button opens a window in which you can change the user under whose name the file will be opened.
If you need to change the attributes of a shortcut, go to the “General” tab - there are several checkboxes and a button that opens additional settings. And on the “Compatibility” tab, you can adjust the settings for launching files of earlier versions if they are not processed correctly by the installed operating system.
In addition to these three, in the shortcut properties window there may be four more tabs with settings that help set the differentiation of access rights for different users (“Security”), “roll back” the version to the previous one (“Previous versions”), compare checksums from two shortcuts (File Hashes ).
Sources:
- how to change in explorer
- Administrator rights to change shortcut properties
There are a large number of ways to change the rather boring interface of your favorite operating system. The easiest way to freshen up the look is to replace the standard icons for frequently used folders and files.
You will need
- - computer;
- - set of icons.
Instructions
To change the shortcut for a specific format, file, or folder, you first need the icons themselves. You can choose new icons from a pre-installed set of Windows. The operating system has a large set of shortcuts that are usually rarely used. If you don’t find the images you need among the standard set, download a selection of icons from the Internet. Finding them is very easy; there are even special sites for changing the appearance of Windows.
After selecting the icons you want, open the Start menu. Next, select “Control Panel”, in the window that opens, click on the “Appearance and Themes” button. A menu will open with which you can customize the appearance of desktop elements or change the theme. Select the “Folder Options” submenu. In the dialog box, click on the “File Types” tab, a list of all registered . Select from it the format whose icon you want to change and click the “Advanced” button. Click on the “Change Icon” button, specify the path to the desired icon and click Ok. To save the changes made, click the “Apply” button.
To change the icon of an individual file or folder, right-click on the object you are interested in and select “Properties” in the context menu. A separate window will open, in it click the “Change icon” button (for a folder, this button will be on the “Settings” tab). Then select any icon from the standard set or specify the path to your folder with icons. Save your changes by clicking on the “Apply” button.
Video on the topic
Helpful advice
Do not set too bright icons - this will increase eye fatigue.
A shortcut is a file that is perceived by the system as a link to launch a program or document. The properties of shortcuts on the Windows desktop are available for editing by the user - it is possible to change both the appearance of these elements and the links to files they contain, along with additional parameters for launching them.

Instructions
Right-click the shortcut you need on your desktop and select “Properties” from the context menu that appears. As a result, a separate window with settings will open, containing several tabs, of which the “Shortcut” tab will be active.
Add the necessary keys to the link in the “Object” field - this is the operation most often meant by the expression “edit a shortcut”. This field contains the full path to the file, enclosed in quotes. The required keys should be added to the end of this entry, after the closing quote, separating the key with a space. The keys themselves, if there are several of them, are also usually separated by spaces. Click "OK" when you finish editing the entry in the "Object" field. If you made any error in the entry format in this field, the system will not save the changes, but will display a corresponding message. To cancel all changes made, press the Esc key, and the system will close the window for editing shortcut properties, leaving them in their original form.
Click the "Change Icon" button if the purpose of editing a shortcut is to change its icon. The window that opens will contain a list of images contained in the file itself, to which the link in the shortcut points. You can select one of them, or click on the "Browse" button and select another file. Images can be contained in executable files (exe extension) or resource libraries (dll extension). In addition, you can select an icon file with the ico extension, which, if desired, you can make yourself or select from a large number of options distributed via the Internet.
Click the Shortcut field and press the desired key if you want to launch the application associated with this shortcut using hotkeys. The keyboard shortcut will be required to include the Ctrl + Alt combination in addition to the key you pressed.
Video on the topic
Some users are satisfied with the standard look of various desktop elements, while others want to add some individuality to the design. If you don't like the system icons in Windows, you can change them.

Instructions
In order to change icons, you can use special applications, for example, IconPhile or IconPackager. Such programs, as a rule, take up minimal space on the local disk and have a simple interface. But if you want to learn how to work with system components yourself, replace the icons manually.
Icons for the “My Documents”, “Full/Empty Recycle Bin”, “Network Neighborhood” and “My Computer” folders are replaced through the “Screen” component. Right-click on any free space on the desktop and select “Properties” from the drop-down menu. Alternatively, open Control Panel from the Start menu and select the Display icon in the Appearance and Themes category.
A new “Display Properties” dialog box will open, go to the “Desktop” tab and click on the “Desktop Settings” button at the bottom of the window. In the additional window, on the “General” tab, select the thumbnail of the element you need and click on the “Change Icon” button. Specify the path to your icon in .ico format and apply the new settings.
If you need to change the icon of a custom folder, right-click on it and select “Properties” from the context menu. In the window that opens, go to the “Settings” tab and click on the “Change Icon” button in the “Folder Icons” group. Specify the directory where your icon is saved and save the settings.
To replace the icons of standard files of various applications, call the “Folder Options” component. Open any folder and select “Folder Options” from the Tools menu. Or, in the Control Panel folder, find this component in the Appearance and Themes category. In the dialog box that opens, go to the “File Types” tab.
Select from the list the file type for which you want to change the icon by selecting it with the left mouse button. In the “Information for extension […]” group, click on the “Advanced” button. In the new “Change file type properties” window, click on the “Change icon” button and specify the path to your own icon or select one of the available thumbnails. Apply the settings.
Video on the topic
Sources:
- how to change folder icons in
Often users are not satisfied with the standard desktop design. They want to add an element of individuality so that while working on the computer, the background image, screensaver, and file and folder icons are pleasing to the eye. But beginners who decide to change the design may be faced with the question of how to change system icons.
You can create a shortcut for programs, folders, and documents that you access regularly. Label is a link to an object, a means of quick access to an object located in a folder on the computer’s disk or on the network to which the computer is connected. Usually the shortcut is placed on the desktop, but it can also be placed in a folder. Double-clicking a shortcut icon allows you to open a document or run a program regardless of where it is located - on the user's computer's hard drive, on a network drive, or on a Web site.
By default, a shortcut has the same name as the object it points to. The shortcut icon, as a rule, differs from the icon of the object for which it was created only by the transition arrow located in the lower left corner of the picture (Fig. 4.31). The shortcut file has the extension .lnk and takes up little disk space (about 1 KB). It is a special communication file. When you double-click a shortcut, Windows uses the information stored in the link file to find and open the object associated with that shortcut (Figure 4.32).
Rice. 4.31. A shortcut to open a Word document

Rice. 4.32. General Shortcut Properties
To make it easier to access any object: a program or document, you can create one or more shortcuts and place them in different places: on the desktop and in frequently used folders. For example, if a Word document contains help information that the user constantly views, then by placing a shortcut to it on the desktop, he can open the file without accessing the menu.
You can place a shortcut inside a document or email message. By dragging the file icon onto the floppy disk shortcut, you can copy the file to the floppy disk. Placing a printer shortcut on your desktop allows you to speed up the printing process and make it easier to control. When you delete a shortcut, the file it is associated with is not deleted. If you rename a folder/file, the name of the shortcut will not change, but the connection between them will remain.
You can create a shortcut to a disk, program, folder or document using one of the methods below.
1. Select the object for which a shortcut is being created in the window My computer or explorer and select from the menu File team Create a shortcut.The new shortcut will appear in the lower corner of the window of the folder in which the item is located. Then you need to drag the shortcut with the mouse to the desired location, for example on the desktop.
2. Select the object for which a shortcut is created in the window My computer or Explorer, then activate the command Copy on the menu Edit. After going to the window of the folder in which the shortcut is supposed to be placed, select the command Insert shortcut on the menu Edit.
To delete a shortcut, select it, press the Delete key, or right-click the shortcut and select the command from the context menu Delete. In both cases, to avoid accidentally deleting an object, Windows will require confirmation of the specified action.
Graphic objects that are used in the Windows operating system to quickly access files are called “Shortcuts”. Each shortcut corresponds to a set of settings that determine both the appearance of the object itself and the launch parameters of the file “linked” to it. The user has the ability to change these settings through the shortcut properties window.
Instructions
Instructions
Call the context menu of the shortcut to be edited by right-clicking and go to the “Object” item to perform the operation of adding the required value to the selected shortcut.
Enter the desired value at the end of the description of the selected shortcut separated by a space (example: D:\Games\Diablo 2 LOD\D2Loader-1.11.exe_-direct, where -direct is the added value, in this case - crack).
Use the following values to add to Counter Strike game shortcuts:
Noforcemaccel - (no force mouse acceleration) to change windows acceleration settings;
-noforcemspd - (no force mouse parameters) to change mouse speed settings;
-noforcemparms - (no force mouse speed) to change the parameters of the windows mouse buttons;
-noaafonts - to disable screen font smoothing;
-heapsize 262144 - allocates 512MB of RAM for the game;
-heapsize 524288 - allocates 1GB of RAM for the game;
-heapsize 1048576 - allocates 2GB of RAM for the game;
-w 640 -h 480 - to launch the game with a screen resolution of 640x480 pixels;
-w 800 -h 600 - to launch the game with a screen resolution of 800x600 pixels;
-w 1024 -h 768 - to launch the game with a screen resolution of 1024x768 pixels;
-full - to launch the game in full screen mode;
-window - to launch the game in windowed mode;
-freq 100 - to change Hertz HL1 Engine. CRT 60-100 85=Common LCD 60-75 72=Common;
-refresh 100 - to change Hertz for HL2 Engine monitors. CRT 60-100 85=Common LCD 60-75 72=Common;
-soft - to launch the game in Software graphic mode;
-d3d - to launch the game in Direct3D graphics mode;
-gl - to launch the game in Open GL graphics mode;
-nojoy - to disable joystick support;
-noipx - to disable the LAN protocol;
-noip - to remove an IP address without connectivity;
-32bpp - to enable 32Bit mode;
-16bpp - to enable 16Bit mode;
-dxlevel 90 - to use DirectX 9;
-dxlevel 81 - to use DirectX 8.1;
-dxlevel - to use DirectX 8;
-dxlevel 70 - to use DirectX 7;
-dxlevel 60 - to use DirectX 6;
-port 27015 - to change the port for the game;
-console - to gain access to the console when starting Half-Life;
-dev - to enable mods for developers;
-zone # - to allocate more memory to files such as autoexec.cfg, etc.;
-game - to enable Half-Life modification of the game;
-safe - to start the game in safe mode and turn off audio;
-autoconfig - to restore default settings;
-condebug - to save all console logs in a text file console.log;
-nocrashdialog - to cancel the display of some errors (memory could not be read);
-novid - to remove Valve's introductory video;
-toconsole - to launch the game engine in the console if the card has +map
+a +r_mmx 1 - to launch the game with a console command or cvar command on the command line (instead of cfg);
+ex_interp # - to assign a parameter to the ex_interp command.
Sources:
- How to write -direct in a shortcut
- Parameters that can be specified in the CS shortcut
- How to write a command in the shortcut properties
Not all old games and programs can run on new operating systems and high screen resolutions. In Windows, you can adjust the compatibility settings and the application will run. Read below for information on how to do this.
Instructions
Right-click on the game shortcut. Select “Properties” from the drop-down menu.
In the window that opens, go to the “Compatibility” tab.
Click OK.
Video on the topic
Tip 3: How to start the game with the +set sv_cheats 1 parameter
Many of those who are interested in how to open certain hidden features inherent in their favorite game find instructions on the Internet that begin with the words “run the game with parameters...”, and nowhere is it written how to specify these same parameters and how start the game with them. Despite all the apparent complexity, this is not so difficult to do.

Instructions
Launching a game with certain parameters, as a rule, implies the use of certain capabilities of the game engine that are not affected during normal game mode. As a rule, these are commands that grant the game character invisibility, the ability to pass through walls, etc.
Find the shortcut on your desktop for the game you want to launch with certain parameters. Right-click on the shortcut and select “Properties” from the menu that opens. A window will open in front of you containing the properties and settings of the game shortcut. This is where you can configure the launch of the game with parameters.
In the window, on the “Shortcut” tab (which, however, is the default), find the input field called “Object”. The path to the executable file that launches the game (“executable”) is stored here. All you have to do is insert the required parameters at the end of the object placement data line. That is, for example, before you had “C:Program FilesWorld of WarcraftLauncher.exe” written, but now it’s “C:Program FilesWorld of WarcraftLauncher.exe” + set sv_cheats 1. Then press the “Ok” button and As a result, you get a shortcut with a game that has the parameters you need. However, it is not always necessary to run the game with the same parameters all the time. Yes, you can change the properties of the shortcut each time, or you can do it more professionally and use the command line.
Go to the Start menu and select Run. If you have the Windows 7 operating system installed, then initially there may not be such an item. Therefore, in addition to selecting the “run” item, you can simply press the key combination Win + R.
Type or copy into the input window the full path to the executable file (“executable”) of your game (you can also copy the full path from the shortcut properties). Next, simply add the necessary parameters to the copied data and press Enter (just make sure that there are no quotes in the executable address). For the system, this will mean that you should launch the program (in your case, the game) once with the described parameters.
Sources:
- Game launch options
Despite the fairly wide capabilities of the command line utility, calling the main Start menu is not one of them, but the task of launching the selected application from the command line tool can be solved using standard tools of the Microsoft Windows operating system.

Instructions
Simultaneously press the Win+K function keys or click the “Start” button to call up the main menu of the system and go to the “Run” item to launch the “Command Line” tool.
Enter cmd in the Open field and click OK to confirm the launch.
Return to the main Start menu and go to All Programs to perform the operation of running the command line tool as an administrator.
Specify the command “Run as administrator” and familiarize yourself with the basic commands of the tool by entering the value cmd /? into the text field.
Locate the directory for the program you selected to open using the command line and enter the value cd C:Program Filesprogram_name in the text field.
Press the Enter softkey to confirm the selected directory and enter program_name.exe in the command line text box.
Confirm the launch of the required application by pressing the Enter function key.
Return to the main Start menu and select Run to perform an alternative procedure for running the selected program using the command line tool.
Enter cmd in the Open field and click OK to confirm that the command line utility will run.
Enter path in the command line text box and press Enter to execute the command to display a list of directories containing executable files.
Select the application to be launched from the list that opens and press Enter to confirm the launch.
Sources:
- Command line in Windows 7
- Command line made easy!
The command line is available in all versions of the Windows operating system. With its help, you can launch programs, services, and diagnose your computer and its individual components. In fact, few people use it, considering it a relic of the past. But sometimes you can only run a program from the command line, for example, if your computer is infected with a virus.

You will need
- - Computer with Windows OS.
Instructions
Click Start. Select All Programs, then Accessories. Standard programs have a “Command Line” line. Click on it and the command line will launch as the current user. If you are a computer administrator, you will see “Administrator” at the top of the command line. If you are not an administrator, or your account does not have administrator rights, some commands will not be available to you.
To open a program from the command line, you need to enter the full path to the executable file. The executable file is located in the root folder of the program and has the Exe extension. As a rule, the full or partial name of the program comes first, followed by the extension. This is the executable file. After each directory you must enter "/".
For example, the program you need is located on drive C in the Program Files folder. Therefore, write the following path: C/ Program Files/name of the root folder of the program/name of the executable file. After that press Enter. In a second the program will be launched. Characters must be entered accurately. If you enter at least one character incorrectly, a notification will appear on the command line instead of opening the program: “This is not an internal or external command, an executable program or a batch file.” In this case, carefully check the address you entered.