Answer from Ramil Ahmet[guru]
If you have a disk with Windows:
1) install the reboot disk on your computer
3) put a drive on the boot
4) press f10 and then enter
Answer from Get some alcohol[guru]
the same for xp
Answer from Caucasian[guru]
transfer everything important to another disk from the system one, then boot from the installation XP and during installation you will be asked whether to format it or not. There, click on format.
and then continue the installation
Answer from W.S.[guru]
In this case, use Google to look for instructions; it’s too long and too much to describe. By the way, before formatting, make sure you have all the drivers for the devices on your computer.
Answer from Ksuxx[guru]
contact specialists... when you press del you get into the BIOS, but this has nothing to do with the OS...
if the thirst for knowledge and dancing with a tambourine is strong, then start with Google or the website of small soft... in order to pump up the materiel a little...
but I still advise you to consult a specialist
Answer from Valery Grekov[guru]
Answer from Anuar Safiev[newbie]
Pstst, write everything to you. You can't say it in words. You have to do it yourself or read where the thread is. For example, write in Yandex: “how to reinstall the OS” and you’ll understand everything
Answer from ValtoBar[guru]
Answer from ValtoBar[guru]
By default, most computers are configured to boot directly from the hard drive. To install the system, you must boot from the CD, so restart your computer and enter the BIOS (usually using the Delete key). At the moment, only two types of BIOS are common.
AMI BIOS - dark blue design on a gray background. Select the Boot tab at the top and set your drive there as the first boot device. The hard drive must be the second one. You can most likely move items using the plus and minus buttons on the numeric keypad (right), or using PageUp and PageDown.
Award BIOS - yellow and red design on a bright blue background. Go to the Advanced BIOS Features category and find the First Boot Device line there. Press Enter and select your drive there (or just “CD-ROM”).
To exit the BIOS, you need to find the Save & Exit item, although usually the F10 key is responsible for the same function, regardless of the version.
Also, remember that many modern motherboards have a Quick Boot Menu. It allows you to specify once which device you want to boot from first. Usually the Quick Boot Menu is set to F8 or F12.
Immediately before installing the OS, you will be asked to format. Confirm - this will remove the old OS.
Answer from SkyNETxxx[active]
Answer from Proslav Borodavkin[newbie]
I agree with SkyNETxxx!
Answer from SkyNETxxx[active]
Buy a new computer and don’t worry 😀
Answer from Proslav Borodavkin[newbie]
I agree with SkyNETxxx!
Answer from Cardinal[guru]
the same for xp
Answer from Ramil Ahmet[guru]
If you have a disk with Windows:
1) install the reboot disk on your computer
2) when turning on, press the delete button (you will get into the BIOS)
3) put a drive on the boot
4) press f10 and then enter
5) after which, when you turn on the computer, it will offer to start loading from the disk, press enter
if you don’t have Windows, buy it from small software dealers or download a pirated version and put it on a blank
Hello dear readers of the blog helpcomputerblog!
Quite recently, I had to face the issue of reinstalling the operating system. I want to note. that sooner or later this question or this situation arises for all PC users.
So let's figure out how to change the operating system.
First, we need to prepare: acquire an image of the system that we will install (the image can be written either to a flash drive or to a disk) and written installation instructions.
We install a boot disk (the disk on which the image of our system is recorded) or a flash drive into the USB connector into the tray.
Press simultaneously ALT+CTRL+Delete, which will cause the system to reboot.
It should be noted that during the reboot we need to get into the BIOS of our PC (BIOS is set by the motherboard manufacturer), in most cases you can get into the BIOS through the following keys:
- F1 – for Dell, IBM, Packard-Bell, HP computers;
- F2 - Samsung, Asus, Acer;
- F3 – Sony, Dell;
- F10 – Compaq, Toshiba;
- F12 – Lenovo;
The access buttons are indicated on the initial splash screen (by the motherboard manufacturer) when you turn on the computer. Let's say. that our access button is Delete, click it.
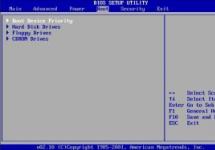
After clicking Delete. we go to the BIOS menu, in the name of the displayed menus we find the name Coms Setup Utility, if this inscription is present on the screen, then you are on the right track.
Next you need to find Boot Menu

and choose how to boot our PC, with CD/DVD-ROM or flash drive. By default, the first position is to boot from the hard drive, so we must set the CD/DVD drive in the boot list to first place, for this growth, select the first position and press Enter, then use the arrows to select CD/DVD and press Enter again. all is ready.

After all the manipulations, we need to restart our PC. To do this, go to the point Exit and press Enter, confirm, the computer reboots.

After rebooting, a message should appear at the top of the screen “press any key to boot trom CD or DVD”, to continue you must press any key, this operation is a confirmation of our intentions.


Select the language we need and click next.

Click install.

 Let’s read and agree to the license terms, check the “I agree” box and click Next.
Using an operating system on your own computer can vary greatly from user to user. Some people, having bought a new PC, mainly use the programs and tools built into Windows, as well as the default OS settings. Others work with many third-party applications and utilities, while customizing the system interface to their own taste.
And if in the first case, reinstalling the system and several applications is not a difficult task, then in the second, in addition to installing the OS, you will have to re-install all the necessary programs, personalize Windows and other settings. That is why many users are not eager to do this again. Moreover, the necessary applications may not be at hand or their settings were made by a specialist, who will now have to be called again.
In general, there can be a lot of reasons not to touch a normally working operating system, but the time comes when the internal components of your computer begin to become hopelessly outdated and replacing them with more productive hardware becomes an urgent need. And if installing a new power supply, RAM, separate processor or video card can be done relatively painlessly, that is, without reinstalling the operating system, then when replacing a hard drive or motherboard, everything is not so simple.
As you understand, all Windows files are stored on the computer's hard drive, so replacing it leads to an inevitable re-installation of the system. Although, this can be avoided by first making a complete backup copy of the current OS into an image and saving it on an old HDD or some other storage medium. Then all you have to do is unpack the resulting system backup onto a new disk, and you can continue working in the same Windows, using all previously installed programs.
In the case of replacing the motherboard on a Windows PC, the result may depend on many different factors, but the main thing is the choice of the future hardware platform (for example, when changing Intel to AMD or vice versa, problems are almost inevitable) and a set of system logic (chipset). In a word, the more differences the new motherboard has from the previously installed one, the less chance the old system will have to boot after it is replaced.
Despite the fact that Windows 7 has an impressive database of drivers in its arsenal, simply changing the motherboard and starting the previously installed system often fails. This is especially true for those boards that were released much later than the release of the system itself. But they are now the majority, since more than three years have passed since that moment. So the question of how to replace the motherboard on a personal computer with Windows without reinstalling it is still relevant.
Why does replacing a motherboard so often result in reinstalling Windows? As a rule, the most common reason is the incompatibility of the ATA/SATA hard drive controller drivers already installed in the system with the one equipped with the new motherboard. In this case, after replacing the hardware, when loading the OS you will receive a blue screen of death (BSOD) with the STOP error: 0x0000007B.

The fact is that when loading, Windows simply does not have the ability to change the hard drive controller driver on its own. As a result, a hard drive with the installed OS connected to the new controller is simply not seen by the system, and its further launch becomes impossible.
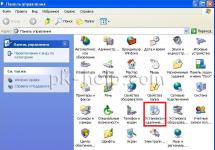
To avoid this situation, there is a fairly simple solution. Even before replacing the motherboard, start Windows, go to device Manager, there, by clicking on the arrow, expand the item IDE ATA/ATAPI controllers and remove all installed devices from it.

To do this, right-click on all controllers one by one and select Delete in the context menu that opens. If after this a window appears Device removal confirmation, check the box Remove driver programs for this device and click OK.
In some cases, to complete the controller removal operation, the system will require a reboot. You shouldn't do this until you've gone through the entire list. Then simply turn off your computer and proceed to replace the motherboard. If you do restart your PC, you will have to do the entire procedure again, since Windows will restore all previously deleted devices at startup.
And yet, there are often cases when this method will not help you. For example, if the system logic set (chipset) on the new motherboard will be very technologically different from the previous one. In this case, in order to avoid problems with loading the system, you need to completely get rid of all drivers that can cause them. But how to do that?
There is one very useful utility in the Windows system, which not everyone, even advanced users, knows about. It's called Sysprep and allows you to delete system data from the operating system, including information about installed equipment, as well as drivers installed by the user.
Thus, in order to ensure successful booting of Windows on new hardware, it is necessary to clean the OS from old system information using this utility even before replacing components! Also, before running Sysprep, it is better to remove all installed anti-virus programs or disable self-defense in them. This is especially true for Kaspersky Lab products. Otherwise, when you start the OS with new hardware, you risk receiving the message: “Windows was unable to complete system setup. To resume setup, please reboot." But no reboot will help you. You will have to return the old equipment to its place and do everything again.
So, to launch the Sysprep utility, press the key combination Win + R and in the window that opens Execute Enter the full path to the executable file: “%windir%\System32\sysprep\sysprep”. For those who don't know, "%windir%" is a variable containing the path to the folder where the system is installed, most often "C:\Windows". And we use it because the location of the system folder and its name on different computers may be different.

In the system preparation program window that opens, in the option System cleaning action paragraph Go to the system welcome window (OOBE) we leave it unchanged. Next, put a checkmark next to the parameter Preparation for use.

In the drop down menu Shutdown Options select a team Shutdown. This is done so that immediately after cleaning the system, the computer does not reboot, because if it is not stopped in time, the process of initial Windows setup will start and you will have to repeat everything again!
Having completed all these simple settings, press the OK button to start the system cleaning procedure. This process is completely automatic and after it is completed, the computer should turn off on its own. Now you can start replacing the system board.
During the first launch of Windows with new hardware, the necessary device drivers will be installed and the corresponding entries will be made to the operating system registry. You will also have to re-enter your regional settings and account settings.
Please note that when the OS asks for a username, you cannot enter the old account name because it already exists. There is no need to be particularly upset about this. Enter any name, and after logging in for the first time, you can delete the new account and use the old one.
The only inconvenience that can await you after booting the system with new components is re-activating Windows. The fact is that a number of versions of this OS are tied to the installed hardware. In particular, the most common legal version of Windows 7 OEM, which is installed on new desktop computers and laptops. In this case, activation will most likely have to be carried out over the phone, since this will no longer be possible to do via the Internet due to the fact that the system will mistake your operation for installing Windows on another computer, which in this version is prohibited by the terms of the license agreement.
Strictly speaking, it was initially designed to create a customized Windows image for the purpose of reusing it. That is, simply put, Sysprep is a utility for cloning a prepared OS onto other computers. Most often, installing Windows from a pre-generated image is carried out in organizations where the set of basic work applications among employees, for the most part, may be the same.
True, in our time there are often situations when there is not one computer at home, but several at once. For example, one desktop PC is used as a multimedia center, another is in the child's room for studying, and a laptop is a business tool for parents. Despite the different purposes of each device, they may well have common software: an operating system, an office suite, a web browser, an archiving tool, a program for burning optical discs, various auxiliary utilities and much more.
In such a situation, it is convenient to have a “standby” OS image, from which, if necessary, you can always install the system with all the main applications. To create it, you just need to install Windows and all the necessary programs once on any computer, then use the Sysprep utility to delete system data using the method described above. Next, you will need to burn the image of the prepared system to a separate medium: a Blu-Ray disc (there is simply not enough space on a DVD), an external hard drive or a flash drive.
The key point here is that the computer must be booted from an optical disc or USB drive to be imaged, but never from the hard drive on which it is installed. If this happens, the process of initial OS setup will start and the entire procedure will have to be repeated again.
You can prepare a boot disk and save the Windows image in the desired location using special applications, for example Acronis True Image Home, a paid program, but it has a clear graphical interface and all the necessary tools. There are also free alternatives, for example, ImageX as part of the Windows PE shell. However, in this case, get ready to work with the command line.
Unpacking the image to the desired (target) computer is similar to removing it using the same programs.
In the process, you will format the local drive that contains the current version of Windows. Simply put, before installing a new system there, you will have to erase all old data from it. The contents of the remaining disks should remain unchanged. But it’s better to play it safe and first copy absolutely all data from your computer that you are afraid of losing to the cloud or to physical media.
If paid programs are installed on your computer, be sure to read their documentation for the rules for working with licenses when reinstalling Windows, otherwise you may lose them.
2. Create a boot disk or flash drive
If you want to install/reinstall a licensed version of Windows, make sure you have the appropriate activation key. Even if you are already using an activated system and just want to install the same version again, the old activation key may come in handy again.
- If you already have a bootable USB flash drive or disk with the version of Windows that you are going to install, you can proceed to step 3. Otherwise, you need to download a Windows image from the Internet and burn it to any of the listed media according to the instructions below.
- Decide on the version of Windows you will be installing and check that your computer meets its system requirements. This information can be found on the official Microsoft website or on the disk with your purchased Windows. Don't forget to also check that your computer supports the new version's bit depth: 32 or 64 bits. To be on the safe side, you can install a version with the same bit depth as your current version of Windows.
- To create a bootable USB flash drive with any Windows image found on the Internet, you can use the program (with UEFI support) and proceed to step 3.
And below I will tell you how to create a bootable disk or flash drive with an official system image using Windows 10 as an example.
3. Boot the system from a disk or flash drive
Now that you have physical media with the desired Windows image, you need to go to the special BIOS software environment and select a disk or flash drive here as the boot source.

Perhaps instead of the classic BIOS you will see a more modern graphical interface. In addition, even in different older BIOS versions, the settings may differ. But in any case, the procedure will be approximately the same: go to the boot menu, select the desired media as the source and save the changes.
After this, the computer should boot from the selected disk or flash drive.
4. Run the installation wizard
 If you did everything correctly, the Windows Setup Wizard will appear on the screen. Further actions are no more complex than installing an ordinary office program. All you have to do is follow the system prompts and wait for the files to be unpacked. Unless you have to select a local disk to install the operating system and format it.
 Also, be prepared to enter your activation key during the process. But if you are reinstalling Windows 10 that has already been activated on your computer, then you can skip the step with the key.
Once the installation is complete, your computer should boot into normal operating mode.
5. Install drivers
Modern versions of Windows load drivers themselves. But if, after reinstalling the system, you notice that the video card, speakers, or anything else is not working correctly, you can use the driver autoload utility. For example, the free Driver Booster is suitable.
Having completed all of the above, you can get to work. The computer must be ready.
How to replace the operating system? It is not uncommon for every computer user to face this question. It is best to learn how to do this on your own, then there will be no problems. The longest time was when the program stayed with me for two years. It was Windows 7 Ultimate. She appeared from the repair shop. I didn't install it. I used to have Windows XP operating systems, and I knew how to change them myself. I had an old computer and these programs functioned better on it. Then I got a new computer, so here I describe how to install the operating system on old and new computers.
How to replace the operating system - reasons for replacement
Each user may have their own reasons for changing the operating system. For example, my Office 2010 program completely collapsed, along with all my articles and drawings. This was a disaster because I have been running 2 websites for a long time. While I had the Windows 7 maximum operating system for so long, from a repair shop, I completely forgot how to replace it, but my eldest son helped me.
I had the operating system on a disk purchased on the radio market, but out of ignorance I installed updates on it from the Internet. I must say that everything works fine with updates if the programs are licensed. However, Microsoft, along with updates, launches programs that monitor the computer. They are just interested in the question: is there a license? It turned out that my Office 2010 program was without a license.
They give you 1 month to purchase it. Even if you buy a license, it is not clear how to technically pay in this case. When the payment deadline began to approach, I threw out the Office 2010 program and installed Office 2003 again, from the disk. However, 2010 was not completely removed by any means and spoiled all my files, mine and Office 2003 programs. This was called limited functionality mode. The mode was super tough because all the documents turned into motionless screenshots.
How to replace the operating system - preparing for replacement
Before deleting, I wrote all the documents onto a flash drive. When I tried to read these files in Office 2003, they were all modified. But then I was able to restore the texts through . First, I transferred the files to Yandex disk, where they were successfully destroyed. In general, my computer was a complete mess, so I decided to completely replace the operating system. This means that all the materials that were there will be erased, but that’s exactly what I needed then.
Many browsers will disappear, but the Google Chrome browser retains all our bookmarks and extensions. The Internet will also turn off, but I connect it myself via the local network, because I store all the lines of my web address in a notebook. You need to prepare for replacing the operating system. Write important files to a flash drive, or send them to . That’s why I copied all the articles and pictures for the websites.
How to replace the operating system - from a disk
In any computer, insert the disk with the operating system into the DVD drive drawer.

No matter what operating system we install on the computer, the beginning is always the same, it is the most important, and the rest goes by itself, you just need to follow the instructions of the program.
How to replace the operating system - installation on an old computer
- Start the computer and hold down the Del key. It is located at the very bottom of the keyboard, on the right. This must be done so that the old operating system does not boot. But for us to enter Bios.

- A large window with entries opens, here we need to enter the “BIOS”. At the same time, no programs work, therefore we cannot write anything. At this stage of installation, we control the computer using the keyboard arrows.
- By pressing the down arrow, go to the line: ADVANCED BIOS FIATURES - press - Enter. A new window will open.

- In the new window, use the arrows down to the line BOOT SEQUENCE – press – Enter. For me it was the last line in the row on the left; we don’t pay attention to the right column.
- 2 lines will open in a new window:

- 1.st. BOOT DENICE.
- 2.nd. BOOT DENICE - press - F10.
- I’ll explain a little here: the lines should be located exactly in the order I wrote them here. The first line means seeder, which is our DVD floppy disk. The operating system must be written from it, so it must be first. This is the order the computer will record.
- The second line is our computer hard drive, on which our old operating system is located. Sometimes the lines may not open in this order, but vice versa and then our usual loading will occur, from the hard drive. But we want to change the operating system, so to swap lines we press + or minus on the keyboard, on the side.
Continue installation
- After we press F10, another beautiful red small window will open, where two words are written: OK and CANCEL. Use the arrow to move to “OK” - press Enter. I didn’t take a photo of this window, but it’s immediately visible.
- Next comes one more, very significant nuance: a black window will open, with a flickering horizontal white cursor - the console. We need to press any key very quickly, within 5 seconds!
If we do not have time to do this, then a normal boot will begin and we will have to start all over again: shut down the computer, turn it on again, press DEL, and so on.
That's what happened to me at first. I didn’t have time, but my son had already left, he had his own business. But it turned out that I remembered everything and installed a new operating system.
How to replace the operating system - on a new computer
When you open a new computer, a colorful program appears with inscriptions. Installing an operating system from a disk is even easier here. But there are small differences.
- At the very bottom, immediately go to the picture where the word “boot” is written and click on it. New customization continuations will appear quickly.
- Use the keys to go down to the inscription: “CD/DVD”. Press this button again and “F10″ - “means save.”
- A small window will appear: “Yes or No”. Use the arrows to move to “Yes” - press “Enter”.
- In the console that appears, with a pulsating cursor, press any key very quickly. Then we follow the program manual.
Some nuances
Should I save materials from the previous operating system or not? I didn't need to save anything. Most often, it happens that various types of garbage accumulate on the computer and there may be viruses, so it is better to replace everything, that is, format the disk.