Updated 12/27/13. Initially, this article was intended as material that would help insert numbered pages in different orientations. However, due to its great popularity and for the sake of completeness, it was decided to add simple pagination information.
In order to number pages in MS Word, you need to go to the “Insert” tab, “Header and Footers” section, insert page numbers.

Then the user has certain options for editing the entered numbers. For example, you can place the number at the top or bottom of the page, on the right or left edge, or simply align it in the center.

How can I rotate the page number 90 degrees?
Numbering pages in the MS Word word processor is a fairly trivial task, but sometimes you need to place a number on one or more pages of text rotated 90 degrees relative to other numbers. For example, like this.

If you print a document, then the pages located in landscape orientation are folded in portrait orientation with a rotation of 90 degrees counterclockwise and the number on the second page will, firstly, be located not in the upper right corner, but in the left and, secondly , the number will be rotated 90 degrees. To prevent this from happening, the number on the second page of the document itself should be placed at the bottom of the document and rotated 90 degrees. To do this, create a new section using the section break “Page Layout” tab and place pages with the same type of numbering in this section. Next, go to the header and footer and delete the page number, having first removed the connection with the previous header, otherwise the number will be deleted on previous pages.

The next step is to open the footer, remove the connection with the footer of the previous section (otherwise the number at the bottom of the page will be duplicated in the previous section) and insert the page number, but the inserted number will not be rotated 90 degrees, in order to expand the number it is necessary in the footer add it to one cell with invisible borders, and in the table itself already set the required text orientation.

And the result will be individual numbers for pages by section.

With these manipulations it is possible to achieve different numbers for pages with different orientations. Naturally, you can also change the numbers if the pages have the same orientation, however, but this is unlikely to be useful when writing scientific papers and reports.
Microsoft Word is the most popular word processor, one of the main components of the MS Office suite, recognized as the generally accepted standard in the world of office products. This is a multifunctional program, without which it is impossible to imagine working with text, all the capabilities and functions of which cannot be fit into one article, however, the most pressing questions cannot be left unanswered.
Thus, one of the common tasks that users may encounter is the need to set page numbers in Word. Indeed, no matter what you do in this program, be it writing an essay, term paper or dissertation, report, book or regular, large text, you almost always need to number pages. Moreover, even in cases where you don’t really need it and no one requires it, it will be very difficult to work with these sheets in the future.
Imagine that you decide to print this document on a printer - if you don’t staple it or staple it instantly, how will you then find the right page? If there are a maximum of 10 such pages, this, of course, is not a problem, but what if there are several dozen or hundreds of them? How much time will you spend organizing them if something happens? Below we will talk about how to number pages in Word using the 2016 version as an example, but you can number pages in Word 2010, as in any other version of the product, in exactly the same way - the steps may differ visually, but not thematically.
1. Having opened the document that you want to number (or an empty one that you just plan to work with), go to the tab "Insert".

2. In the submenu "Header and footer" find the item "Page number".

3. By clicking on it, you can select the type of numbering (location of numbers on the page).

4. Having selected the appropriate numbering type, you need to approve it - to do this, click "Close the header and footer window".

5. The pages are now numbered and the number is in the location corresponding to the type you selected.

How to number all pages in Word, except the title page?
Most text documents in which you may need to number pages have a title page. This happens in essays, diplomas, reports, etc. The first page in this case acts as a kind of cover, which indicates the name of the author, title, name of the boss or teacher. Therefore, numbering the title page is not only not necessary, but also not recommended. By the way, many people use a corrector for this, simply covering up the number, but this is definitely not our method.
So, to exclude the numbering of the title page, left-click twice on the number of this page (it should be the first).

In the menu that opens at the top, find the section "Options", and in it put a tick opposite the item "Special footer for this page".

The number from the first page will disappear, and page number 2 will now become 1. Now you can work on the title page as you see fit, as needed, or in accordance with what is required of you.
How to add numbering like “Page X of Y”?
Sometimes, next to the current page number, you need to indicate the total number of pages in the document. To do this in Word, follow the instructions below:
1. Click on the “Page Number” button located in the tab "Insert".

2. From the drop-down menu, select the location where this number should appear on each page.

Note: When selecting an item "Current location", the page number will be placed at the location where the cursor is located in the document.
3. In the submenu of the item you selected, find the item "Page X of Y" select the required numbering option.
4. To change the numbering style, in the tab "Constructor" located in the main tab "Working with headers and footers", find and click the button "Page number", where in the drop-down menu you should select "Page Number Format".

5. Once you've selected the style you want, click "OK".

6. Close the window for working with headers and footers by clicking on the outermost button on the control panel.

7. The page will be numbered in the format and style you selected.

How to add even and odd page numbers?
Odd page numbers can be added to the right footer, and even page numbers can be added to the left footer. To do this in Word you need to do the following:

1. Click on the odd page. This could be the first page of a document that you want to number.
2. In a group "Header and footer", which is located in the tab "Constructor", click on the button "Footer".

3. In the drop-down menu with lists of formatting options, find "Built-in" and then select "Aspect (odd page)".

4. In the tab "Constructor" ("Working with headers and footers") check the box next to the item "Different headers and footers for even and odd pages".

Advice: If you want to exclude the numbering of the first (title) page of the document, in the “Design” tab you need to check the box next to “Special header for the first page”.

5. In the tab "Constructor" click the button "Forward"- This will move the cursor to the footer for even-numbered pages.

6. Click "Footer" located in the same tab "Constructor".

7. In the drop-down list, find and select "Aspect (even page)".

How to number different sections?
In large documents, it is often necessary to set different numbering for pages from different sections. For example, there should be no number on the title (first) page; pages with a table of contents should be numbered with Roman numerals ( I, II, III...), and the main text of the document must be numbered in Arabic numerals ( 1, 2, 3… ). We will tell you below how to number different formats on pages of different types in Word.
1. First you need to display hidden symbols, to do this you need to click the corresponding button on the control panel in the tab "Home". Thanks to this, you will be able to see the section breaks, but at this stage we just have to add them.

2. Scroll the mouse wheel or use the slider on the right side of the program window to scroll down the first (title) page.

3. In the tab "Layout" click on the button "Breaks", go to point "Section breaks" and select "Next page".

4. This will make the title page the first section, and the rest of the document will become Section 2.
5. Now go down to the end of the first page of Section 2 (in our case this will be used for the table of contents). Double-click on the bottom of the page to open the header and footer mode. A link will appear on the sheet "Same as previous section"- this is the connection that we have to remove.

6. Having first made sure that the mouse cursor is located in the footer, in the tab "Constructor"(chapter "Working with headers and footers"), where you need to select "Same as previous section". This action will break the connection between the title section (1) and the table of contents (2).

7. Scroll to the bottom of the last page of the table of contents (Section 2).

8. Click on the button "Breaks" located in the tab "Layout" and under the point "Section breaks" select "Next page". Section 3 will appear in the document.

9. With the mouse cursor in the footer, go to the tab "Constructor", where again you need to select "Same as previous section". This action will break the connection between Sections 2 and 3.

10. Click anywhere in Section 2 (table of contents) to close the header/footer mode (or click the button on the control panel in Word), go to the tab "Insert", then find and click "Page number", where in the drop-down menu select "At the bottom of the page". In the drop-down list, select "Easy number 2".
11. Expanding the tab "Constructor", press "Page number" then select from the drop-down menu "Page Number Format".

12. In paragraph "Number format" select roman numerals ( i, ii, iii), then click "OK".

13. Scroll down to the footer of the first page of the entire remaining document (Section 3).

14. Open a tab "Insert", select "Page number", then "At the bottom of the page" And "Easy number 2".

Note: Most likely, the displayed number will be different from the number 1; to change this, you must follow the steps described below.

15. The document page numbering will be changed and arranged in accordance with the necessary requirements.
As you can see, numbering pages in Microsoft Word (everything except the title page, as well as pages of various sections in different formats) is not as difficult as it might seem at first. Now you know a little more. We wish you successful studies and productive work.
Students and people who work a lot with text often have to create large documents. In order not to get lost in the contents and not to mix up the printed pages, they must be numbered.
Fortunately, this process takes little time and does not require any special skills. In addition, the algorithm for numbering pages does not depend on the version of the office program installed on your computer: in Office 2007, 2010, and 2016, the numbering process consists of the same steps.
We'll show you how to number pages in Word and talk about the different numbering options. All examples in this article were made in Microsoft Word 2010.
How to number pages in Word
Create a document in Word or open a ready-made one. In the top menu, go to the "Insert" tab. In the “Header and Footer” section, click on the “Page Number” line.
In the drop-down list, you will see four options for placing the page number: at the top, at the bottom, in the margins, or in the current position - where the cursor is currently located. The design of many official documents, such as dissertations, is regulated by GOST, so choosing the position of page numbers should not confuse you. As a rule, the page number is placed in the footer.
 After you select the position of the number, the program will number all pages starting from the first, and the “Working with Headers and Footers” tab will open in the top menu.
To customize the appearance of the number, go to the “Page Number” - “Page Number Format” section.
 In this window, you can select an alphabetic or numeric format for the number, and also set the page from which the document numbering will begin. For example, if you put the number 2 in the “start with” field, then the first page of the document will receive the second number.


If your document has numbered sections, you can include the chapter number in the page numbering. If you select an em dash as the separator, the format of the number will be “X - Y”, where X is the chapter number and Y is the page number.
How to avoid numbering the first page in Word
 The first page is usually occupied by a title page, which cannot be numbered. To avoid putting the number on the first page, do the following:
- Double-click on the footer where the page number is located. The “Working with Headers and Footers” panel will appear in the top menu.
- In the “Options” tab, check the box next to the “Special footer for the first page” function. Now the cover page will not be numbered.
By the way, we told you how to start numbering from any page of the document.
5 minutes to read. Views 328 Published 06/03/2017
Hi all! Probably, almost every computer user has in his arsenal a Microsoft Office package with a standard set of programs: Word, Exel, PowerPoint, Outlook. Today we will talk about Microsoft Word, if you often have to print and edit texts in this text editor, then you have probably already wondered how to number pages in Word. Very often this is simply necessary when creating documents, reports, dissertations, or you simply need to put down numbering so that the pages do not get mixed up after printing the document. Therefore, in today’s article, we will take a detailed look at how to number pages in the Word text editor in different ways. I recommend reading this manual and further applying these steps in practice.
How to number pages in Word quickly and easily?
As a rule, the process of pagination is quite simple, but not all users know how to do it correctly. Therefore, I suggest that you consider this issue in as much detail as possible and remember the instructions once and for all.
The following options are available:

I suggest using an example to look at how to number pages in Word. To do this, select the very first item “Top of the page”. Next, options for positioning the page number will open.
I chose the second option "Easy number 2". On the page it will look like the one below. 
Where the number will be placed on the page is up to you, as you can see, there is nothing complicated here, but many experience problems. 
As you can see, in order to enter page numbers from the beginning of the document, you need to click the mouse several times, but what if the numbering needs to be done not from the first page, but, for example, from the third. This is often necessary to do when writing dissertations and various abstracts, where you do not need to put a number on the page with the title or table of contents. You will find the answer to this question in the next paragraph.
How to number pages in Word other than the first page.
If your task is to put down page numbers starting, for example, from the third, then doing this will also not be difficult. To do this, follow the instructions below step by step and you will definitely succeed.

As you can see, there is no magic. Everything is done quite simply. Perhaps many users are simply confused by the huge number of editor settings and do not notice this item. I would also like to tell you how to number pages in Word with Roman numerals, letters or other symbols. You will find this information in the next paragraph.
How to number pages in Word using letters or Roman numerals.
If you don’t have any strict rules when numbering a document, you can distinguish yourself and put page numbers in Roman numerals or even letters. It all depends on your imagination. To do this, we do the following:

Note! Very often, after you number the pages of a document, a dotted stripe may appear at the top and bottom of the page, which is called the “Header and Footer”. To remove these bars, in the “Insert” item you need to select “Close header and footer window”.
Let's summarize.
In today's short article, we examined in detail the question of how to number pages in Word. As you can see from the instructions, the numbering process is quite simple. We have looked at all the necessary settings that can be made for page layout. Therefore, if this article helped you, tell your friends about it.
Often, when writing long materials in Word, you need to quickly number pages. For diplomas, abstracts, books, articles. In this article you will learn how to automatically number pages in the Microsoft Word text editor. How to number from the first, second or third sheet, and exclude some pages.
I have itWord 2016. Also tested in versions 2007 and 2010.In other versions, the interface is slightly different, but the actions are very similar.
Numbering from the first page
Let's start with the standard task - number all pages in order, without exception.
In the top panel in Word, select the “Insert” tab → “Page Number” → “Page Number”.
A window will appear allowing you to choose where to display the number (top or bottom) and alignment. Some versions will instead have a drop-down window to select a footer template.

Changing the numbering format
When setting numbering, there is a “Format” button. With its help you can change the display and numbering order. For example, make numbering in letters, Roman numerals, start counting numbering from an arbitrary number.

Double clicking on the page number opens the footer designer. You can also change the format using the Page Number button.

Numbering from the second page
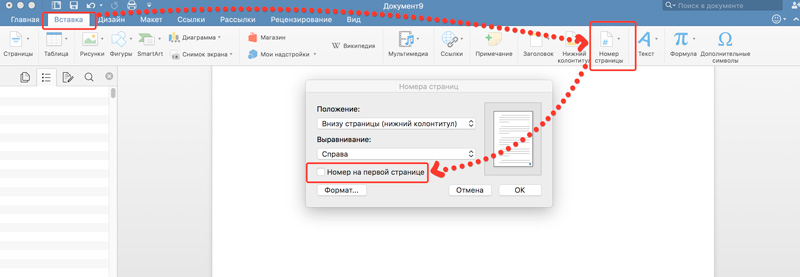
To avoid putting the first page number, follow the steps from the previous paragraph: on the insert tab, click “Page Number” and in the window that appears, uncheck the “Number on the first page” checkbox.
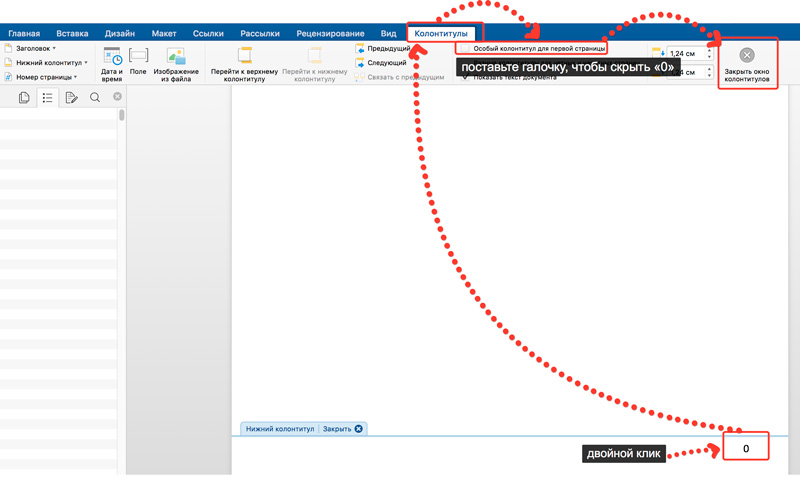
A similar result can be obtained by double-clicking on the numbering, and on the tab that opens with the header and footer designer, click the “Special header and footer for the first page” checkbox.
The countdown starts from the first page, but the number will not be displayed on it.
To exit the header and footer designer, its tab has a special button: “Close header and footer window.”
Change starting digit
If you need to start counting from the second page from the number 1, you need to set 0 as the starting number. To do this, double-click on the page number, in the tab that appears, open “Page number” → “Page number format” → “Start from” → specify 0.

At the same time, do not forget to click the “Special footer for the first page” checkbox so that the zero is not shown.
If you want to start numbering from 3, 4, 5 or another page other than the second, you won’t be able to simply add a special header and footer; it only works for the first page. In such cases, go to the first page, place the cursor on the last line of the first page and click on the Layout tab → Breaks → Next Page.

Then double-click on the number of this page and check the box “Special footer for the first page” (as in the previous paragraphs). Repeat this step for each page that does not need a number.

Using the “Numbering Format”, specify the number from which to start counting. As a result, you can make sure that there are no numberings on the first five pages, and then on the sixth the countdown starts from 1 or 6.
Exclude pages from numbering
You can ignore some pages in the numbering, that is, skip them.

After you have numbered, click on the bottom line on the page you want to exclude. On the Layout tab, click Breaks → Next Page. After this action, there will be one number on this and the next page. Now you can hide one of the numbers: double-click on it and click the “Special footer” checkbox.
As you can see, Word has very flexible page numbering settings. You can enter numbers in just a minute.
Video on page numbering in Word 2010: