This article continues the series of articles “First steps in 1C development.” The material assumes that you have already read our previous articles on the interface. In the same article, we will continue our acquaintance with the new features of the Taxi interface and consider what interesting innovations managed forms have received in this interface.
Applicability
The article discusses the “Taxi” interface of the configuration developed on the 1C 8.3.5.1098 platform. Additions to the current platform releases (8.3.11) are given in the conclusion. Therefore, all information provided is relevant.
New in managed forms in 1C:Enterprise 8.3
The developers of the 1C:Enterprise 8.3 platform have once again worked hard to make it easier for users to work with managed forms.
Line input
Previously, in the input fields, when entering initial characters from the keyboard, the system searched for suitable elements.
However, often users need to search not only by the first characters of the name, but also in an arbitrary place in the name.
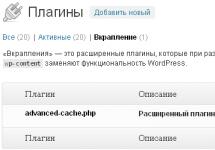
In the configurator for reference metadata objects, to configure input by line, a separate “Input Field” tab was created:
It presents the following options for generating a selection list when entering a line:
- use of full text search;
- search by occurrence of a substring or by the beginning of a string;
- perform searches directly or in the background.
In the “String search method when entering by substring” property, you can choose whether to search only by the first characters of the string or in any part of it.

In user mode, searching for any part of a string looks like this: the user sequentially enters characters from the keyboard, and the system performs the search.
And not only from the first letters of the name, but also from the occurrence of the typed line:

Naturally, using search on any part of a string can lead to deterioration in system performance, especially with a large amount of data.
In file mode, while the user is typing a line, the search is performed in the background only if another background or scheduled task is not running at that moment.
If the appropriate setting is set, full-text search can be used when entering data into the input field.
During a full-text search, both whole words and strings in which the typed characters are part of whole words will be found (the * full-text search operator is used).
For example, the user enters the following parts of words into the input field, the system displays the options found using the full-text search mechanism in a pop-up window:

The results of a full-text search corresponding to the entered search string are shown in the figure:

Let's remember that in platform 8.3 it became possible to redefine the representation of a reference data type using the ViewGettingProcessing and ViewGettingFieldsProcessing procedures in the object manager module.

When using this functionality and line input together, there is the following feature.
The above handlers do not affect the presentation of values in the selection list—the list reflects the underlying representation of the object.

However, once selected, the field displays the expected overridden representation of the object.

To enlarge, click on the image.
The developers believe that there are no errors in this behavior of the platform, and that it is more valuable to show why a particular result was found (highlighting, for example, the substring by which the object was found) than to display a representation of the corresponding value divorced from the search result.
The row input properties discussed above were set at the level of the entire metadata object.
The developer can override these properties at a specific location in the configuration.
For example, using the AutoSelect and EndTextInput event handlers for a specific input field or using the SelectionDataProcessingSelectionProcessing event handler in the object manager module.
For this purpose, in these procedures there is a parameter named Structure type Parameters, the properties of which contain the method of searching for a string, the mode for obtaining selection data, and setting the use of selection data.

To enlarge, click on the image.
Dropdown list for input field
In platform 8.3, the drop-down list for the input field received additional functionality to improve the usability of the system.
This list can now display the history of previously selected values. A list with history is shown on the screen when you place the cursor in a field, when you press the Select from list button, or the Down Arrow button on the keyboard.

You can enable the display of history for input fields associated with data such as directory, document, business process, task, plan of characteristics types, plan of calculation types, chart of accounts and exchange plan. The configurator provides a property for this purpose, located on the “Input Field” tab:

To enlarge, click on the image.
The use of history can be overridden for a specific object attribute or form element.

In addition, if the user does not find the element of interest in the list of the input field, he can click the “Show all” button to open the list form to select an element from the entire directory.
Also in the list of the input field there is a command “Create a new object”. This will open the new element form.
In this form, the user fills in the required fields. After recording and closing the form, a link to the newly created element will be inserted into the input field.

A typical template for using the “Create a new element” command looks like this. The user enters the name of the desired element in the input field.
If the system does not find such an element in the database, a message about this will be displayed. After clicking the button in the list, a new element form with a filled-in name will open on the screen.
The considered innovations make it possible to increase the speed of entering information into the system.
Saving dynamic list settings
In Platform 8.3, dynamic list settings can be saved automatically. To do this, in the configurator, for the required form details, you need to set the “Automatic saving of user settings” property. By default, this setting is enabled when creating a list.

The root configuration element now has a new property – Storage of user settings for dynamic lists.
This property is selected from the list of settings stores defined in the configuration.

To enlarge, click on the image.
Setting up lists in user mode is called up using the corresponding menu item:

The appearance of the form is similar to setting up reports.

To enlarge, click on the image.
The conditions by which the list was selected are automatically displayed at the bottom of the settings. These settings will be included in the list form.
In the configurator mode, to do this, you need to fill in the table property of the User settings group form.
In it you need to specify a separate group of the form, inside which elements will be added to display the selection.

With this setting, the form will have fields in the form of “quick selections”.

To enlarge, click on the image.
If the user has customized the list, the settings will be automatically saved and the list will have the same appearance when opened again.
The dynamic list viewing mode (list, tree, hierarchical list) is saved along with the settings of the form elements.

For one list, the user can save several different settings.
If the configuration compatibility mode is set to “Do not use”, then for a dynamic list in which the document journal table is specified as the main table, the “Create” button is automatically generated in the form of a submenu with a list of documents included in the journal.

To enlarge, click on the image.
This simplified the creation of new documents by the user from the journal form. It has also become possible to quickly create separate buttons on the form’s command panel to create a new document of a certain type.
For this purpose, the standard CreateByParameter command was created. If this command is assigned to a button on the form, then the Parameter property becomes available, in which you can select the type of document to be created when this button is clicked.

To enlarge, click on the image.
In custom mode, this button will look like this:

To enlarge, click on the image.
Because The material in the article is described for platform 8.3.5, then we will update it.
- Prior to version 8.3.7, string input was not fast enough, so in this release the data structure of the full-text search index was changed, which led to increased speed when running the system in places where this mechanism is used. Note that the new full-text search format is used when the compatibility mode is set to "Do not use". In compatibility mode with version 8.3.6, the behavior has not changed. Also note that in the next release of the 1C platform (8.3.8), the mechanism for entering by line and when using the dynamic list search line was also improved, and now it provides search for data that has not yet been included in the full-text search. This behavior has not been observed before.
- The managed form input field dropdown list has also received some improvements. In version 8.3.8, it began to automatically adjust its width to the width of the data displayed in it, plus the keys Home And End began to be processed directly in the input field. These improvements make it easier to use the drop-down input field.
- The mechanism for saving dynamic list settings has also been improved, and in version 8.3.6, the form table extension properties for the dynamic list Period and Display are now stored in the same sections as other dynamic list settings, which greatly simplifies the developer’s work with them. They are now available in the managed form handler WhenLoadingUserSettingsOnServer(), which was not the case before.
This is where we will complete our acquaintance with managed forms in the Taxi interface, but in the next article we will get acquainted with the new features introduced by the 1C:Enterprise platform version 8.3.
To enter and process information stored in configurations written on the 1C:Enterprise 8.1 platform, various forms are actively used in the user interface. To simplify somewhat, we can say that forms are the very windows that are opened by the user and which display the information he needs in one form or another. In "1C:Enterprise 8.1" there are several main types of forms. V.V. talks about the purpose of each type, the possibilities and features of working with them in this article. Fishing, company "1C".
list forms

Rice. 1
Action |
Keyboard shortcut |
Add new element |
|
Mark for deletion |
|
Ctrl+Down Arrow |
|
Going to a higher level |
Ctrl+Up Arrow |
Change current element |
List form
Let's start with the most commonly used form type - list forms. This type of form is used primarily to display any lists of information items stored in a configuration.
For example, you can see list forms when opening various directories, document journals, lists of entries in configuration registers, etc.
What all forms of this type have in common is the presence of one or more lists of configuration items as the main display object with which you are asked to work.
For example, when calling the “Counterparties” directory, we get just such a list form on the screen (Fig. 1).
Rice. 1
As a rule, in addition to the list itself, forms of this type have a command panel with action buttons that are performed on the elements of this list.
When you hover (not click!) the mouse over one of the actions, you will receive a brief explanation of this action and a hot key (or key combination) to perform it, if available.
In addition, the command panel usually contains an “Actions” element, which contains all the actions that can be performed on the elements of this list.
When you mark an item in the list, you can right-click on it. As a result, you will receive a list of allowed actions for this element.
Some actions are the same for all lists, some are created by the configuration developers and may not be available in other list forms.
For frequently used action lists in the form, keyboard shortcuts are assigned ( Read more about using hot keys in issue 10 (October) of BUKH.1S, 2007, page 8), the use of which will increase the efficiency of the program:
Action |
Keyboard shortcut |
Activating an action in the command bar |
|
Add new element |
|
Mark for deletion |
|
Add a group (for directories with hierarchy) |
|
Move an element to another group (for directories with a hierarchy) |
|
Quick entry into the group (for directories with hierarchy) |
Ctrl+Down Arrow |
Going to a higher level |
Ctrl+Up Arrow |
Add a new element by copying the current one |
|
Change current element |
List forms can include simple lists and trees. Trees are hierarchically subordinated elements according to a certain rule. In Fig. 1 on the left of the form we see just an example of such a tree - a hierarchical list of groups of counterparties nested within each other.
Some lists have the ability to select selected items multiple times for group processing. In order to select multiple elements (if this is allowed in the list), just press the Shift key and click the necessary elements with the mouse.
To do this, you can use the arrow keys (up, down, right, left), including the page turning familiar to us all (PageUp/PageDown) in combination with these keys. Common hotkeys also work:
Element Shape
Element Shape- another common type of information presentation used in configurations created on the 1C:Enterprise 8.1 platform.
An element form is essentially a display of any one logical configuration object so that you can view and, often, edit all the necessary information about it. There are plenty of examples of element forms. Let's consider the form of an element in the directory "Counterparties" - "Light (Chertanovo)" (see Fig. 2). (Opening the element form from the list form can be done by double-clicking the mouse, or by pressing the Enter key).
Rice. 2
As a rule, the element form contains all the necessary information about the current configuration object, in our example - about the counterparty. Moreover, often it is in the form of the element that we can edit the current data, and it is the form of the element that is used to enter information about a new object.
In order not to overload our perception, the information content of the form is distributed in it across several tabs.
Bookmarks are grouped by the type of information provided - in our example, this is general information, addresses, contacts and information on contracts and accounts.
Element forms are characterized by the presence of command panels at the top and/or bottom of the window being opened. These are command panels of a form with actions that relate to the entire open configuration object.
As a rule, at the top are various possible actions on an open object (including the already familiar “Actions” section), and at the bottom are the main options for processing user actions with form data (for example, "OK"- save and close; "Record"- save edits in the information base without closing the form window; "Close"- closing the form window).
Typically one of the commands is designated as the "default button". It is activated by the Ctrl+Enter key combination. Such a button is highlighted in bold (in our example, this is the button "OK").
In addition, as a rule, another default action is available - Ctrl+S, which is similar to clicking on “Record”.
In addition to the command panels of the form, there may be auxiliary command panels - they contain actions related to any information element of the open configuration object.
Let's look at fig. 3 - striking examples of such auxiliary panels are the panels located above the list of bank accounts (their own options for actions related only to bank accounts) and above the list of counterparty agreements (their own options - only for contracts).
Rice. 3
Typically, on an element's form, you can clearly identify the difference between the form's command bars and auxiliary command bars.
The Alt+F10 combination works here too; it activates the command panel whose elements the user is currently working with.
It is useful to know that almost all actions on the element form can be performed without using the mouse.
Keyboard control, as a rule, significantly speeds up the process of working with data. For example, pressing the Enter or Tab key allows you to “jump” from one form element to another (the next one). Pressing Shift+Tab allows you to “jump” through elements in the opposite direction. If you are in any input field (for example, in Fig. 2 in the group of counterparties), just write the first letters of the element you need and press Tab and the program will automatically insert the desired element into the input field (if it is unique in the system), or provide automatic list to clarify your option.
As a rule, in quick selection in this way, for reference books you can use not only the name of the element, but also its code, and for documents - the number. Hotkeys are also available in the element form:
Action |
Keyboard shortcut |
Open the form for selecting the desired element |
|
Open the element form of an already selected object in the input field |
|
Clear input field |
|
Quickly switch between bookmarks on the form, if any |
Ctrl+PageUp and Ctrl+PageDown |
Switching the active element of the "Checkbox" type |
|
Discard changes made to form text elements |
|
Revert undone action |
|
Closure of almost any shape |
|
Closing/opening the service message window (the one that may appear below) |
Ctrl+Shift+Z / Ctrl+Alt+O |
When entering new configuration objects using element forms, required fields are underlined in red. For example, for the document “Sales of goods and services: Sales, commission” such fields are the “Counterparty” field and the “Agreement” field (Fig. 4).
Rice. 4
You can select text blocks with the mouse, or you can use cursors with the Shift key pressed. This can be useful for clipboard operations.
By the way, for almost all elements you can use copy to clipboard. Just activate the desired element and press Ctrl+C - the text representation of the element will be copied to the buffer, if such is possible for it.
Selection form
In addition to the forms described above, another type is often used - selection form. As the name suggests, it is intended primarily to help the user select a configuration object (for example, a directory element, document, etc.). You can often see a selection form when filling out data for a new configuration object (document, directory item, register entry, posting in the chart of accounts, etc.). For example, in Fig. 4, when selecting a counterparty, we receive a selection form containing a list of counterparties. Pay attention to the "Select" action located in the command panel of the "Accounts" form. You can see the same action by right-clicking on the element you need in the list of this form.
Often, the selection forms can be forms of a list of currently required configuration objects. But there may be exceptions - that is, the system may provide you with a form other than the list form for selection.
Typically, a selection form can do a lot of things similar to a list of actions. For example, create a new element. You can always find out what actions are possible in this case from the contents of the command panel of the selection form and from which hot keys work and which do not.
Please note that the result when pressing the Enter key differs in the list form and in the selection form - there it is editing the current element, and here it is selecting it.
Group form
Sometimes, when entering a new group or editing an existing one in a particular directory, you can see group form- a specially designed form for entering data related only to this specific group. Essentially, the group form is identical in its capabilities to the element form. You only need to take into account the fact that you are editing group data, and not an element of this directory.
Similar to the (item) selection form, there may be group selection forms in the configuration - sometimes they are available when the configuration developer requires an explicit selection of only the groups of a specific directory. These forms have no obvious differences (except for filling in data) from “regular” selection forms.
For each configuration object, several forms can be specified during development: various forms of an element, selection, auxiliary forms. This is necessary, first of all, to facilitate the input and processing of information stored in this object. That is, a set of forms, as a rule, is determined at the stage of creating a configuration and in different configurations can differ from each other even for objects of the same type (for example, in the standard configurations “Enterprise Accounting” and “Trade Management”).
The configuration may also contain some very special forms that solve certain problems embedded in the logic of a specific configuration. They may not be tied to any specific configuration object - these are the so-called "General Forms". What and how they are displayed is decided by the configuration developers, and the user can understand their purpose from the context in which they are opened.
In any case, the behavior of elements located on the form is usually identical in terms of the ability to control them with the mouse or hot keys.
All forms are characterized by the presence of a special "Help" button in one of the general command panels. Help in this case is a call for explanations on working with this particular form, if any are provided by the developer.
If there are no special explanations, then you will be shown general information on working with the current form type.
Help can be accessed by pressing the F1 key.
If the form contains a list that can change the order of its elements, you will see the corresponding actions in the command panel related to it - moving rows and sorting them (Fig. 5).
Rice. 5
In addition, in this case the hot keys Ctrl+Shift+Up Arrow and Ctrl+Shift+Down Arrow are always available.
1. Input field
2. Checkbox
3. Switch
Entry field
As a rule, an input field is associated with an object attribute and reflects its data. This is perhaps one of the most common elements, it has several ways to select a value:
Selecting from a list (List Selection Mode)

Selecting from another form (Select button)

Control buttons
The implementation of the above examples does not require significant effort on the part of the developer. for example, for the list mode it is necessary to fill the list of an element with values; to select from another form, it is enough to simply associate the control element with the directory data. But for the control buttons, you will need to write more code to process clicks on each button, although it will not be large:
Procedure pvSelection of NomenclatureRegulation(Element, Direction, StandardProcessing)
//Select data for the input field
// in this case, the Nomenclature directory
Request = New Request;
Request.Text=
"CHOOSE
| Nomenclature.Link As Product
|FROM
| Directory.Nomenclature AS Nomenclature
|ORDER BY
| Nomenclature.Code";
TZNomenclature = Request.Run().Upload();
//look for the current directory element specified in the input field
CurrentElement = TZNomenclature.Find(Element.value);
If TechElement = Undefined Then
// if the element is not found then set the index number
// outside the value table, because the very first element in
// value table has index 0
TechIndex = -1;
Otherwise
// if the element is found we get its index
TechIndex = TZNomenclature.Index(TechElement);
endIf;
// calculate a new index depending on the button press
// minus in front of the variable The direction is placed so that when
// clicking on the top arrow showed the element above it
// and therefore with a smaller index
NewIndex = TechIndex-Direction;
// get the number of elements in the directory
// subtract one because all collections in 8.1 start at 0
Number ofElements = TZNomenclature.Quantity()-1;
If NovIndex< 0 Или НовИндекс >Number of Elements Then
// if when changing the index is outside the value table
// i.e. its number is greater than the largest index or less than 0 then
// do not change the value and inform the user about it
Notify("You have reached the directory limit");
Otherwise
// assign a new value, "Product" is the name of the column of the value table
Element.value = TZNomenclature.Get(NewIndex).Product;
endIf;
End of Procedure
Checkbox
In most programs, a checkbox serves to display two states: checked, unchecked. In 1c, the checkbox has three states; in the third state, the checkbox is displayed as checked and at the same time shaded. The three states are only available if the checkbox data is a number, and the states have the following meanings:
Switch
The switch is used to select one value from a small number of possible ones (preferably no more than five), and the values cannot be combined. For example: suitable for selecting a person’s gender. Another example: let’s say a company gives one of 3 discounts on a product, and the discounts do not add up:

In this case, the convenience of using radio buttons may lie in the fact that each of them can have some value, which is set in the “Selectable value” property. And then "5% Discount" can store the value 5 or 0.05.
It's important to remember three things when using switches:
The first switch should have the "FirstInGroup" property (in this example, it is the "5% Discount" switch).
Switches that are meaningfully related to one group should go in a row when setting up the traversal order, without interruption by other form elements. The traversal order is set from the menu "Form -> Setting traversal order", for this example it looks like this:

- The type of selected value is set for the switch that has the "FirstInGroup" property.
Base input mechanism- this is one of platform application mechanisms. It allows you to simplify the user’s work with the application solution and save him from re-entering data that is already stored in the information base.
Let's look at a simple example. Let's say that in an application solution there is a document Receipt of goods, which records the fact that certain nomenclature items appear in the organization:

After the item is received from the supplier, a document should be drawn up Payment for goods and services, in which indicate the supplier and the amount that needs to be transferred to him for the delivered goods:

In such a situation, the input mechanism on the basis allows you to generate a document Payment for goods and services automatically, using information stored in the document Receipt of goods. This is done literally with one click of the mouse:

After executing this command, the system will create a new document Payment for goods and services and fill in his details according to the information available in the receipt. The user will only have to select specific current accounts if the supplier and our organization have several of them.
Thus, the based input mechanism allows you to create new application solution objects (directories, documents, etc.) based on information contained in other existing application solution objects.