Many of us now have at home not only a TV and a computer, but also a telephone, tablet, etc. And there is only one Internet connection.
How can we access the Internet from all the devices we have at home???
You answer that thanks to the router that distributes WI-FI. Then this post is for you.
But is it possible to make a computer or laptop distribute Wi-Fi wifi?Internet without a router,is this possible? Certainly!!!
If you ask this question in a store, they will tell you that this is not possible, you need to buy a router. But oddly enough, this is just a pure scam, because the goal of managers is to sell you something that you don’t actually need.
My operating system is Windows 7. I also tested this method on Windows 8. So distributing Wi-Fi Windows 8 is not a problem!I have not tried this method in other operating rooms.If you connect, dear friends, using the proposed method, on another operating system, please write in the comments for the benefit of others.
It’s probably worth adding that to distribute the Internet via Wi-Fi from this access point, the computer must be equipped with a Wi-Fi adapter. Either USB or PCI. In laptops this is often a built-in device. But this is often not the case with desktop computers. Sodistributing Wi-Fi via a laptop from this access point will not be difficult.
So, if your computer is equipped with all this, then let’s get down to business to distribute Wi-Fi from the computer.
First, let's briefly discuss what needs to be done to distribute Wi-Fi from a PC.:
1. You need to create a virtual WI-FI point, then transfer the existing Internet connection to this access point, so you need download free wifi.
You don’t have to think about how to do this; a very small, free program that distributes Wi-Fi will create an access point for you and will be responsible for it.- "Mhotspot".
This program does not require installation. Here link to download this wonderful program. OR - download a program that distributes Wi-Fi from the official website.
5. Max Clients- Here indicate the number of clients, that can connect to your connection point, you can connect up to 10 devices at a time. If you specify 1, then you will not be able to connect any other device to this point except the connected one.
6. Now all we have to do is click “Start Hotspot” and create an access point.
Step 7 how to install wifimore difficult! That's why, take your time and be careful.
We set up Internet distribution through an existing Internet connection.
First go to:Start - Control Panel - Network and Internet - Network and Sharing Center - Change adapter settings.
There you find "Wireless network connection 2.
You can rename it to the desired name, for your convenience so as not to get confused during further configuration, for example, I renamed it to “ Virtual WiFi". But this is not necessary, you can leave itWireless network connection 2.As your heart desires.
Find your active connection. For me it is implemented through USB 3g modem, you can have any other, for example in most cases this LAN connection.
8. Now come in in your properties active connections, go to the “Access” tab. And then check all the boxes, it’s shown on the image .
Checkboxes for “Allow other network users to use this computer’s Internet connection” and the “Allow other network users to manage Internet connection sharing” checkbox. A on the list “Connecting your home network” select your “Virtual WiFi” or your renamed or non-renamed connection.
9. Restart your computer and then your WiFi access point will be ready and start working.Now you can always use this access point. When you connect your devices to the Internet, simply find this point in them and enter the password you specified earlier when creating the point in the Mhotspot program.
10. If you have rebooted your laptop (computer), then to enable Internet distribution via WiFi you only need launch the “Mhotspot” program and click “Start H” otspot » . You don’t need to enter anything else, because the program automatically remembers all the point name and access password you previously entered.
So, you found out that you can easilydownload Wi-Fi to your computer, completely free and distribute Wi-Fi from your PC and laptop.
If suddenly you are unable to connect to Internet distribution using this method. Maybe you need to connect Internet distribution via wi-fi in Windows XP? Try the following effective method. It's even more simple. You don’t need to perform many manipulations, because this program will do almost everything for you! To connect Wi-Fi using another, similar methodAfterwards, please don’t forget to write in the comments which method you liked and suited best, what difficulties you encountered and how you resolved them.
By writing this, you may unknowingly help many others!
Good luck to you friends in free swimming with Wi-Fi wifiover the Internet without any router!Save your money, you will need it for more important things!
Who found this article useful, please write in the comments and share this unique advice on how to distribute wifi from a computer,with others. Click on the social buttons on the left of the screen and your friends on the social network will soon read these tips, saving themselves time and money! Thank you!
If your PC has a cable Internet connection, you can quickly set up a Wi-Fi point without purchasing additional equipment in the form of a router.
The main thing is that your PC has a Wi-Fi adapter. All modern laptops have such a wireless module already built into them by the manufacturer, and if this unit is not included in your desktop computer, you can purchase and connect it.
The cost of purchasing a Wi-Fi adapter will be significantly lower than the cost of a wireless router.
Wi-Fi distribution methods
There are several effective options for distributing Wi-Fi through a home computer, for example, using the built-in tools of the operating system, using applications from third-party developers, and in Windows 10 you can use mobile Hotspot.
One of the main conditions for the successful implementation of the task is that a cable from the provider, that is, an Internet source, is connected to the PC, and the computer must be equipped with a special wireless module.
 If your PC does not have a Wi-Fi module, the most convenient option is to connect an external Wi-Fi adapter to it via a USB port.
 It should be noted that driver installation is required for the device to function properly.
If Windows 10 is installed on your PC, then for the most part the system installs the software on its own.
If the computer is running on earlier versions of the OS, it is recommended that you visit the official resource of the hardware developer and download and install drivers on the computer.
In order to analyze the performance of the Wi-Fi adapter, you need to open the console with extended rights and type: “netsh wlan show drivers”.
 Then click “Enter”. You should then see a positive response message in the Hosted Network Support column.
After completing the preparatory steps described above and making sure that all resources are available, you can begin organizing a wireless network without using a router.
Without a router. Using programs
There are many applications designed specifically to distribute Wi-Fi to other home devices of the user through a computer.
After all, almost every modern smart phone running operating systems: Android, Windows and iOS is capable of accessing the World Wide Web via Wi-Fi.
"mHotspot"
The mHotspot program has many positive reviews.
You don’t even need to install it on a PC or laptop, and by downloading it from the resource “mhotspot.com”, you can immediately launch and organize a home wireless point without using a router.
Once you open the application, you must do the following:

"My Public"
Like the previous utility, it does not require installation. All you need to do is download “MyPublikWiFi” and use it right away.
 To distribute the Internet using this application, you will need to complete the following steps:

"Switch Virtual Router"
The “Switch Virtual Router” program works perfectly in the Windows environment. It is available for download and installation on the Internet for free.
Settings are made in an intuitive interface, which is completely Russified.
 The application can launch automatically immediately after the PC boots. The user is once required to indicate the name and password for the Wi-Fi being created and check the boxes that interest him.
Without programs
If it is not possible to install specialized utilities on your PC, you can successfully solve the problem using the built-in Windows tools.
All currently supported Microsoft Windows are capable of sharing an existing connection.
On different OS
To realize your plans, you need to perform several successive steps:

Note: It is better to enter the name invented by the computer owner himself, the main thing is that he can remember it and then find it in the list of connections.
To ensure reliable connection security, it is advisable to come up with and print a complex access code, which consists of symbols and numbers, instead of “koddoctupa”.

When you need to stop the broadcast, you need to type in the console: “netsh wlan stop hostednetwork”. Click Enter.
Via the command line in Windows 10
In "Ten", the procedure for turning a PC into a modem is almost no different from performing actions in earlier versions of the OS and is also carried out via the console.
 Steps:
- Run the CS with extended permissions and type: “netsh wlan set hostednetwork mode=allow ssid=TochkaDostupa key=koddoctupa”;
- Click “Enter”;
- Paste “netsh wlan start hostednetwork”;
- Click “Enter” again;
- Right-click “Start”, click the line “Network connections”;
- Right-click on the current connection and enter “Properties”;
- Give permission to other clients to connect.
Windows 10 (Mobile hotspot)
The new OS with index “10” has a convenient method for solving the problem.
Therefore, if the user has this latest development from Microsoft installed, he will simply need to enter the name, code and connection through the new function.
You only need to complete a few sequential steps:

 Note: Sometimes the steps described above do not lead to a successful solution to the problem. The reason for this is the security utilities running on the PC, so it is recommended to temporarily disable the antivirus and firewall.
Windows 7
Today, "Seven" continues to hold the palm of leadership among popular OS for PCs. In it, you can organize Wi-Fi distribution using the OS using 2 methods:
- Via the console (the method has already been discussed earlier in this guide);
- By setting up your network environment.
Setting up your network environment
In a PC on “Seven” you need to perform the following actions:

Using the Conectify Hotspot program
Several steps need to be completed:

Connection control is available in the application menu. 
How to distribute the Internet from a laptop?
The setup process via a laptop is no different from a desktop PC, so the above methods work great for laptops as well.
The main thing is that the device has a Wi-Fi module or it must be connected via a USB connector.
Create a Wi-Fi hotspot
You can use the Windows tools or third-party applications listed above.
In Windows 7, 8 and 10, the method of creating a point through the console works fine.
 After this, you will also need to perform similar actions in the properties of the current connection.
 To pause and resume distribution, use the commands shown in the figure below:
 As you can see, all actions and commands are completely similar and work well on a mobile computer.
You don't have to buy a router to have WiFi in your home. A laptop connected to an Ethernet cable can also distribute the Internet throughout an apartment. There are plenty of instructions on the Internet on how to do this on Windows 7 and older, but if you have XP, do not rush to completely reinstall the operating system.
Laptop as a router on an old OS
On any operating system from Microsoft, Internet distribution via WiFi can be organized using both built-in tools and third-party utilities. But why clutter your hard drive with unnecessary programs? On Windows XP, follow these steps step by step:
- Open “Start” and go to “My Computer”.
- In the left pane, select “Network Places”.
- Next, go to the “Show network connections” section.
- Right-click on the “Wireless Connections” shortcut and open “Properties”.

- Next, go to “Wireless Networks” - “Advanced”.
- Here, select the “Computer to Computer” option and confirm your choice.
- Click “Add” and enter the details of the network to be created (name, password, encryption method) and confirm.
- Next, open the “General” tab and highlight the IPv4 item, click on the “Properties” button.
- In this window, set the indicator to “Use the following IP...” and enter the following data:
IP - 192.168.1.1
Subnet mask - 255.255.255.0
The distribution has been created, all that remains is to enable the ability to connect to it from other devices within the range of the wireless network. To do this, return to the network connections window and right-click on the local connection and open its properties. You need to put an indicator next to the “Allow other network users...” item.

Now WiFi distribution should be fully functional.
Settings on the current OS
Similar actions can be done with Windows 7. In order for Wi-Fi to be distributed from a computer or laptop, you can, as in the previous example, step by step create a new virtual network. The only difference is in some steps.
- You need to look at the “Network and Sharing Center”.
- Run “Set up a new connection...”.

- Then go to “Setting up a wireless network “Computer-Computer” and click the “Next” button.
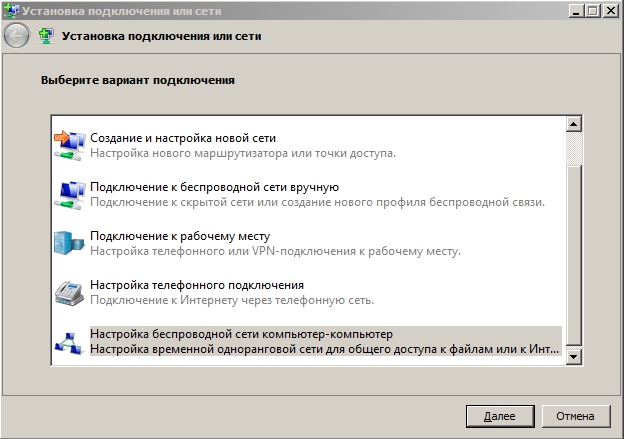
As you can see, the actions are similar. In the new window, enter the network name, encryption type and password. Save the changes and click “Next”. Here all that remains is to apply the “Enable sharing...” setting.

But that is not all. To be able to connect to WiFi from other devices, return to the “Network and Sharing Center” and on the left side of the window, find the line “Change advanced settings...”.

After opening this menu, make active the items highlighted in the screenshot:

Ready! But Windows 7 offers another, more advanced and simpler way to organize WiFi distribution from a computer or laptop equipped with a wireless adapter. This is using the command line. Find it in the list of all Windows programs and open it with administrator rights (right-click on the shortcut and select the appropriate item).
In the window that opens, enter a command of this type:
netsh wlan set hostednetwork mode=allow ssid=”new network name (at least 8 characters)” key=”password”
and press Enter. This is a quick way to create a distribution, and to start distributing the Internet from your laptop, use the command:
netsh wlan start hostednetwork
All that remains is to go to the “Network Control Center...” - Properties of the Local connection (the same one that is the wire through which the Internet “gets” into the apartment). Open the “Access” tab and check both boxes. WiFi distribution is now working.
(Visited 21,556 times, 2 visits today)
If you need to share the Internet between several gadgets, but don't have a router at hand, you can do without it. These instructions will help you turn your computer into a router for distributing the Internet via an access point (Wi-Fi network) or an Ethernet cable.
1. How to distribute the Internet from a computer using the “Mobile hotspot” function (Windows 10 only)
1. Find the Mobile Hotspot menu: select Start → Settings (gear) → Network and Internet → Mobile Hotspot.
2. In the “Internet connection sharing” field, select the type of connection that connects the current computer to the Internet. This can be a Wi-Fi (or 3G) or Ethernet wireless connection.

3. Click “Change” and in the next window, specify the name and password for the new wireless network through which the computer will distribute.

4. At the top of the page, enable the option “Allow the use of my Internet connection on other devices.”
After this, you will be able to distribute the Internet through the created Wi-Fi network. It is enough to connect the necessary devices to it using the password created in the third step. And you can turn off Internet distribution in the same place where wireless communication is turned off - in the “Network” window on the taskbar.
1. Launch Command Prompt. To do this, enter “Command” in the system search, right-click on the found element and select “Run as administrator.”
2. To create a new network for distribution, enter the command netsh wlan set hostednetwork mode=allow ssid=Stacy key=4419E1z# in the line and press Enter. Instead of Stacy, you can enter any other network name, and instead of 4419E1z# - any other password.
3. To activate the created access point, enter the command netsh wlan start hostednetwork and press Enter again. If the commands worked, you will see the following text.

4. Now allow other users to access the Internet through the created network. First, open the Windows Control Panel and select Network and Sharing Center.
5. Then right-click on the icon for connecting your computer to the Internet, select “Properties” → “Access” and check the boxes next to permission requests. In the “Home network connection” field, select the wireless connection created in the second step of the instructions.

After this, you will be able to connect other devices to the Wi-Fi network configured in this way using the specified password. To disable the access point, enter netsh wlan stop hostednetwork at the command prompt. To re-enable it, use netsh wlan start hostednetwork .
If the Internet does not work on the connected devices, open the “Device Manager” menu through the “Control Panel”, expand the “Network adapters” item and check that all devices from this list are turned on. If you find inactive ones among them, enable them using the context menu.
If other problems occur, try reinstalling the network adapter drivers manually by downloading them from the manufacturer's website, or automatically using the Driver Booster program or service. The latter will do everything for you.
If you don't want to bother with the command line, you can use a special utility to quickly configure a wireless access point. You can use the free Connectify Hotspot program in just a few minutes.
- Download and install Connectify Hotspot.
- Launch the program and follow the on-screen prompts. The Russian interface language can be selected in the settings. The utility will ask you to set the type of computer connection to the Internet and the parameters of the new wireless network. After this, all you have to do is click on the start button to activate the access point.

When you're done, you can distribute the Internet to other devices via Wi-Fi. You can manage your wireless network directly in the program window.
Connectify Hotspot also has a paid version with additional features. For example, it allows you to distribute not only landline Internet via Wi-Fi, but also 3G and 4G. Hotspot Pro costs $35.
- Connect the Ethernet ports of both devices with a cable.
- On the computer from which you want to distribute the Internet, open the “Control Panel” and go to the “Network and Sharing Center” → “Change adapter settings” section. The names may differ between versions of Windows.
- In the window that opens, select two connections using the Ctrl key. The first should be responsible for connecting your computer to the Internet. The second is for connecting a second computer to this one. Right-click on either of the two connections and select “Bridge Settings.”

After a few seconds, a new connection called “Network Bridge” should appear, and the status “Connected, Linked” should appear next to the used connections. If everything goes well, the Internet will work on the second computer. But this may not happen immediately, but after 10–15 minutes.

In macOS it is quite easy to set up Internet sharing, both via cable and . You don't need any additional programs for this.
- Expand the Apple menu and go to System Preferences → Sharing.
- Check the “Internet Sharing” checkbox in the left panel and specify the type of connection of the current computer to the Internet in the “Shared Connection” list on the right side of the window. For example, if it is connected to the Network via cable, select Ethernet.
- In the “For computers using” field, select a method for sharing Internet access with other devices. For example, if you want to distribute the Internet wirelessly, choose Wi-Fi; if via cable, then choose Ethernet.

If you chose Wi-Fi, uncheck the “Internet Sharing” checkbox, click “Wi-Fi Settings” and set the access point name and password, then check the “Internet Sharing” checkbox again.
After making these settings, you can connect other devices to your computer using the selected method.
Despite the fact that now the simplest wireless router can be bought for only about 1000 rubles, still not everyone can afford it. And some people simply don’t want to spend money on it. But there are emergency cases when you urgently need to organize a Wi-Fi network, but there is no router or access point for it. For example, you bought a modern Smart TV and want to use it to watch videos on YouTube. What should I do? The solution is simple - we will use the means at hand to distribute WiFi without a router. I will give several working examples, and you can decide which one is more convenient for you.
How to share the Internet from a laptop on Windows 10
In modern operating systems from Microsoft, which are installed on most computers in Russia, it is possible to organize a virtual access point and turn a laptop into a router. The only limitation is that this computer must be connected to the Internet either through a wired Ethernet adapter or through a 3G/4G modem. The fact is that using one adapter, the laptop will not be able to distribute the Internet via Wi-Fi and receive it. The second limitation has now practically disappeared. The fact is that the wireless adapter or its driver must also support this function. On modern supported computers, problems are very rare.
So, in order to use your laptop as a router and distribute the Internet in Windows 10, you need to enable the Wi-Fi adapter on it, and also make sure that it works and there are no problems with the installed driver. After this, there are two ways - activate the function manually or use the program. Consider both options.
Method 1: netsh wlan hostednetwork commands and ICS sharing
In order to independently configure a Windows virtual router and enable shared access to it using the built-in ICS mechanism, do the following.
Right-click on the "Start" button in the lower left corner of the screen. The following menu will appear:

Select the “Command Prompt” item in it or, if you are not working with Administrator rights, then the “Command Prompt (Administrator)” item. A black window will appear into which you must enter commands - the so-called “Windows console”. The first command is to configure the parameters of the wireless network that we will launch. Here's an example:
netsh wlan set hostednetwork mode="allow" ssid="moi-wifi" key="wifipassword" keyUsage=persistent
This is what it looks like on the command line:

Let's take a closer look. Parameter SSID- this is the name of the Wi-Fi network that you are creating and will distribute. Parameter Key is the security key or, in other words, the password for connecting to this WiFi. Settings entered using this command are saved in the registry and will retain the entered values until you change them to others.
The second command is:
netsh wlan start hostednetwork
It starts the wireless network configured above.

In fact, this is how you force the computer’s wireless adapter to distribute WiFi without a router, that is, on its own. Unfortunately, so far you have only been able to make an access point from a laptop, which cannot distribute the Internet.
In order to now distribute the Internet on Windows 10, you need to make one more setting. Press the Win+R key combination and enter the open command in the line ncpa.cpl. Press the Enter button on the keyboard and a window will open for the network connections that are available in the operating system.

Please note that you must have two wireless connections while using only one network adapter. This is fine! Secondly, in my example this “Local Area Network Connection *2” is the Wi-Fi that the computer distributes. But what we need now is not that, but the connection through which your PC accesses the Internet. For me it is a Local Network. Right-click on this icon:

Note: If you are using a PPPoE connection to your provider, then you need to select a High-speed connection. If you are connected via L2TP or PPTP tunnel, then you need to select a VPN connection.
In the window that appears, open the “Access” tab:

Check the box "Allow other network users to use this computer's Internet connection." After this, the “Connect to your home network” list will appear below. Here you need to select the created wireless network, which I already mentioned above. That's it, click OK to apply the settings.
Well, that’s basically it, now the laptop distributes the Internet via WiFi and without a router, independently performing their functions.
Advice:
Every time you turn on your computer to start a virtual access point, you will have to enter this command:
To automate this process a little, you can create a text file on your desktop with the following content:

After that, save the file and rename it to change the extension from *.txt to *.bat. This will make the file executable. Now it needs to be placed in Autoload. This will force the laptop to distribute WiFi automatically as soon as Windows 10 boots up.
On previous versions of the OS - Windows 7 and Windows 8, everything is done exactly the same as on Windows 10. Here is a video instruction:
Possible problems: If, when you try to start a virtual access point in the command line, you receive the error “The hosted network could not be started. The group or resources are not in the required state to perform the required operation,” then first check whether the Wi-Fi adapter is turned on on the laptop. If it is definitely enabled, then run this command:
netsh wlan set hostednetwork mode=disallow
After that, try starting the virtual router again. Everything should work!
Method 2. Programs for distributing the Internet from a laptop via WiFi
This is an easier way to distribute Wi-Fi, which does not require any “extra steps” at all. Typically, all you need to do is launch the application. In some cases, he needs to manually specify through which network adapter the laptop accesses the Internet. The most popular program for distributing WiFi is, of course, the utility Connectify Hotspot:

In my opinion, despite its popularity, this is not the best option. There are analogues that are simpler, more convenient and, most importantly, provide the same functions as Connectify Pro absolutely free.
One such example is the program mHotspot:

This is an excellent free program for distributing the Internet over a wireless network. There are only a few fields in the main application window. "Hotspot Name" is the name of the WiFi network or the so-called SSID. The "Password" field is the Wi-Fi password. In the "Share From" list, you must manually specify the network connection through which the PC accesses the Internet. We don’t touch anything else and press the “Start” button. Well, let’s enjoy the delights of wireless Internet!
In general, as I noted above, there is a sea of similar software, but personally, I liked the Chinese utility the most of all of them Ostoto Hotspot. It is distributed freely, there are no built-in advertisements yet, it works and is not buggy! What else is needed for happiness?!

This free program for distributing Wi-Fi from a laptop has the bare minimum of settings and works right out of the box. Even a schoolboy can figure it out. To change the SSID or password for the connection, simply click on the “Edit” icon and enter your parameters in the fields that appear. Don't forget to save your changes by clicking the "Save" button.
How to distribute the Internet from a phone or tablet
Many users, for various reasons, prefer mobile Internet access to cable, because it is always at hand - not only at home, but wherever you are. The main thing is to have reliable cellular reception. But again, if you need to connect another device, difficulties immediately arise. Fortunately, the developers of the Android and iOS operating systems for mobile devices have built in the ability to organize a Wi-Fi router via a phone or tablet. Let's look at how this is done in more detail.
How to set up an access point on Android
Click on the gear icon and open your smartphone Settings:

In the "Wireless Networks" section, find the "More" button and click it. In the next menu we find the item “Modem mode”:

And then you need to select the “Wi-FI access point” item. The following menu will appear:

Here you need to move the slider to the “On” position.
With this, you have already launched a virtual router, which allows you to distribute Wi-Fi on Android.
To see what the password is for connecting to this wireless network or to change it, click on the line “Setting up an access point”:

If necessary, here you can change the SSID, the type of encryption standard used, and the security key.
To disable the virtual router, simply move the switch to the "Off" position.
How to distribute Internet from iPhone
Fortunately, not only Android has such a function; Apple's iOS also allows you to turn on the hotspot on your iPhone and iPad with just a few swipes of your finger. This is done as follows. Open the settings of your iPhone and find the “Cellular” item:

Scroll down to “Modem Mode” and select it:

The following menu will appear:

Here you need to turn on the modem mode with the slider, after which your iPhone will start distributing the connected 3G/4G Internet via Wi-Fi. The password for connecting to this wireless network can be viewed and even changed in the “WiFi Password” field.
To turn off the wireless access point on iPhone and iPad, simply turn off tethering mode.


