Today we will talk about how to partition a hard drive in Windows 10: why it is needed, as well as several ways to do it. Increasingly, an advanced computer user, when installing the Windows operating system, decides to split the system or hard drive into several partitions. What is it for? The main goal is ease of use, and most importantly, the separation of working operating system files and personal data, which we in no case want to lose. And this can happen if the system suddenly crashes. Additionally, partitioning your hard drive will help your Windows 10 to run faster.
So, here are some ways to partition your hard drive in Windows 10:
- Using standard operating system tools
- When you install Windows 10
- Using special programs
Now let's look at each of the methods in more detail.
How to create partitions on your hard drive using Windows 10
The main condition in this method of dividing a hard drive into partitions in Windows 10 is that there is enough free space (so that it is no less than what you decide to define for a new one).
- Press the Win+R keys and in the “Run” window enter diskmgmt.msc
- The loading of a special management utility has begun
- After loading it, right-click on the partition that corresponds to the disk we are working with
- Next, select “shrink volume”
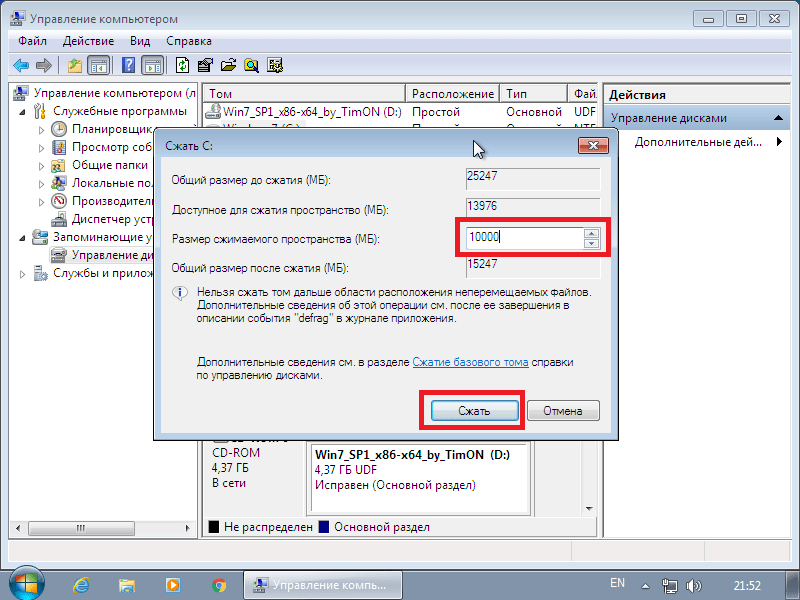
- In the window that opens, in the “Partition of compressible space” column, indicate the size that we are going to allocate for a new disk or logical partition
- Select “compress”
- Unallocated space should appear on the right, right-click on it
- You need to select “create simple volume”
- The resulting volume will have a default size that is equal to all free space. We can specify a lower value if, for example, we want to create several logical drives
- Specify the letter of our new drive
- Define the file system (set a new one or leave it as is) and click “next”
- That's it, if the steps were followed correctly, our disk is divided into two
Splitting on the command line
You can also change the disk size in Windows 10 using the command line. This method also applies to the tools of your operating system. Please note that this method will only work when you divide the only system partition into two - for system data and your personal ones. And here's how to create a new volume on your Windows 10 hard drive this way:
- Open command prompt as administrator
- We begin to enter commands in this order: first diskpart
- Then list volume. When this command is executed, pay attention to the volume number that corresponds to drive C
- Enter select volume N. N is the volume number from the previous paragraph
- Next is the command shrink desired=size. Instead of the word “Size”, enter the number in megabytes by which we will reduce drive C in order to divide it into two
- Then list disk. When executing this command, remember the number of the HDD or SSD disk where there is partition C
- The next command is select disk M. M is the number that we remembered in the previous paragraph
- Next, enter these commands in order: create partition primary
- Format fs=ntfs quick
- Assign letter=desired_drive_letter
- The process is complete. You can look in Explorer at the disk partition we created
Acronic Disk Director
This program will also help us expand or reduce the size of the railway. How to use it:
- When you first start the program, select the “manual” operating mode
- A window will open in which we select the section that we will split
- Right-click on it and select “split volume”
- Set the size, then click “OK”
- Click “apply pending operations”
- Restart the computer and click “Ok” again
A hard drive is designed to permanently store information used when operating a computer. They are also called hard drives or hard drives. The abbreviation HDD also stands for hard drive in computer terminology. A hard disk is one of the fastest devices for writing and reading information, not counting RAM.
Most often, it is not convenient to use a hard drive as a single storage of information, so most users of PCs and laptops split the hard drive into partitions for convenience.

The concept of a hard drive partition
A partition (often referred to as a volume) is an area of a hard drive that can be formatted for a specific file system. A partition or volume is designated by a letter of the Latin alphabet, for example F, E, H, Z, or other letters that are not currently used on this hard drive.
Type of computer hard drive
Types of hard disk partitions
Experts in modern computer terminology related to hard drive partitions distinguish three main types of volumes on a hard drive:
- Primary (Primary partition);
- Extended partition;
- Logical partition.
The primary hard drive partition typically stores user data, programs, and operating system files. There can be more than one primary partition on a hard disk, but there cannot be more than four. It is impossible to install more than one operating system on one primary hard drive volume, so if you want to use several operating systems on one PC, split the hard drive into several partitions. And since there cannot be more than four primary partitions on one hard drive, there cannot be more than four installed operating systems either.
During each session of working with a computer, only one primary partition is active, the one from which the operating system was loaded. Many operating systems have the ability to boot only from the active volume on the hard drive.
An extended partition combines logical drives, which are also called logical partitions. You can create a huge number of logical disks in an extended partition. They can store various information, such as user data, applications, programs, personal photos, videos and documents, even operating system files that can be loaded not only from the primary partition.
Logical partitions are almost no different from extended partitions. Any logical drive is simply an area of an extended partition.
Computer hard drive
Partitioning your hard drive
Many owners of laptops and personal computers, after purchasing, think about the problem of dividing the hard drive into partitions. The essence of this partition is to divide the computer's hard drive into two or more partitions. In most cases, they create a local drive C containing the operating system and system folders, as well as a local drive D on which they mainly store their favorite movies, music, photos, text documents, etc. But for storing personal data, not one, but several local drives can be used and They can be named by any letters of the Latin alphabet.
Hard disk division occurs only formally
Advantages of partitioning your hard drive
Splitting your hard drive into several partitions has many advantages. For example, the most significant advantage of this procedure is that personal files such as videos, photographs and documents will be stored on a separate disk. Because if the need arises to reinstall the operating system, and formatting the disk with the OS is simply inevitable in this case, then all your personal files and folders will be saved.
There is, of course, another solution to this problem. Before reinstalling the operating system, move all important data to removable media, but this is quite a labor-intensive task, especially if the amount of information that needs to be saved is tens or even hundreds of gigabytes. And if a situation arises when an emergency reinstallation of the operating system is necessary, access to personal files saved on a shared local drive along with the OS is no longer possible, important information will simply be lost.
This is what a computer's hard drive looks like when purchased in a store.
Storing system and personal files in different sections of the hard drive will be more convenient. It will be easier to find the information you are interested in, since each section will be less cluttered, and you will easily find the necessary files or folders. In addition, the obvious advantage of partitioning a hard drive is that it is easier for the operating system to work with a less loaded partition, that is, the performance of the OS increases significantly.
Another advantage of dividing a hard drive into partitions is the ability to use several operating systems on one computer. For example, Windows 7 and Windows 8 or Windows XP can be installed on one hard drive, but for this the hard drive must be partitioned. If a failure occurs in one of the operating systems, you will have another operating system installed and ready to use.
To summarize, it is worth highlighting the main advantages of dividing a hard drive into partitions. So, the advantages of this procedure include:
- ensuring the security of personal data even if failures occur in the OS;
- high efficiency of organizing information stored on the hard drive;
- increased OS performance due to less partition load;
- the ability to install and use several operating systems on a computer.
A hard drive is a very complex device that provides quick access to stored information.
Dividing a hard drive into partitions using built-in Windows OS tools
Since we have found out the main reasons why a hard drive is partitioned and become familiar with the main advantages that such a solution subsequently brings, we should consider in detail how to partition a hard drive into local disks in practice. Moreover, we will describe the algorithm for performing this procedure in relation to the most popular operating systems - Windows 7, 8 and 10.
Partitioning a hard drive in Windows 7
If your computer or laptop has the Windows 7 operating system installed, then to divide the hard drive into partitions, follow these steps:
Step 1. Right-click on the “Computer” icon on the desktop or in the “Start” panel, open the context menu, and click “Manage.”
Right-click on the Computer icon
Step 2. In the window that opens, select the “Disk Management” utility from the menu. After this, you will have to wait for a few seconds until a window with the hard drive structure opens.
Select Disk Management
Hard disk partitions
Step 3. To partition the hard drive, you need to select a volume that has a fairly large space, but it is worth remembering that it is better to compress a non-system partition if possible. Right-click on the selected volume and select “Shrink Volume” from the context menu. A small window will open and you will still need to wait some time.
Select Shrink disk and wait a few seconds
Step 4. The system will offer available compression options. Maximum values will be indicated, but it is not recommended to use them, so reduce the size a little to the level required for you. This will be the size of the future logical disk. Enter the required values in the boxes and click on the “Compress” button. Next, we wait again until the compression process is completed.
Maximum allowed values for volume compression
Step 5: Once the process is complete, a new partition will appear in the Disk Management window. A black stripe and the inscription “Not distributed” will be visible on the top of it. To convert it into a hard disk volume, right-click, then select “Create simple volume”.
Unallocated space on your hard drive
Step 6. The “Simple Volume Creation Wizard” will open, click “Next” and select the maximum size.
Creating a Simple Volume
Step 7. Assign from the proposed letters of the Latin alphabet the letter that will later become the name of the new section and click “Next”.
Working with the Simple Volume Wizard
Select the name of the future partition in the Simple Volume Creation Wizard
Step 8. Check the box next to “Format this volume as follows”; select the NTFS file system; cluster size – default; Check the box next to “Quick Format” and click “Next”.
Manually setting formatting options
Step 9. When the “Completing the Create Simple Volume Wizard” window appears, check all the data and click the “Finish” button.
Completing the Create Simple Volume Wizard
Step 10. And the new hard drive partition is ready!
Ready new section
So, without the use of additional software, you can easily and simply partition the hard drive on a computer or laptop with the Windows 7 operating system installed.
Partitioning a hard drive in Windows 8
Owners of Windows 8 OS can partition the hard disk also using the Disk Management utility, but to open this window you need to simultaneously hold down two Windows + R keys. As a result, the Run window will appear, enter “diskmgmt.msc” into the command line » only without quotes and press the Enter button on your computer keyboard.
Next, the “Management” window will open, similar to that in the operating system discussed earlier. In order to create a new partition on your hard drive, you need to sequentially perform the same steps as in the algorithm described in Windows 7. That is, you perform all the manipulations described in steps 2-10.
Partitioning a hard drive in Windows 10
The hard drive on computers and laptops with the Windows 10 operating system installed can be divided into partitions using the same built-in Disk Management utility. You can open this utility in Windows 10 by opening the Start menu. We type “Control Panel”, left-click on it and select “System and Security”.
Finding Control Panel in Windows 10
Control Panel in Windows 10
Hard disk structure
In the window that opens, scroll down the scroll bar and find the “Administration” item. In this item you need to find “Creating and formatting a hard disk”, click on it and wait a couple of seconds, after which a window with the “Disk Management” utility opens in front of us. We carry out further steps in full accordance with the hard drive division algorithm in Windows 7, again we do steps 2-10.
Other ways to create a new volume on a hard drive
It is worth mentioning that the Disk Management utility also allows you to delete hard drive partitions. You will need this if, for example, there is no more free space left, and you simply need to create a new volume. To do this, you can right-click on the hard disk partition to be deleted and select “Delete Volume”. An unallocated volume will appear in place of the deleted partition, which can be formatted to the parameters you require.
Removing a volume using Disk Management
The steps described in the algorithm show how to create a new partition using the compression method. But there is a way to create a new volume from unallocated space, which may appear after deleting a partition, as described in the paragraph above, or after previous divisions, there could simply be unallocated space on the hard disk, from which you can create a new volume by following steps 5-10 of the above algorithm .
In addition, it is possible to expand another of the existing volumes into the free space after deleting the old volume, or the partition can be expanded into unused unallocated space. To do this, click on the “Extend volume” item in the context menu, select “Next” and “Finish”.
Partitioning a hard drive when installing Windows OS
After launching the operating system loader, select your language, accept the terms of the License Agreement, and select “Full installation”. The bootloader will prompt you to select a partition on which the operating system will subsequently be installed. Next, a window will open with a “Disk Settings” button. By clicking on this button, you will have access to all the tools that will allow you to work with disk space.
In this window, using the buttons, you can format the disk or disks, delete partitions, create new disks and select the desired size for them. Any changes you make will only take effect after you click the “Apply” button.
External hard drive
Dividing a hard drive with special programs
In addition to built-in tools, such as the Disk Management utility, special programs are also used to divide the hard drive into partitions, they are also called volume managers. At the moment there are a huge number of them. The functionality of these programs allows you to perform many functions, not only dividing a hard disk into partitions. Among the most popular programs that have received a large number of positive reviews, it is worth noting the following:
- Acronis Disc Director;
- Paragon Partition Manager;
- AOMEI Partition Assistant;
- Norton Partition Magic;
- EASEUS Partition Master
- Ranish etc.
Most of these programs can be downloaded for free on the Internet, in addition, many of them are available in Russian.
Acronis Disc Director hard drive management software
Paragon Partition Manager hard drive management program
Conclusion
The above describes in detail how to quickly and easily divide a hard drive into partitions using the built-in tools of Windows operating systems in versions 7, 8 and 10. The option of how to partition a hard drive initially when installing the operating system on a computer or laptop is also considered. Here is a list of the best programs for managing hard disk partitions according to user opinions.
The described benefits obtained from dividing a hard drive into partitions are simply undeniable. After all, this way you not only rationally use disk space, but also increase the performance of the operating system.
After purchasing a computer or installing a new hard drive, as a rule, you will only have 1 partition on it. We’ll talk about this today: how to divide a hard drive into 2 or more partitions. This example will be given on Windows 7 OS through the operating system, without installing additional software.
How many sections should there be:
For Windows 7 to work correctly, 1 partition “drive C” is enough. The system is installed on it and it doesn’t need anything else because... it has all the necessary folders. But, from the point of view of convenience and personal safety, it is recommended to have at least 2 partitions: drive “C” and drive “D”. Why 2? It's simple! It is advisable to leave drive C only for windows and programs, and use drive D for games, music, movies, photos, etc. Thus, in the event of a failure and reinstallation of Windows, all important information will not be affected.
How to split drive C into multiple drives
In order to partition the disk, open: Start Menu, Control Panel. Next we will have to work with the “System and Security” tab.

That's it, we've come to the right place and you should see a window like this:

To see which partitions are already installed, open Disk Management. The operating system is usually located on the C drive, so you need to be careful when working with it.
To split drive “C” into partitions, right-click on it and select “Shrink Volume”.

In the new window that opens, enter the desired size of the new partition:

Now click “create”. In the window that opens, enter what volume you want.
In the new window, on the unallocated area, right-click and select “create simple volume” as below:

Ready. You can start working, but it is advisable to restart your computer.
Program for partitioning HDD into partitions
Personally, I prefer to do without third-party programs; if it is possible to do it using Windows, I do so. I have already written above how to partition a HDD without a program, now let’s look at an alternative method using third-party software.
For example, I took the simplest, free and very convenient program “disk manager free”

I uploaded it to Yandex disk, you can download for free— https://yadi.sk/d/c0A22sBs3ReiFh
Installation and use are as simple as doors. To partition a disk, you need to do everything the same as in the example above without programs. As you can see, it is of no use, in my opinion, and it is better to do everything as in the example above, without downloading anything.
Typically, on most computers and laptops, the hard drive is divided into several partitions called “Local Disks”. Multiple local drives allow the owner to properly separate system files from games, programs, and so on. Thus, when restoring the system, only one local disk will be used, without the intervention of others, which greatly simplifies the work.
But, unfortunately, some owners have a hard drive with only one partition, which contains absolutely all the files. This should not be allowed, and therefore you will have to divide the hard drive into partitions yourself. In this article we will tell you how to partition your hard drive in Windows 7 without losing data.
Using these instructions, you can, without using third-party programs, divide a local disk, for example, into two equal parts and still save all the data. To do this we do the following:
We go into computer management by right-clicking on the “Computer” icon on the desktop or in the “Start” menu and selecting “Manage” from the menu that opens.

Disk management in windows 7
The window below will display all drives connected to the computer. You need to right-click on the local disk that you want to partition and click on “Compress Volume...”.

Selecting the disk from which a new one will be “chipped off”
After turning on the “launcher” to compress the volume, a notification will appear that the system is searching for free space. You won’t have to wait long, and within a minute a window will appear indicating the free space on the selected local disk and the maximum size for compression. In other words, you specify the size of the new local disk, which will be “bitten off” from the selected one.
Selecting a size for a new local disk
Specify the size of the future disk in megabytes and after entering, click on the “Compress” button.
After the compression has completed, you will see that a new unallocated space has appeared. This is the space that we "cut off" in the previous step. Now in its place we will create a new section.

Unallocated area for new partition
To do this, click on the unmarked area and select “Create a simple volume...”.

Creating a new partition on an unallocated area
The “Volume Creation Wizard” is activated, where you need to specify the maximum size, drive letter (for example, D), and check the boxes next to the lines NTFS, “Format this volume...”. Don't forget to put "Default" next to Cluster Size. (In fact, we click “Next” everywhere).
Once the simple volume creation is complete, you will have a new local disk.

The result of splitting one partition into 2 in windows 7 without data loss
Now you know how to partition a hard drive in Windows 7 without losing data using standard Windows 7 tools without using third-party programs.
Question from a user
Hello. Tell me, I bought a new laptop and it has one hard drive “C:/”. Is it possible to divide it into two disks (I used to have this on my computer), one for the system, the other for files.
It is highly desirable without data loss and system reinstallation. Laptop - Asus (I can't tell you exactly the model), OS - Windows 10.
Good day to all!
A fairly typical situation that usually occurs when buying a new laptop or computer. Of course, there is no crime in this, but using a computer with several local hard drives (partitions) is more convenient!

Local drive "C:/"
Imagine the situation: the system has crashed and needs to be reinstalled. If you have one local drive “C:/”, then you will have to first save/transfer all the files, and then install the system. And if you have only Windows and programs on the “C:/” drive, and all documents on another local drive “D:/” (for example), then you will “instantly” reinstall the system and get your PC working properly (and the documents on the "D:/" drive will remain intact, because when installing Windows, only one partition of the disk on which you install the system will be formatted - that is, the "C:/" drive) .
In this article, I will look at a way to partition (or partition) a hard drive in Windows without losing data (perhaps this is the key condition!), and without installing additional software.
How to partition a disk // through disk management
Disk management- the most necessary tool for working with disks, which is available in all popular versions of Windows 7/8/8.1/10
Every modern version of Windows has a special built-in tool for working with disk drives: hard drives, flash drives, solid-state drives, etc. This tool is called "Disk Management" (which is logical).
Most often it is used in cases : when a disk or flash drive is not visible, when you need to format the media, when you need to resize hard drive partitions (our case), when you need to change the drive letter, etc.
So, below we’ll look at how to make two from one local drive “C:” of 110 GB: “C:” and “G:” (all data will remain on drive “C:” safe and sound. In fact, we’ll just take part of the free space on the "C:" drive for the new "G:" partition. See the screenshot below, and everything will be clear).

Was (left, 1 disk), now (right, 2 disks) // data is in place
How to open Disk Management:

Now, in fact, you can start partitioning the disk...
1) The first thing you need to do is decide which partition of the disk you want to take away free space for the new partition. In my example, I will take away free space from the “C:” drive (you can do this from any other drive).
Note! Please note that on the system disk, in addition to the "C:" drive, there are several partitions necessary for system recovery (in my case, 300 and 100 MB). I'll give you one simple piece of advice: to avoid problems, just ignore them and don't delete/edit them!
After selecting a section, right-click on it and select the function in the pop-up context menu (as in the screenshot below).


Request space for compression
3) Now you need to specify size of compressible space (i.e. the number of free MB on the local disk that will be given to another disk).
In the example below (see screenshot), the size of the compressed space is 30000 MB (number 1. Those. essentially specify the size of the new partition being created ), and the total size after compression is 83494 (number 2. This is how much disk space you will have left, from which you take free space ).

Size of compressible space
4) When the compression operation is completed, a “black” rectangle should appear on your disk with unallocated space (i.e., a new disk partition that needs to be formatted).
To do this, simply right-click on this section (see screenshot below), and select from the menu.


6) In the next step, specify the drive letter (any free one).

7) Last point: you need to specify the file system and set the volume label. I recommend choosing NTFS , volume label you can ask any (this is the drive name you will see when you log into my computer/this computer ) , and check the box next to the item "Quick Format" (as in the picture below).

8) Confirm the entered settings and parameters.

Actually, after waiting a few seconds, you will see that the partition will be formatted and you can start using it (like any other disk). Now it will be visible in "my computer/this computer".
How to get everything back: merging two sections into one
Let’s assume that your task is the opposite: to combine two sections into one (see the visual example in the screenshot below). For my example, I will use all the same disk partitions that I used in the first part of the article.
It was (on the left, 2 disks), now (on the right, 1 disk) - the disk is combined
1) The first thing you need to do is copy and transfer ALL DATA from the disk partition that you want to attach. For example, if you want to add a “G:” partition to the “C:” drive, then copy all the data from the “G:” partition to other media (at least to the same “C:” drive).
2) After that, on the volume “G:” (in disk management), right-click and select the function "Delete Volume" . Important! All data on this disk partition will be deleted!

3) By the way, Disk Management is a fairly advanced program, so it will also warn you that the data will be deleted (screen below).

4) After the volume deletion operation, you should see unallocated space (with a black rectangle, as in the screenshot below) . Now this unallocated space can be attached to another disk partition, for example, to the "C:" drive.
To do this, simply right-click on the “C:” drive partition and select from the context menu (as in the screenshot below).

5) Now all that remains is to select the volume that we recently deleted and add it to the “C:” drive. In general, everything is quite simple (screenshot below)...

Mission accomplished!
Note. If you do not have a hard drive, but an SSD (solid state), then all the steps presented above will be performed in a similar way.
Addition. For formatting, partitioning a disk, changing partitions, etc. there are a number of special programs: Acronis Disk Director, Partition Master Free, AOMEI Partition Assistant, etc. They make many operations easier and faster. Therefore, if the functionality presented in disk management , it won’t be enough for you, I recommend using one of these programs. I do not consider them in this article, because... I think that for the task at hand, the “disk management” capabilities are more than enough...


