The Yota company offers many variations of connection via modem. It is possible to work with Windows OS or another system. The Internet is also accessible from a smartphone or tablet. To connect the device without negative consequences, it is important to know the instructions on how to connect a Yota modem.
An antenna or modem from the provider is connected to the computer. The system will begin to automatically configure drivers. The boot disk is inserted into the drive.
Next, you will need to install the Yota Access program. After launch, the program will install itself and connect to the WiMax network. You can find out how to activate services on the website or by calling the support service - 8 800 550 00 07 . Usually, everything happens automatically; you just need to select and configure your tariff plan in the application.
When the Internet connection is paid for, it is better to restart the computer.
Modem settings
To know how to connect a Yota modem, you need to have an idea of the modem's features. The device is inserted into a USB port. After connecting to the PC, drivers will begin to be installed and activation occurs automatically. Setting up any Yota modem does not involve connecting any programs or applications.
When the drivers are installed, you need to see if there is a network. Next, they register, select a tariff plan and top up their account to use the Internet. Setting up the router is quite easy, but you can contact a specialist to find out how to set a password or how to activate the connection.
Login to settings
Setting up any Iota modem requires logging into the interface. To do this, enter http://status.yota.ru And http status yota advanced 10.0.0.1.
If it doesn’t work, you can go to the router’s account and enter the address in the browser: 10.0.0.1 , Further 10.0 0.1 status yota. The web interface should then appear 10.0 0.1 Personal Area.

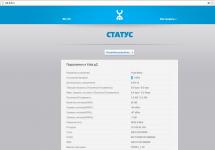
This area contains detailed information about the current network connection:
- IP address;
- identifier;
- signal quality;
- volume and speed of traffic.
Thus, you can answer the common question of how to set up a modem, because all the data that can be changed is collected there.
Setting and changing passwords for modem and Wi-Fi
When connecting a device, you can enter its settings by typing in the browser 192.168.0.1 , or 192.168.1.1 . There is a sticker on your modem or router that shows you how to set a password.
You can reset your WiFi router password by clicking “ Reset"and hold it for about 15 seconds. All network settings and parameters will be restored to their initial state.

The Yota router is similar to all other models of these devices. In the address bar you should write 192.168.0.1 , and press enter.
The initial menu will appear, where you need to enter data to enter the modem settings. Pre-set password and login - " admin" If it often turns out that the user has forgotten the password, it is better to leave it the same.
How to open ports
When you have one PC and a connected modem, the problem of how to open all the ports on the Yota modem does not arise.
In other cases, you need to configure the following sequence:
- Torrent client;
- Internet connection parameters;
- Firewall;
- Router.
Other settings
If you have questions about how to set up the Internet on iOS, then you will first need to go to Settings, then Cellular Communications, Data Options and, finally, “Cellular Data Network”.
At the bottom you need to find “Modem mode” and enter APN – internet with the password gdata. Then you should reboot or wait until it turns on.
How to connect a Yota modem to a router
You need to understand in detail how to connect the Yota modem to the router. A mobile device is inserted into the router, the wire (it was included with the router) is connected to the socket on the computer.

Below we will tell you how to configure the router. To do this, you need to go to the network settings and find the network management section, there select change adapter settings and go to properties. Having selected Internet Protocol 4, you need to check the boxes to receive an IP and DNS server automatically. The setting is saved.
Go to the modem control panel, specify:
- APN: yota.ru;
- Access: *99# ;
- Do not fill in the password and username;
- Some models adjust automatically;
- Apply settings, reboot device.
The Yota modem is connected to the tablet in the same way.
Next you need to open the section with wireless networks. Set the network name SSID and security method - WPA2-Personal, then Encryption type: AES or TKIP, as well as a password for the connection (at least 8 characters). The question of how to set a password was discussed above.
What to do if the modem does not work
If you have lost your password, you can recover it on the company website.
The profile may not work, in this case you need to:
- disable firewall and antivirus software for a while;
- disable third-party networks;
- try to log in using a different browser.
If the signal value is less than 110, then you need to:
- check whether the device is within the network coverage area;
- change the location of the device in the apartment;
- if there are breaks in the connection, you should identify the availability of the status in the web interface;
- checking the device on another PC.
Conclusion
The Eta company offers its customers various Internet packages, both for computers and other devices. The operator supplies various traffic options to suit any customer needs. Before going into any device settings, it is better to visit the official website of the Yota company and read the detailed instructions.
Yota is not only a mobile service provider, first of all, it is a Russian Internet provider that provides its users with unlimited access to the network at high speed.
The company's special product is a modem. The Yota modem was developed with special care, taking into account all user wishes.
The company tried to combine minimalism and convenience in its product. Thus, the Yota modem does not require an additional call to a master installer, since it does not need to be configured by a professional.
By purchasing this product, the subscriber is able to configure the Yota wireless product himself, using not only devices with USB outputs. The modem in normal mode transmits a Wi-Fi signal at a high data transfer speed and simultaneously supports up to 8 connected “here and now” devices. The network on the modem does not fluctuate depending on the speed of movement, so this product can also be used in the car while traveling.
The modem operates at the 4G network frequency and has a high-speed feed of 10 Mbit/s.
How to setup
Setting up a modem from the Yota Internet provider in most cases does not require much time or complex mechanical processes. In theory, all that is required from the user is to log into the so-called Personal Account of the router in the browser and perform a series of simple actions that are prescribed in the algorithm.
Review of Iota modems
The Russian company Yota offers its customers several options for modem models. The devices have been designed taking into account the specifics of their use.
Yota modem for laptop and desktop computer. A lightweight model of devices in the Yota line of modems. Such a device does not imply any special functions and is used to connect a particular device to the Internet network via a USB connection. No special setup required.
The case is made in a very laconic style: no unnecessary details, and most importantly, small size. You can always take it with you and not feel any discomfort from its size or heaviness.
Important! This device model does not require additional configuration. Network settings are set automatically as soon as it connects to the laptop/computer and establishes a network signal. Usually this does not take more than 15-20 seconds from the moment the device is connected.
Modem with wi-fi distribution function. It is a collaboration between a Wi-Fi network and a USB connection. When a modem is connected to a laptop or desktop computer, it has the ability to distribute the Internet network to other devices. It is convenient for those who are used to always staying in touch and active on social networks. No special setup required.
The model has a special connector that allows the device to operate from any power supply (portable battery, outlet, etc.). This is done because it does not have its own battery, which allows you to keep the charge on the device.
Important! Network setup is not required in this device and connection occurs automatically within 15 seconds. Setting up the modem may be required when changing or setting a special password, which is designed to protect the Wi-Fi network from third-party connections.

The Yota Many modem is a universal modem that combines the functions of the two above models. In addition to the fact that this model can operate and provide Internet via a USB connection, as well as distribute Wi-Fi to other devices (simultaneously), it has an internal battery that allows the device to operate autonomously. The model works up to 16 hours without a break. The device is also made in a laconic style, but has more noticeable dimensions. Thus, a feature of the model is the presence of a small screen on the device, which displays the number of currently active devices. No special setup required.
Important! Each modem has permission that allows it to sync with all available operating systems.
How to connect
In most cases, setting up a Yota modem is not required and simply involves connecting the device via a USB port to a technical device. When connected, automatic downloading and installation of drivers on the user’s computer/laptop begins. After installing the necessary elements, the user can open the browser and start working.
Important! After the installation is complete, you need to check on your computer for a new active network available. You can check this in the network settings of any technical device that requires access to the Internet.
Step-by-step instruction
When connecting the Yota modem to the device for the first time, you need to go through standard activation, which does not take much time:
- Connecting the device to a computer or laptop implies automatic installation of drivers.
- After activating one of the browsers on the computer, the user is asked to click on the activation button. Next will be the activation of the subscriber profile.
- Activation involves entering the subscriber’s phone number, which will receive a special SMS notification within a few seconds. After entering, the user can safely work on the Internet.

When setting up a modem, it happens that activation does not take place, in which case you should make sure that the technical device to which the modem is connected is working properly, namely:
- Make sure your computer recognizes USB media.
- Make sure that the blue network indicator on the modem itself is lit. There are situations in which the modem does not pick up the network signal, then you should connect a special wire to the modem and reconnect to the computer through it. (The wire is used to position the router in a place where the signal travels more strongly).
- Make sure the software on your computer is up to date. Some firmware does not see the Yota modem due to the lack of modern firmware, and old settings cannot recognize the connection format.
Access to the web interface 10 0 0 1 on status yota ru
There are situations in which the user needs to independently enter the router settings. For such cases, the company has developed a special address that must be entered into the browser. Status yota ru allows you to perform the “router setup” function yourself. And it represents the user’s “personal account”. In terms of interface, this command resembles the personal account section, which is used for users of Yota mobile communications and manual configuration.
In order to get to this section, the user needs to enter status yota ru in the address bar, and then press the “enter” button.
The user can enter a similar entry into the “personal account” by typing the command 10 00 1. This combination of numbers is the IP address and is used to configure the network.

If everything goes as expected and all equipment works properly, then after entering the required combination, a web resource opens in this tab, thanks to which the user can manage the interface and settings of the Yota router.
In the menu that opens, the user can find all the necessary information about network settings and the number of connected users, the quality of the network signal, the amount and frequency of transmitted Internet traffic.
Also, thanks to this section, the user gets the opportunity to manually configure the router/modem software, change modem parameters, change device settings that are not publicly available, and it is also possible to expand the modem settings, including data transfer servers.
Important! If you have connection problems and have any remaining questions on the topic “how to set up a yota modem,” you should contact a specialist or consult your operator about possible faults on the lines.
How to log in
When entering the service 10 0 0 10 personal account status yota ru, you must undergo authorization and further registration.
The initial step will be to enter the “Personal Account” section (if there is no account, the user will be asked to complete initial registration).
For registered users resource 10 0 0 1 section “personal account” status yota ru it is required to enter the personal email used for registration, as well as a password.
Important! When registering for the first time on the site, the user needs to know the personal account number (located on the SIM card box).
.jpg)
Why doesn't it come in?
If the user entered the data correctly, but it was not possible to log in to the 1 0 0 0 1 resource yota status, then in this case there may be several reasons:
- Incorrect code written in the DNS server address. This situation most often occurs due to saved settings on the computer, from previously connected devices (if the device itself did not re-register and make the new modem network the main one) or if the computer was previously infected with a virus that switches the start page to another. There is a solution to this problem. The user needs to open the network settings window and select the “properties” button.
Important! If the modem is connected via a wi-fi network, you need to select the item that lists wireless networks; if the modem is used via a USB channel, the user needs to select the local network settings item.
- The DHCP service code is entered incorrectly. In this case, the user needs to repeat the algorithm from the point above and enter the correct address in the required settings line.
Important! When contacting the Yota network customer support service, the operator (through the technical support service) will inform you how to restore the required addresses in the code fields of custom objects. Also, the specialist, after clarifying which platform the user’s computer is running on, will tell you an algorithm for solving the difficulties that have arisen.
- Technical failure of the modem. In order to make sure that the reason for the Internet network not working is the modem, you need to turn off the wi-fi network and connect the modem via a USB cable (it is advisable to try several connectors). It is important that the modem is connected to the device directly. In this case, the use of additional wires should be avoided.
It still doesn’t work, what should I do?
If none of the above actions lead to a positive result, the user can try connecting to his yota personal account using another browser. There are situations when the browser itself does not give permission to use any resources or network settings.
Another way would be to contact the company's customer service. The call center operator will connect the user with technical support. A specialist will check online to see if there is any accident at the site that is interfering with the operation and network settings. After this, he will offer the client to solve the problem in a telephone conversation: he will describe what needs to be done and where to click.
You can also try restarting your computer; perhaps this is a glitch in the operating system that needs to be restarted.
If a situation arises where none of the methods helps solve the problem, the modem should be taken to the official Yota salon, where they will take it for diagnostics and, if under warranty, exchange it for a new one or set new technical settings.
Increase Yota speed: how it should be and how to configure it
Many subscribers of the mobile, wireless Internet provider Yota are tormented by the main question - How to increase Yota speed? Newly connected citizens are especially concerned about this point.
Main reasons
The Internet speed has decreased or initially, when the SIM card is activated, the loading of content is very slow, sometimes it is interrupted altogether.
A device with an activated and connected Yota SIM card does not react in any way to connecting to the mobile Internet.
First, check the signal strength. It should be no less than SINR 2 RSRP -110. You can find out what kind of cellular signal you have by entering the device category - Device Information (or something similar).
If the network signal strength is low or absent, check on the page. If necessary, use the moving method to increase the radio coverage of the Yota network.
If the signal is excellent but there is still no speed. Try rebooting your device and disabling all downloads and updates. After that, go to the page and read the article about. She will tell you how to properly test all the Upload-Download capabilities of a device in 2018.
If all else fails
The Yota provider is one of the largest providers of wireless high-speed Internet services. To use the services of the Yota mobile operator, you must purchase a proprietary modem (router).
Many Yota subscribers, after purchasing a router, encounter problems setting it up. Let's find out how to go into the Yota router settings to set parameters and change the password.
How to set up a Yota router
All Yota mobile Wi-Fi routers, both old and new, can be configured using the IP address http://10.0.0.1 or http://status.yota.ru. To get to your Yota Personal Account, you need to enter this web interface address in any Internet browser and follow it. The admin settings panel will open, where you can change or set the default values, restoring the factory settings. The Yota device must be connected by a network cable to the computer, if such an interface is provided.
In principle, the new Yota Wi-Fi router does not need configuration and works out of the box. Having purchased a device in a store, you can immediately use the Internet and distribute it to any device. But fine tuning to suit your needs is also possible.
How to enter Yota settings on status.yota.ru and 10.0.0.1
- Turn on the device by connecting it to a 220V power supply
- Connect to your router or Internet center via Wi-Fi. To do this, you can use a smartphone, tablet or laptop. Find the wireless network “YOTA-xxxx” created by the device; the network name and password for access are indicated on the bottom panel.
- Launch your internet browser and go to the configuration page - http://10.0.0.1. The default administrator password is admin.
- When connecting for the first time, on the configuration page, enter a new name for the Wi-Fi network, select the encryption type and create a password on the “Device Setup” page.
- After saving the settings, you will need to reconnect to the Wi-Fi network. In the future, you can change these settings yourself using the web interface at http://status.yota.ru.
- Open your browser and enter www.yota.ru in the address bar and follow the instructions on the operator’s page, which will open automatically.
Managing Yota modem settings
To go to settings:
- Insert the Yota modem into the computer's USB port
- Wait for the LED indicator to turn on
- Launch an Internet browser, go to the website http://start.yota.ru
Changing settings and checking the connection status are available at the IP address 10.0.0.1 and the web interface address status.yota.ru.
The status.yota.ru/advanced page allows you to change the DHCP range of the device and return to factory settings. Change the values on this page only on the advice of a Yota Contact Center specialist.
Resetting the settings can be done using the reset button next to the SIM card slot. Briefly (within a few seconds) press the button with a thin object (a paper clip or a toothpick) to return to the default settings.
By logging into the Yota device administration panel, you can:
- Reset settings to factory settings
- Check and update software version
- Change Wi-Fi password
- Change password and access parameters in the admin panel
- Change the parameters for distributing IP addresses to connected devices
An example of setting up a Yota router via the web interface
We remind you once again that for a successful connection, the Yota device must be connected to the network connector of the computer with a cable. If the router does not have a network connector, then it is configured via Wi-Fi. Below are examples for the Yota Internet center.
Resetting the Yota modem to factory settings:

In order to access the router settings, its IP address is usually displayed in the address bar of the browser. Most manufacturers use addresses 192.168.1.1 or 192.168.0.1. It should be noted that the second is used somewhat less frequently, but in general these are the two most common options at the moment.
The developers of the equipment and software of the Yota company chose to use a completely different combination: 10.0.0.1, what they were guided by, besides the fact that it is much more beautiful, is unknown. However, it is used on all modems produced by this company or its subsidiary Yota Devices and used to gain access to the Internet via 4G LTE technology.
Tasks that can be solved in the settings menu.
If there is a need to change the password that protects Wi-Fi from unauthorized connections, the network name, security settings, obtain signal strength data and similar information, you need to access the router settings. To do this, you need to enter in the address bar of your browser 10.0.0.1 /status.yota.ru. Both combinations will provide access to the page from which you can manage the router settings. If you enter http://status.yota.ru/advanced in the address bar, you can access additional settings and make all the desired changes.
Possible problems and methods for overcoming them.
However, unfortunately, sometimes significant difficulties arise in gaining access to the router settings. They can be caused by a variety of reasons and, accordingly, require different solutions.
First of all, you should eliminate the simplest problems - disconnect the router from your computer or laptop, then turn it on again. You can use for this not the port where the device was connected earlier, but the neighboring one. If, for ease of connection, an extension cable was used for testing purposes, it can be temporarily omitted. If without it the transition occurs without problems, we can assume that it is faulty and needs to be replaced.
Next, you should check the network settings of the adapter. To do this, you will need to press the Win+R key combination, wait for the window to open, and enter ncpa.cpl into it. This gives you access to view your current network connections. If there is more than one, you should select the one through which the computer is connected to the Yota router and right-click on it. A context menu will appear in which you need to select the “Properties” tab. Next you need to select: “IP version 4 (TCP/IPv4)”, where you can manually enter the following values: IP address - 10.0.0.2 Mask - 255.255.255.0 Default gateway - 10.0.0.1 DNS servers 10.0.0.1 and 8.8.8.8. If these manipulations do not lead to the desired result, you will have to set the IP address to be automatically obtained. After this, you will need to check which address was received automatically. To do this, right-click on the connection icon and select the “Details” menu item. The “Default Gateway” line should contain the value 10.0.0.1. If everything is so, but the connection does not occur, you need to ping the router.
Setting up the router
In order to ping the router, you need to press the already familiar key combination: Win+R, and then enter the command: ping 10.0.0.1 –t. The reason to be wary will be a message about exceeding the timeout interval for the request. With a high degree of probability, it means problems with the firmware or a hardware malfunction of the router. To get the full picture, it is better to try connecting it to another computer that you are confident is in full working order.
If the router responds as expected, but you cannot access the settings, there may be some problems with the browser. You can try to close the current browser, open another one and try to perform the necessary manipulations in it.
In addition, an antivirus or firewall installed on your computer can prevent you from achieving the desired result. You can try to turn them off, only then remember to turn them back on, returning the security system to its original position.
If none of the above helps, it’s time to resort to a radical remedy that has been tested by many generations of users. It is popularly known as “Seven Troubles – One Reset.” You will first have to try to find the desired button. Manufacturers place it in such a way that you won’t find it right away. It can be located on top of the power slider, under the cover, under the SIM card. Perhaps in order to press it you will need auxiliary means: a needle, a toothpick or something like that. The button must be held down for at least 15 seconds.
If such extreme measures do not help, you will have to go to a service center, or even get a new router.