Google, together with Android, has created a whole group of various services that significantly expand the functionality of the device. The Android synchronization function is extremely popular, thanks to which you can quickly and conveniently move data between several phones, including contacts. You can activate synchronization on Android in your account settings in just a few steps.
Advantages of synchronization: how best to enable synchronization on Android
Most people change phones frequently. Buying a new gadget is a pleasant event, but it brings with it one common problem. There is a need to transfer all your contacts from Android to a new gadget. This can be done manually by simply rewriting the list of required numbers and then entering them one by one. If you have dozens or even hundreds of numbers in your notebook, this method will not work.
An equally big problem is restoring numbers if you have lost your phone. Restoring your entire contact list will take a very long time, and some important numbers may be lost forever. Synchronizing the contacts of Android devices with Google will help solve all these problems. As soon as you activate it, all data (phone numbers, calendar, and even, if necessary, photos) are synchronized with Google, and you can always restore this information on a new device. You don't even need a computer for this operation.
All you need is a Google account on Android that is directly linked to gmail. You must log in to this account on the phone from which you want to read information. Next, you should log into the same account, but from a different smartphone, and then activate synchronization. After this procedure, you can delete your account from your old device for additional security. However, not all users of Android devices know how to enable Google account synchronization on Android.
Activate synchronization: synchronize android OS contacts with google
The inclusion procedure is not particularly difficult. You will only need to activate contact synchronization once. Once the phone is synced, you can remove it. To activate, follow the instructions provided:
After this, contacts from Android will be recorded on the cloud, and you will only need to download them to another phone. Now you know how to enable synchronization on mobile phones and tablets on Android. If you are wondering how to disable synchronization, then you just need to uncheck the items that do not need to be synchronized. These are all the steps required to disable it.
Activate the display of contacts
The next logical question is how to sync Android contacts with Google on a new device. To do this, you must first perform a similar procedure. If this doesn't work, you may need to reset the display. To do this, follow a few simple steps:

All the necessary numbers will appear in the address book, and you will be able to use the synchronized data. If you have multiple Google accounts, make sure you use the same one for both phones. You can register with Google either from your phone or through a personal computer.
Thanks to this, they can be accessed from different devices (smartphone or computer). This is convenient if you use several phones or are simply worried about the safety of important files. Next, we will tell you how to enable and configure account synchronization Google on Android.
How to enable Google account synchronization on Android
By using Google account, you can synchronize contacts, messages, photos, passwords and other user data. For example, to have access to them from another smartphone or computer. How to enable backup:
Step 1. If there is an item in the phone settings "Synchronization", then select it. In the page that opens, move the slider "Auto-sync data" in a state "Enabled".
Step 2. Confirm the action. If necessary, synchronize objects immediately, limit data synchronization (for example, only by WiFi). Here you can set up individual accounts.

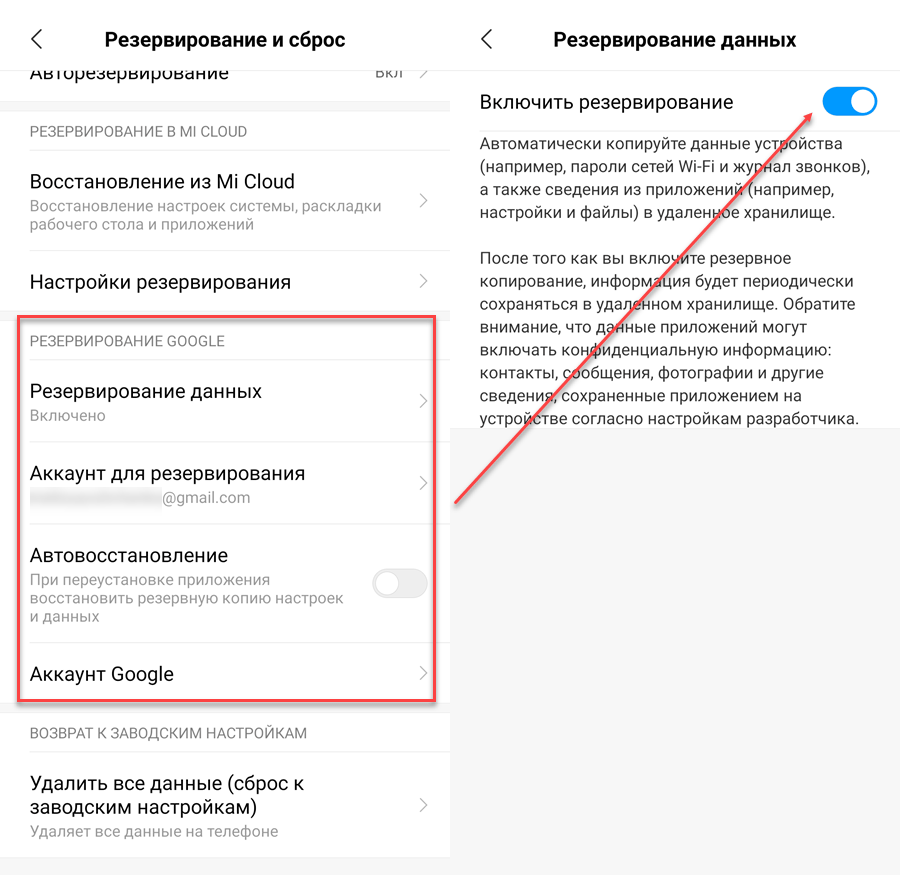
Step 3. In settings, find and select "Google". Click on the line here "Backup".

Step 4. Move the slider "Upload to Google Drive" in a state "Enabled". After this, the information on the screen will be updated, a button will appear "Start copying" with which you can immediately create a backup copy of your data.

Step 5. Go to the menu through settings "Advanced settings". Here, find and select "Backup and Reset".

Step 6. In settings "Local reservation" you can manually backup system settings or delete existing ones.

Step 7. In chapter "Google Backup" you can select an account, auto-recovery, and configure other settings. Depending on the device model, there may be other sections here.
After that, you can synchronize Android with Android. To do this, it is enough to use one Google account on two devices. This is convenient if you want to transfer all user data from one smartphone to another.
How to disable contact synchronization on Android
By default, when creating a backup, Android copies all settings and user data to the cloud. If you do not want to sync contacts between devices, you can disable this. Instructions:
Step 1. From the setup menu select "Advanced settings". Find the item here "Backup and Reset".

Step 3. If you do not want to sync Android contacts, then select "System settings". Here, uncheck the line "Contacts" and click on the button "OK" to confirm the action.

Step 4. If you want to disable synchronization of other applications, then click on "Select applications" and mark those objects whose data you do not plan to save.

The names of some menus and buttons may differ depending on your device model. The same applies to the location of some sections. Therefore, if you cannot disable contact synchronization, then you can transfer them to SIM-card and delete from Google account.
Any user’s smartphone or tablet will definitely contain data that they would really not like to lose. The easiest way to save them is to copy them to your computer. To do this, you just need to connect your Android device to your laptop using a USB cable. This way you can transfer photos and videos to your hard drive. But how to save contacts? And what if you don’t have a USB cable at hand? You will find the answer to these and other questions in our article.
Synchronizing data using a Google account manually
One of the most convenient and reliable ways to save important information from a gadget and have free access to it is to synchronize your mobile device and Google account. If the user does not yet have an account in this service, he must create one. Registering an account and mailbox is simple and free, there will be no problems with it. It can be done either from a smartphone or tablet running Android, or from a computer, it doesn’t matter. After receiving an account, you must complete the following steps:

- Enter the “Settings” section of the main menu.
- Scroll the screen to the “Accounts” sub-item. It may also be called Accounts and Sync.
- Click on the + icon (“Add new account”).
- A window will appear with two commands “Existing” or “New”. Select the first one.
- Enter your email address and password in the appropriate fields. You will be logged in, which may take some time (usually no more than a minute).
- After this, a window will appear with information about what data can be synchronized. Check the checkboxes next to the ones you want to save.
Automatic data synchronization
Now your contacts, calendar, application data are synchronized with your Google account. If you make changes to them, you will need to repeat the entire procedure. For data to be updated automatically, the user needs to enable auto-sync on their mobile device. It's very simple. Do this:
- Enter the main menu and select the “Settings” section.
- In the “Wireless Networks” menu item, go to the “Data Transfer” tab.
- Use the settings touch key (for smartphones) or click on the dotted menu icon (for tablets) to open tab commands.
- Check the checkbox next to the “Auto-sync data” command.
- Return to the Settings section and go to the list of accounts.
- Click on the account selected for automatic synchronization.
- Now her update icon has changed from gray to yellow-green. Auto-sync activated!
You can synchronize your Android phone with your Google account in two simple ways: manually or automatically. Select the most suitable synchronization method and follow the instructions provided.
Was the article useful to you?
Rate it and support the project!
Automatic synchronization of Android contacts with Google over the Internet ensures that your phone book is preserved even when your phone and SIM card are lost or stolen. This functionality is provided in all Android devices and is recommended for use by all users. Let's figure out how synchronization works and what you need to enable it.
Why is it necessary to synchronize contacts with Google and what does it give? It's simple - it is needed to save a list of contacts on the server when you lose your mobile phone or when it is replaced. People change handsets quite often, and every time they buy a new device they are faced with the problem of saving contacts. The problem is partially solved by transferring them to a SIM card, but only the phone number and name of the subscriber are saved here. But users also need other data:
- Place of work;
- Additional telephone numbers;
- Email addresses;
- Additional contact information.
Also, in the phone book on Android, additional fields are specified and groups are formed. You will not be able to save this data on the SIM card.
Synchronizing contacts with Google allows you to save data “in the cloud” using the Internet. As soon as we add a new subscriber to our phone book, their details are automatically added to their Google account.
Start synchronization
How to synchronize contacts on Android with Google and what is needed for this? First you need to register an account with Google. This is done in two ways - on the Google website or during the initial setup of the Android device. There is nothing complicated about this, you just need to provide a free login and come up with a normal password. Be sure to save your registered account information in a safe place.
So we now have a Google account. What to do next?
Let's consider two options:
- Your contacts were saved on your SIM card and you created an account on your new smartphone. In this case, you need to go to the “Contacts” application, visit the “Settings” item and copy contacts from the SIM card to your Google account. After this, all contacts will be sent for synchronization;
- Your contacts were saved in the smartphone, the account was created on the computer, and the smartphone itself worked without the Internet and a Google account. In this case, go to “Settings – Accounts” and add a new Google account there, specifying your login and password. After that, go to “Contacts” and copy all the entries from the smartphone’s memory to your account - they will automatically be sent for synchronization.
Some users disable syncing in the drop-down menu of their Android devices. This saves Internet traffic and battery power. If you often add, delete and edit contacts, be sure to turn on synchronization so that the changes are saved not only on your smartphone, but also on Google servers.
After synchronizing contacts from your Android device to Google, go to the Google Contacts service. Contacts can be edited here:
- Subscriber numbers and names change;
- Photos are added and removed;
- Additional data and numbers are added;
- Additional fields can be edited (last name, first name transcription, nicknames and much more).
In order for all these changes to appear on your smartphone, do not forget to enable synchronization.
Additional Google Contacts features:
- Export and import of contacts;
- Creation of subscriber groups;
- Rolling back changes in the phone book;
- Phone book printing;
- Removing duplicate contacts.
It is also possible to work with Gmail email contacts.
What to do when changing your smartphone
What to do if you need to change your telephone:
- Make sure synchronization is enabled on your old device - check the date of the last synchronization of contacts in the “Settings - Accounts - Google” menu. If necessary, start synchronization manually;
- Turn off your old smartphone and reinstall the SIM card in the new device;
- Turn on your new smartphone, connect it to the Internet, enter your Google account login and password - synchronization will start and all contacts will be transferred to the new device.
Thus, we were able to avoid manually transferring contacts, since they were synchronized with the Google account and safely restored to the new device - the structure of the phone book is completely preserved.
Do you use several smartphones at once and always want to have up-to-date contacts at hand? Synchronization with Google will help you out in this case too - take another smartphone, add your Google account to it and after a few minutes your phone book will appear in the new device.
You must remember that adding new contacts when synchronization is disabled will result in them not appearing on another device. If you disable synchronization to save battery power, be sure to activate it when you buy a new smartphone.
Synchronization with Google is also convenient because it allows you to synchronize many other data - calendar entries, photos, videos, application data, data from contacts on Google+ and other data stored on your smartphone. The Google Disc service is used for this. The main disadvantage is the lack of synchronization of SMS messages - this is implemented using additional applications.
Have you just switched to a new Android device and forgot to save your previous device's contacts to the SD card? Want to sync contacts on your Android device with your Google account? Are you tired of importing/exporting Android contacts and want to find the perfect solution to manage contacts on your Android device?
In the article below, you will learn how to sync contacts with Google on Android using one of two methods. The first method is Google's official sync method.
The second method to sync Google contacts, or the manual sync method, can come in handy if your device's Internet connection isn't working or the sync feature isn't working properly.
As mentioned above, there are two ways to sync contacts with Google on Android:
- official Google synchronization;
- manual import.
The first method is perhaps the easiest and most reliable way to sync your Android device with your Google account. Official synchronization from Google allows you to synchronize applications such as:

Thus, using the official method, you synchronize not only your Google contacts, but also a number of other useful applications. The official Android account sync feature, when enabled, automatically backs up all your contacts and allows you to import those contacts to another Android device simply by using your Google account information. This function not only saves time, which cannot be said about manual synchronization.
However, if the sync feature on your device is not working properly, then you can go straight to the manual sync method.
Step 1. Sign in using your Google account information.

Step 2. Go to the Google Contacts website by clicking on the Google Apps icon. Scroll down the menu, click on the “Contacts” icon.

The screenshot above shows the fastest and most convenient way to log into Google Contacts.
Step 3. A list of your contacts can be found in the “All Contacts” section. Make sure all your contacts are saved in your account.

On a note! If you can't find your contacts, you can import any vCard contacts stored on your PC by clicking More and selecting Import. In the picture below you can see what it looks like.

Step 4. Go to Settings on your Android device, then tap on Accounts & Sync. On some devices, you'll only see "Accounts" instead of "Accounts & Sync."

Important! We must not forget that this process will look slightly different on different devices.
Step 5. Click "Add Account". Then, under the list of available accounts, you need to select the Google account type (as shown in the pictures below).

Step 6. If you have several accounts, select the one with your contacts and log in to that account.

If you have not added an account on Android, enter your email address and password and log in.

Step 7. When you sign in to your Google account, syncing will start automatically. To do this, you need to check the sliders in the Contacts and Google+ Contacts options to ensure they are active.

In some versions, you need to check the “Synchronize contacts” options, as in the screenshot below.

On a note! You can also turn on the automatic sync feature to automatically sync all your Google contacts in the future.

The synchronization process may take some time, depending on the speed of your Internet connection and the number of contacts. Once the process is complete, the sync icon next to Sync Contacts will disappear.
Step 8. Open the Contacts or People app on your Android device, tap the Menu button and select Show Contacts. Some devices may have a Contacts Filter option instead of Contacts.


In the screenshot below you can see that by clicking on “Contacts” you will automatically enable synchronization of all your contacts.

All your Google contacts should now be available on your Android device. If you previously selected the automatic sync feature, your device will sync automatically every time a new contact is added to your Google account. This is very convenient, as you will save your time in the future and be sure that not a single contact of yours will be lost.
Method 2: Manual import
For users who are facing problems using the official Android sync method, manually syncing and manually importing Google contacts to your Android device may be an option. This method doesn't take much longer, but you'll have to manually import your contacts every time you add a new contact to your Google account.

This is ideal for users who are unable to access the Internet on their Android devices. Additionally, many users are reporting problems syncing their accounts. You may receive a message about synchronization problems. Manual import aims to sync Google contacts on PC and then transfer them to Android device manually.
Step 1. Go to the Google Contacts website, sign in with your Google account information.
Step 2. Click on the "More" button and select "Export" (as shown in the image below).

Step 3. Select all your contacts if you want all your Google contacts on your Android device. You can also select a contact group by tapping and selecting the group you want. The screenshot below shows how it should look. In the "Select a file format to export" section, select the vCard format and click the "Export" button. The VCF file should now be downloaded to your computer.

Step 4. Connect your Android device to your computer using a micro USB cable and make sure the device is connected in USB Storage mode.

Step 5. The AutoPlay window should now pop up. Click "Open Folder" to browse the files and copy the previously downloaded VCF file to your Android device's root storage.
Step 6. Open the Contacts or People app on your Android device.
Step 7 Press the Menu button and select Import/Export.

Step 8 Select SD card if you copied the VCF file to a micro SD card, or select internal storage if the file is saved in your device's internal storage.

Step 9 Under the "Create Contact" pop-up above your account, select your Google account.

Note! This process will look slightly different on different devices.
The app should now scan your device for VCF files. On some devices, you may have to manually select the VCF file. To do this, you need to go to the directory in which it is saved. Your Google contacts should now be available on your Android device.
Bottom line

Contacts are one of the most important features of Android OS as they store phone numbers and other information about people you know. The Google account sync feature is probably one of the most used features of Android as it allows users to automatically back up their online contacts. This is not only a good way to recover contacts after a factory reset or after a major update, but also an ideal way to get all contacts back when switching to another Android device.
Find out, as well as programs for this and instructions, from our new article.
The first method should work on most Android devices, and once you enable automatic sync, you won't have to worry about syncing your Google contacts anymore. If the first method does not work properly on your device, you can try the second method to manually sync your Google contacts. Whichever method you choose, make sure you follow all the instructions to sync contacts with Google on Android.
Video - How to save contacts when changing phone. Why store contacts in a Google account. Synchronization


