Paradoxically, the sudo command does not prevent running an administrator session inside a regular user session. Because with its help you can run the same su command:
$sudo su
And this is even in Ubuntu, where there is no root account; more precisely, there is no default password. But using sudo makes it unnecessary even for the su command. But it is not prohibited to set a superuser password - after all, to do this it is enough to give the command
$sudo passwd
in order to use su in the usual way in the future. And even, if desired, log in as root when registering in the system.
However, here too the sudo command provides an “ideologically correct” method, and not even just one. These are the -s and -i options, which prolong, although in slightly different ways, the action of the sudo command for an indefinite period, until the “secondary session” is terminated with the exit command.
The -s option, when opening a secondary root session, preserves all the environment variables of the original user. However, if you add the -H option to it, then these variables will be read again from the profile files of the administrator’s home directory, that is, /root, as when starting an interactive shell instance. However, the directory that was current at the time the command was entered will not change, nor will the appearance of the command line prompt change.
The -i option completely reproduces the root environment, launching its command shell as a login shell. Of course, in this case, the current directory changes to /root, and the command line prompt takes on the form described in the corresponding variable in the profile file of the administrator shell (in bash - PS1).
In practice, the difference between both forms of gaining permanent administrator rights is not great, especially in bash. But in zsh, with the appropriate settings of the profile files, if desired, you can achieve a significantly different environment in each of these cases. True, how much the user needs this is a big question. But the fact that when using the -H options, being in permanent administrative mode does not appear outwardly in any way is fraught with errors. And makes using the -i option preferable in most cases.
By the way, the capabilities of sudo are not limited to running commands as an administrator: by specifying the -u username option, they can be executed on behalf of the user whose login is specified as its value. This can be useful when viewing or copying another user's dot files and dot directories, which are often readable and editable only by the owner.
By the way, the sudo command can be run so that it asks for the password of the user under whose name the command will be executed (for example, an administrator), and not the one who requires his authority. There is an option -targetpw for this. And to make the root password requirement permanent, it is enough to define, for example, an alias like
Alias sudo -targetpw
Requiring the root password to be entered when running sudo is the default behavior in some distributions, for example, as they say, in Suse.
The sudo command has many more options - I listed above only those that I had to use. The rest are easy to look up in man sudo. Of those not listed, I will also mention the -b option, which instructs to run the “supervisory” command in the background. It can be useful when performing long-term actions, for example, when copying USB images to a flash drive with the dd command.
As we just saw, the sudo command gives the user almost unlimited powers for any system-wide actions, as well as for manipulating other people's user data. In this regard, let us ask the following questions:
- whether any user can gain administrator rights through the sudo command, and
- can he perform all administrative actions using it?
If we talk about the Ubuntu family, in which this mechanism was first used “out of the box”, then “out of the box” the answer to the first question will be negative, to the second - positive. In general, this depends on the settings of the sudo program, which are described in the /etc/sudoers file. And in it you can set rules that allow only certain users to execute certain commands. In summary it looks like this:
Username host = command
Here, as you might guess, username is the name of the user for whom this rule is set, host is the name of the machine from which he can resort to this rule, command is a specific command, the use of which this user is allowed from this machine. The command must be given with a full absolute path (that is, /sbin/fdisk, not fdisk). The command description field can include multiple values separated by commas, for example:
Username ALL = /sbin/fdisk,/bin/mount
In Ubuntu, the default rules for user access to administrative privileges are described as follows:
# User privilege specification root ALL=(ALL) ALL # Members of the admin group may gain root privileges %admin ALL=(ALL) ALL
That is, the root user, as expected, can execute any commands from any hosts. But only users who are members of the admin group (analogous to the wheel group, which was discussed in) can obtain its rights. A user created during a normal installation automatically becomes a member of this group - and therefore has full administrative rights available to him without any further settings. However, other users whose accounts will be created subsequently are deprived of this privilege. Unless, of course, they were specifically included in the admin group.
In other distributions that do not use sudo out of the box, you will need to edit its configuration file - the same /etc/sudoers mentioned above.
The /etc/sudoers file is a regular text file, and, accordingly, it can be edited in any text editor (or, say, using ed or sed). However, there is a certain risk of screwing something up (due to ordinary typos), even to the point of completely blocking your access to superuser privileges. Of course, these situations can be corrected - for example, by rebooting in single-user mode. However, it is better not to hit them. And therefore, a more reliable means of modifying /etc/sudoers would be to use a utility specifically designed for this purpose - visudo.
The visudo utility does not do anything supernatural - it simply opens /etc/sudoers in a text editor described by the superuser EDITOR variable (if one is not defined, it will again be classic vi - hence the name) and allows you to edit it in the usual way, and then exit editor with saving the results using its standard means. However, before this, the editing result is checked for correctness. And if a violation of the syntax accepted for /etc/sudoers is detected, a corresponding warning is issued. After which you can return to editing, refuse the changes made, or still accept them (of course, at personal responsibility).
The visudo utility does not guarantee 100% editing success. Since it only checks the consistency of the syntax, but not the “correctness of the rules themselves.” That is, if an error is made in specifying the path to the command required for a given rule, this command via sudo will not work.
However, in reality it usually looks much simpler and not at all scary. So, in Fedora 11, in the sample config /etc/sudoers I only had to uncomment the line
%wheel ALL=(ALL) ALL
to give the user from the specified group (and I included myself there in advance, as described in) all the rights granted to the administrator. At the same time, you could give yourself the opportunity to use sudo without a password. This would require uncommenting the line
# %wheel ALL=(ALL) NOPASSWD: ALL
But I limited myself to making the password last longer by adding (the initially missing line
Defaults timestamp_timeout=10
where the timeout value is specified in minutes. By the way, if you change it to zero -
Defaults timestamp_timeout=0
then the password will be requested every time you use the sudo command.
You can, on the contrary, disable the timeout for the sudo action by entering a negative value for it:
Defaults timestamp_timeout=-1
In this case, the password will be requested only the first time you call this command.
A closer look at the /etc/sudoers file will easily reveal opportunities to give certain users or groups only a limited set of rights. However, this is where the subtleties of real administration begin. I simply deprived my double-experimenter of access to any administrative actions in order to stop all his attempts in this field. However, even this does not always allow me to cope with him - just as Timur Shaov is unable to cope with his lyrical hero.
The sudo command is very important for managing access rights in the Linux operating system. Thanks to this small command, you can grant permissions to perform certain actions on behalf of the administrator to other users, without giving them the superuser password itself. Also, you do not need to always be under a superuser account to occasionally perform administrative actions.
It would seem that such a small team, with a minimum of capabilities and the simplest possible use, but in fact it can do much more. In this article we will look at how sudo is configured in Linux to control access to system functions and user capabilities.
Before we move on to setting up access to the sudo utility, let's look at how it works. There are two ways to gain administrator rights in Linux. You can switch to the root user using the su command, or you can pass the desired command as a parameter to the sudo utility, which will execute it with administrator rights. Moreover, the second method is preferable, because you will not forget what you are using and will not do anything unnecessary.
The team name means substitute user do or super user do. The utility allows you to run programs as another user, but most often as the root user. The utility was developed back in 1980 by Bob Cogshell and Cliff Spencer. During this time, many developers have changed and many features have been added.
sudo works thanks to the SUID access flag. If this flag is set for a program, then it is executed not on behalf of the user who launched it, but on behalf of the owner, given that the file is owned by sudo, then the utility is executed as root. It then reads its settings, asks for the user's password, and decides whether the user can be allowed to run commands as an administrator. If yes, then the command passed in the parameter is executed.
Now that you know the theory, let's look at how to set up sudo on Linux.
Setting up sudo on Linux
All sudo settings are located in the /etc/sudores file. Here you can configure a lot of parameters, starting from who will be allowed to execute commands on behalf of the superuser and ending with limiting the set of available commands.
To open a file for editing, type the following command as superuser:
You can also specify the text editor in which you want to edit the configuration file:
EDITOR=nano visudo
Next we will look at the most interesting settings that you can set in this file. But first, let's look at the basic file syntax. It consists of two types of strings, these are aliases that allow you to create lists of users and flags, as well as the rules themselves, which specify how the sudo command will behave. The alias syntax looks like this:
type alias_name = element1, element2, element3
The type specifies what type of Alice should be created, the name is the name that will be used, and the list of elements specifies the elements that will be implied when referring to this name.
The description of user permissions has a slightly different syntax:
user host = (other_user:group) teams
The user specifies the user or group for which we are creating the rule, the host is the computer for which this rule will apply. Another user - under the guise of which user the first one can execute commands, and the last one can execute allowed commands. An alias can be used instead of any of the parameters. And now setting up sudo in Debian and other distributions.
Main settings
The Defaults alias allows you to set standard parameters for the utility’s operation, which we will consider in this section. Such an alias begins with the word Defaults, followed by the name of the flag. If there is a ! symbol in front of the name, this means that the flag needs to be turned on; otherwise, turn it off:
Disable the introduction the first time you use it:
Defaults!lecture
The superuser cannot do sudo:
Defaults !root_sudo

Now if you try to run sudo sudo nothing will work:

Change the home directory for the target user, leaving the current user's folder as the home directory by default:
Defaults set_home

Save the list of groups of the current user:
Defaults !preserve_groups

Request superuser password instead of user password:


Set the number of password attempts before sudo quits, default is 3:
Defaults passwd_tries=5


The number of minutes that will pass before sudo asks for a password again is 5 by default. If you set the value to 0, it will always ask for a password, no matter how long ago you used the utility:
Defaults timestamp_timeout=10

The following parameter specifies the number of minutes that sudo will wait for a password to be retyped if it is entered incorrectly:
Defaults passwd_timeout=10
You can change the message that is displayed when prompted for a password:
Defaults passprompt="Your password:"

You can specify another user, not root, from which all commands will be executed, for this use:
Defaults runas_default="user"
You can log all attempts to connect to sudo:
Defaults logfile=/var/log/sudo

Then we try to check the operation of the log:
sudo cat /var/log/sudo

These were all the most interesting sudo settings that you may need, next we will look at how to set sudo access rights for users.
Setting up sudo users
We have already discussed above the syntax for setting up actions for users; here everything is more complicated than with aliases, but you can figure it out. For example, let's allow any user to use sudo, from any host, and execute any command:
ALL ALL = (ALL) ALL

Such a team is very unsafe; it allows everyone and everything. The first ALL is to allow all users, the second ALL is for all hosts, the third ALL is to allow login as any user, and the fourth is to allow any command to be executed. But another construction is used much more often:
%wheel ALL = (ALL) ALL

It means the same as the previous one, only here we do not allow all users to use sudo, but only those who are members of the wheel group.
%wheel ALL = (root) ALL
Here we have already limited the possible choice of users to only the root user. You can also specify the user group on behalf of which he can execute commands:
%wheel ALL = (root:admins) ALL

This means that you can run the command as root or another user from the admins group. We can also specify commands that the user can execute. For example:
%wheel ALL = (root) /bin/mount, /bin/umount
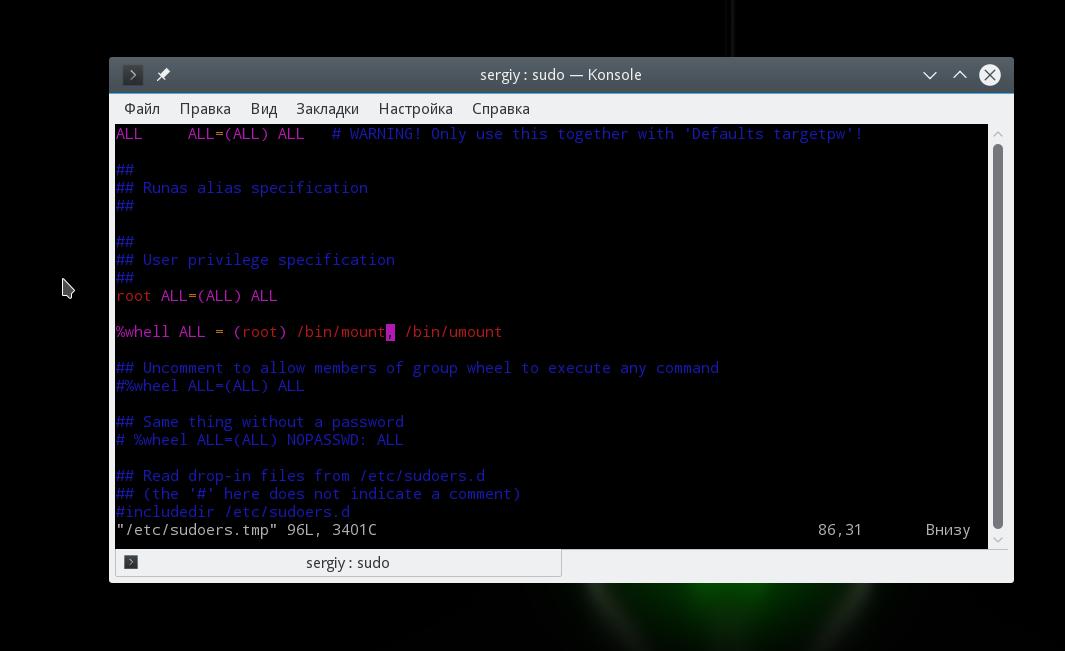
The user can only run the mount and umount commands as superuser. Now let's make it even more interesting, the user can execute mount and umount without a password, and all other commands with a password:
%wheel ALL = (root) ALL
%wheel ALL = (root) NOPASSWD: /bin/mount, /bin/umount
You can also limit users by host, for example, we allow the use of sudo only from host1:
%wheel host1 = (root) ALL
It remains to consider how to use aliases. Aliases can be of the following types:
- User_Alias- alias of users who will use sudo;
- Runas_Alias- alias of users on whose behalf commands will be executed;
- Host_Alias- host alias;
- Cmnd_Alias- command alias;
For example, let's create four aliases and use them in our rule:
User_Alias Users = user1,user2,user3
Runas_Alias Admins = root,admin
Host_Alias Hosts = host1,host2
Cmd_Alias Cmds = /bin/mount,/bin/umount
Users Hosts = (Admins) Cmds
This means that users from the Users list will be able to execute Cmds commands on behalf of Amdins users on Hosts hosts.
There are still a few words left to say about flags. The NOPASSWD flag tells you not to prompt for a password when executing this rule. For example, to allow all users to run the mount command with sudo without a password:
ALL ALL = (root) NOPASSWD: /bin/mount
You can also prevent this particular command from being executed at all using the NOEXEC flag:
ALL ALL = (root) NOEXEC /bin/mount
You can check whether the /etc/sudores file was configured correctly and see all the created rules using the command:
All installed flags and settings are displayed here, as well as the permissions of this user.
conclusions
In this article we looked at how to configure sudo in Linux. As you can see, despite the fact that this is a very simple utility, it hides a lot of useful settings that you can use on your system. If you have any questions, ask in the comments!
Separation of access rights is one of the most important security paradigms implemented in Linux and Unix-like operating systems. Regular users work with limited rights; This reduces their impact on their own environment and on the operating system as a whole.
The root user has superuser privileges. This administrator account does not have the restrictions that are present on regular user accounts. Other users may be able to run commands as root in a number of specific cases.
This guide shows you how to properly and safely transfer root privileges to your system.
Note Note: This tutorial was performed on an Ubuntu 12.04 server, however most modern Linux distributions will behave in a similar manner.
To complete the tutorial, you must first complete the initial server setup:
Login to the server as a non-root user.
How to get root rights
There are three main ways to gain superuser privileges, which vary in difficulty.
Login as root
The easiest way, of course, is to log in as root.
If connecting via SSH, provide the IP address or hostname:
ssh root@IP_address_or_domain
When prompted, enter your root password.
su command
It is not recommended to constantly use the root account, since, having absolute access rights, you can accidentally cause irreparable harm to the system.
Therefore, the system has the su command, which allows an ordinary user to obtain root rights at any time.
Note: The su command is short for substitute user.
So to root, just type:
The system will ask for the root user's password, after which it will open access to the root user's shell session.
After completing all tasks that require root rights, you can return to the previous session:
sudo command
The last way to gain root privileges is with the sudo command.
The sudo command allows you to run specific commands as root without having to open a new session.
sudo command_to_execute
Note: Unlike su, the sudo command does not ask for the root password, but rather the password of the user calling the command.
For security reasons, the sudo command is not available by default; access to it must be configured. If you've followed the initial server setup guide, you already know how to do this.
What is Visudo?
The sudo command is configured using the /etc/sudoers file.
Important! Never edit this file using a regular text editor! To do this you should use visudo.
Incorrect syntax added to this file can completely break the distribution of rights between users. Therefore, the visudo command is used to work with this file.
The visudo command opens a file in a regular text editor, but checks its syntax when saving the file. This avoids configuration errors.
Typically, visudo opens the /etc/sudoers file in the vi editor. On an Ubuntu system, visudo uses nano.
To configure the visudo command to use vi on an Ubuntu system, run the command:
sudo update-alternatives --config editor
There are 3 choices for the alternative editor (providing /usr/bin/editor).
Selection Path Priority Status
————————————————————
* 0 /bin/nano 40 auto mode
1 /bin/nano 40 manual mode
2 /usr/bin/vim.basic 30 manual mode
3 /usr/bin/vim.tiny 10 manual mode
Select the number corresponding to the text editor you want to use.
On CentOS, this value can be changed by adding the following line to ~/.bashrc:
export EDITOR=/path/to/editor
To update your settings, enter:
To open /etc/sudoers, enter:
Editing the sudoers file
So, in the text editor of your choice, the sudoers file will open on the screen.
Below are the Ubuntu 12.04 system file parameters (the commented lines are omitted and the changes made during the initial server setup are saved).
Note: The CentOS sudoers file is much larger; Some of its parameters are not described in this manual.
Defaults env_reset
Defaults secure_path="/usr/local/sbin:/usr/local/bin:/usr/sbin:/usr/bin:/sbin:/bin"
root ALL=(ALL:ALL) ALL
demo ALL=(ALL:ALL) ALL
%admin ALL=(ALL) ALL
%sudo ALL=(ALL:ALL) ALL
Standard parameters
The first line, Defaults env_reset, resets the terminal environment to remove all user variables. This security measure is used to eliminate the potentially harmful effects of environment variables from the sudo session.
The second parameter, Defaults secure_path=..., specifies the path (PATH, points in the file system where the OS will look for applications) for sudo operations. This prevents potentially dangerous user paths from being used.
User rights settings
The third and fourth parameters should be familiar to you. You added the fourth line yourself, but perhaps you did not examine it in detail.
- demo ALL=(ALL:ALL) ALL
- The first field specifies the name of the user to whom this rule should be applied (in this case it is demo).
- The first ALL means that the rule will apply to all hosts.
- The second ALL means that the specified user can run commands in any user's session.
- The third ALL means that the specified user can run commands in any group.
- The last ALL indicates that these rules should be applied to all commands.
This means that root and demo users can run all commands using sudo with their password.
Group privilege settings
The last two lines are similar to the user privilege settings, but they are responsible for group rights.
Group names begin with the % symbol.
As you can see, the admin group can execute any command as any user or host. The sudo group has similar rights, but it can also run the command like any group.
Custom rules
Once you're familiar with the basic file syntax, try creating a couple of rules yourself.
Creating Aliases
The sudoers file can be more conveniently structured using various aliases.
For example, you can create three different user groups with combined rights:
User_Alias GROUPONE = abby, brent, carl
User_Alias GROUPTWO = brent, doris, eric,
User_Alias GROUPTHREE = doris, felicia, grant
Group names must begin with a capital letter. After this, you can give GROUPTWO users the right to change the apt-get database:
GROUPTWO ALL = /usr/bin/apt-get update
If the rule does not specify a user and group, sudo defaults to root.
You can then allow GROUPTHREE users to shutdown and restart the machine; To do this you need to create a command alias:
Cmnd_Alias POWER = /sbin/shutdown, /sbin/halt, /sbin/reboot, /sbin/restart
GROUPTHREE ALL = POWER
The POWER command alias contains commands for shutting down and restarting the machine.
You can also create an alias, Run as, which replaces the part of the rule that specifies the user in whose session the command should be executed.
Runas_Alias WEB = www-data, apache
GROUPONE ALL = (WEB) ALL
Now any user of the GROUPONE group can execute commands in www-data or apache user sessions.
Note Note: Remember that previously created rules take precedence in case of a rule conflict.
Blocking rules
There are a number of ways to control how sudo behaves and responds to calls.
For example, the updatedb command in combination with the mlocate package is relatively harmless. So that an ordinary user can perform it with superuser privileges without entering a password, you can create the following rule:
GROUPONE ALL = NOPASSWD: /usr/bin/updatedb
The NOPASSWD command means that the system will not prompt for a password. There is also a PASSWD command that does the opposite behavior and is used by default.
NOPASSWD applies to the entire rule unless the PASSWD command overrides it. For example, the line might look like this:
GROUPTWO ALL = NOPASSWD: /usr/bin/updatedb, PASSWD: /bin/kill
Another handy command is NOEXEC, which is used to prevent dangerous behavior of certain programs. For example, some commands, such as less, can call other commands:
This command executes any command with the privileges of the user running less, which can be very dangerous.
To prevent this behavior, you can use the following line:
username ALL = NOEXEC: /usr/bin/less
additional information
This section contains various useful tips for working with sudo.
If you specified a user or group in the Run as parameter, you can run commands in that user's session using the -u and –g flags, respectively:
sudo -u run_as_user command
sudo -g run_as_group command
By default, sudo stores credentials in one terminal for a period of time. This means that you will not have to enter your password again during this period.
If for security reasons you want to reset this timer, use the command:
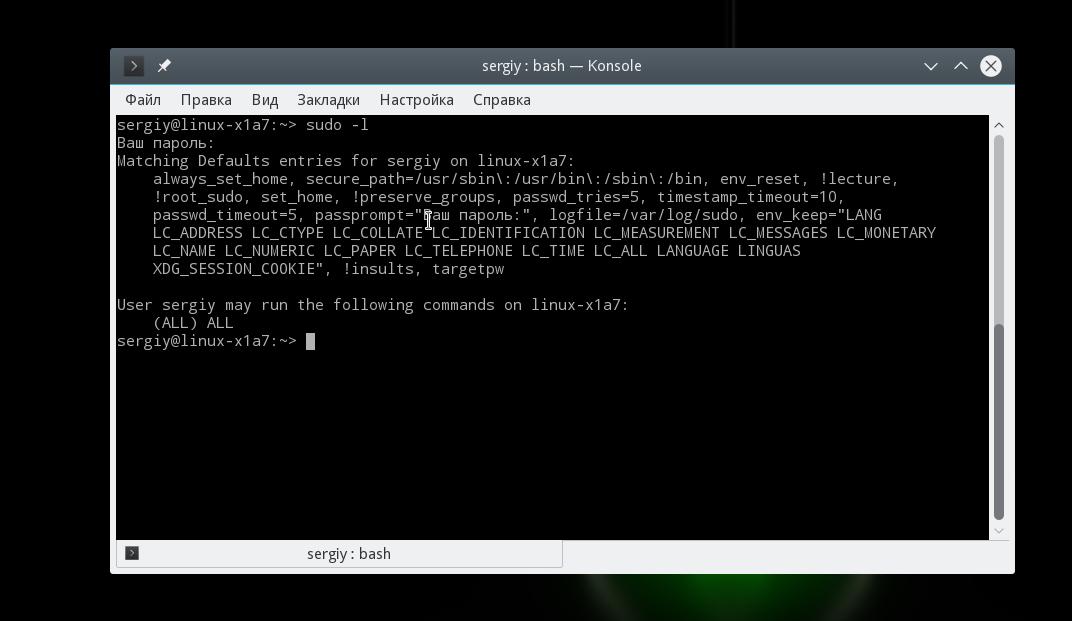
To find out the user's rights, enter:
This command will list all permissions specified in the /etc/sudoers file for a given user.
If a normal user tries to run an administrator command without the sudo prefix, the command will not work. To avoid having to retype the command, use a bash function that repeats the command:
A double exclamation point will repeat the last command.
Conclusion
You now have basic skills with the sudoers file and root permissions.
When working with superuser rights, remember that regular users do not have such rights by default for security reasons. Do not abuse root rights, otherwise you may accidentally cause irreparable damage to the system.
Tags: ,Sometimes, you just need to run a command from another user. And there are several ways how this can be done. I will talk about them in my article “Run a command as another user in Unix/Linux”.
Run a command as another user in Unix/Linux - method 1
And so, you can use the SUDO utility. Let's look at an example:
$ sudo -H -u Your_another_user -c "ping site"
Explanations:
- -H YOUR_HOME: Sets HOME (Environment variable for a specific user's home) and by default is root.
- -u YOUR_USER: Specify the user from whom the command will be executed.
- -c YOUR_COMMAND: Serves as an option to enter a command.
Something like this.
Run a command as another user in Unix/Linux - method 2
You can use the SU utility. And now I will give a few examples.
Login as root user
To get root, run:
$su -root
Run the command as root user
Here is an example command:
# su - root -c "YOUR_COMMAND_HERE"
Su - -c "YOUR_COMMAND_HERE arg1"
Execute a command from another user using su
So, here's an example:
# su -c "/opt/solr/bin/solr create -c test_solr_core -n solrconfig.xml" -s /bin/sh solr Created new core "test_solr_core"
Let's look at another example:
$ su another_user -c "ping site"
$su -YOUR_USER -c "YOUR_COMMAND_HERE"
- — — Will simulate the login of the specified user.
- -c - Used to specify the command to be executed (for the specified user).
Something like this.
Run a command as another user in Unix/Linux - method 3
And so, you can use the runuser utility. The runuser command starts a shell with replacement user and group IDs. This command is only useful when you are logged in as root. The syntax is as follows:
# runuser -l YOUR_USER -c "YOUR_COMMAND_HERE"
As an example, I'll show the following line:
# runuser -l nginx -c "service nginx start"
PS: The runuser command does not require a password and should only be run by the root user.
Main options:
- -l: Create a login shell using the runuser-l PAM file instead of the default one.
- -g: Points to the main group.
- -G: Indicates an additional group.
- -c: Actually, it is used to specify a command.
- –session-command=COMMAND: Pass a single command to the shell with the “-c” option and does not create a new session.
- -m: Do not reset environment variables (ENVs).
That's it, the topic "Run a command as another user in Unix/Linux" is complete.
Since ancient times, many have been confused by the variety of security options when performing operations with maximum privileges. For example, in the official Ubuntu documentation it is recommended to use something like sudo nano as an editing command, and in numerous amateur manuals (in the style of “5 command line tricks that will surprise your grandmother”) to get a root shell it is suggested to write sudo su - I’ll try to explain why this state of affairs seems wrong to me.
Historically, the only universal way to execute a command as another user on Unix was with the su program. Launched without parameters, it asked for the superuser password and, if successful, simply replaced the current username with root, leaving almost all the environment variables from the old user (except for PATH, USER and a couple more, see man su from your distribution). It would be more correct to run it as su - in which case the shell would also receive the correct environment. With the -c option you could run the command: su -c "vim /etc/fstab" .
In this case, trusted users had to remember the root password, and all users listed in the "wheel" group (that is, in the group whose members could run the su command and become a superuser) had the same unrestricted access to the entire system, which was a serious security problem.
Then the sudo command came along and it was a breakthrough. Now the administrator could specify a list of allowed commands for each user (or group of users), files available for editing, special environment variables and much more (all this beauty is controlled from /etc/sudoers, see man sudoers from your distribution). When launched, sudo asks the user for his own password, not the root password. A full shell can be obtained using "sudo -i"
Of particular note is the special command sudoedit, which safely launches the editor specified in the $EDITOR environment variable. With a more traditional scheme, editing files was done something like this:
sudo vi /etc/fstab
Launched in this way, vi inherited the shell with unrestricted rights and through:! the user could run any command (unless, of course, the admin took care of this in advance) and open any file.
Sudoedit checks whether this user can modify a given file, then copies the specified file to a temporary directory, opens it in an editor (which inherits the rights of the user, not root), and after editing, if the file has been modified, copies it with special precautions back.
On Debian-based distributions, the root user does not have a password; instead, all administrative actions must be performed through sudo or its graphical equivalent gksudo. Being a complete replacement for su , sudo should be the only command for switching between users, however, as was said at the beginning, at the moment this is not the case and for some reason everyone is inventing wild sequences of sudo, su, vi and dashes.
Therefore, I suggest everyone remember once and for all:
After the first publication of this note, I was asked several questions. From the answers we managed to make a mini-FAQ.
Q: How can I use sudo to do su -c "echo 1 > /etc/privileged_file" ? sudo echo 1 /etc/privileged_file complains about “permission denied”
A: This happens because only the echo command is executed with elevated rights, and the result is redirected to the file with the rights of a regular user. To add something to privileged_file, you need to run the following command:
$ echo 1| sudo tee -a privileged_file >/dev/null
Or temporarily become a root:
$ sudo -i # echo 1 > privileged_file # exit $
Q: sudo -i is longer than su - , but there seems to be no difference between them, why print more?
A: sudo has several advantages that are worth the trouble of typing a few extra characters:
- by default, sudo records all user activity in the authpriv syslog channel (as a rule, the result is placed in the /var/log/auth.log file), and in su a similar feature must be enabled by setting a special parameter in the settings file, which varies from distribution to distribution (SULOG_FILE in /etc/login.defs on Ubuntu Linux, /etc/login.conf and /etc/pam.d/su on FreeBSD, etc.)
- in the case of su, the system administrator cannot restrict the commands executed by users, but in sudo - he can
- if the user should be deprived of administrative rights, in the case of su, after removing him from the wheel group, he must forget the root password; if sudo is used, it is enough to remove him from the corresponding group (for example, wheel or admin) and/or the sudoers file, if it was further customized.
A: I’ll answer the question with a question: if there is correct sudo, why use the outdated su?


